스프링 클라우드 컨트랙트 공식 레퍼런스를 한글로 번역한 문서입니다.
전체 목차는 여기에 있습니다.
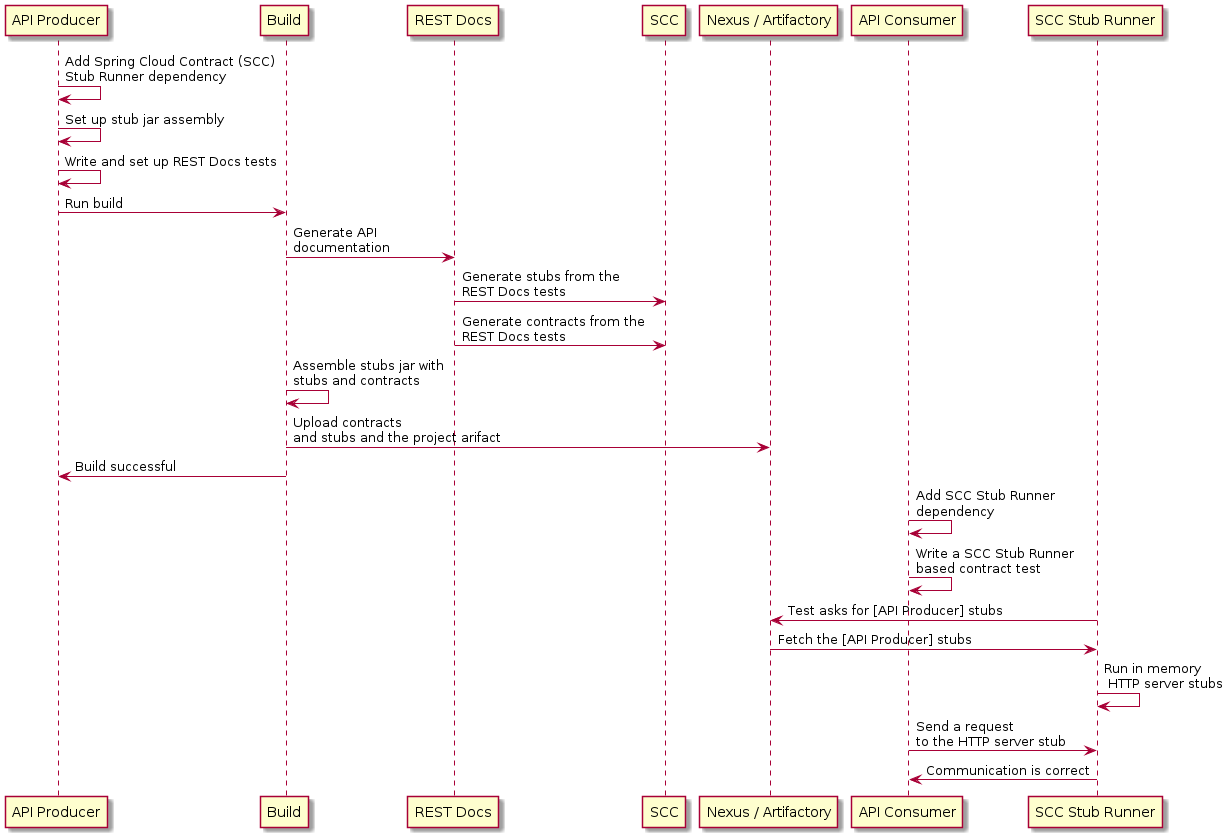
Spring REST Docs는 스프링 MockMvc나, WebTestClient, RestAssured로 HTTP API를 위한 문서를 생성해준다 (Asciidoc 포맷 등으로). Spring Cloud Contract WireMock을 사용하면 API 문서를 생성하는 동시에 WireMock 스텁stub도 생성할 수 있다. 평소처럼 REST Docs의 테스트 케이스를 작성한 다음, @AutoConfigureRestDocs를 사용해 출력 디렉토리를 지정해주면, REST Docs 출력 디렉토리에 스텁stub이 자동으로 생성된다. 아래 있는 UML 다이어그램은 REST Docs의 플로우를 나타내고 있다:
다음은 MockMvc를 사용하는 예시다:
@RunWith(SpringRunner.class)
@SpringBootTest
@AutoConfigureRestDocs(outputDir = "target/snippets")
@AutoConfigureMockMvc
public class ApplicationTests {

	@Autowired
	private MockMvc mockMvc;

	@Test
	public void contextLoads() throws Exception {
		mockMvc.perform(get("/resource"))
				.andExpect(content().string("Hello World"))
				.andDo(document("resource"));
	}
}
이 코드에선 target/snippets/stubs/resource.json에 WireMock 스텁stub을 생성하며, /resource 경로로 들어오는 모든 GET 요청을 처리한다. 아래 있는 예제는 스프링 웹플럭스 애플리케이션 테스트에 사용하는 WebTestClient를 이용한 동일한 코드다:
@RunWith(SpringRunner.class)
@SpringBootTest
@AutoConfigureRestDocs(outputDir = "target/snippets")
@AutoConfigureWebTestClient
public class ApplicationTests {

	@Autowired
	private WebTestClient client;

	@Test
	public void contextLoads() throws Exception {
		client.get().uri("/resource").exchange()
				.expectBody(String.class).isEqualTo("Hello World")
 				.consumeWith(document("resource"));
	}
}
테스트 코드에 별도로 설정을 추가하지 않았지만, HTTP 메소드에 대한 요청 matcher와 host, content-length를 제외한 모든 헤더가 포함된 스텁stub을 생성한다. 요청을 좀 더 구체적인 조건으로 매칭시키려면 (예를 들어 POST나 PUT 요청의 body로 매칭시키고 싶다면), 요청 matcher를 직접 명시해야 한다. 그러면 다음과 같은 두 가지 효과를 볼 수 있다:
- 명시한 스펙과 매칭되는 스텁stub만 생성한다.
- 테스트 케이스에 사용한 요청이 해당 조건에 매칭된다는 것을 검증할 수 있다.
이 기능을 사용해볼 거라면, 아래 예시처럼 document() 대신 WireMockRestDocs.verify()로 시작하면 된다:
import static org.springframework.cloud.contract.wiremock.restdocs.WireMockRestDocs.verify;

@RunWith(SpringRunner.class)
@SpringBootTest
@AutoConfigureRestDocs(outputDir = "target/snippets")
@AutoConfigureMockMvc
public class ApplicationTests {

	@Autowired
	private MockMvc mockMvc;

	@Test
	public void contextLoads() throws Exception {
		mockMvc.perform(post("/resource")
                .content("{\"id\":\"123456\",\"message\":\"Hello World\"}"))
				.andExpect(status().isOk())
				.andDo(verify().jsonPath("$.id"))
				.andDo(document("resource"));
	}
}
위 명세contract는 id 필드를 가진 모든 유효한 POST 요청에, 테스트에 정의한 응답을 보내도록 명시한다. 다른 matcher를 추가하고 싶다면 .jsonPath()를 체이닝해서 호출하면 된다. JSON Path가 익숙하지 않다면 JayWay 문서를 읽어봐라. WebTestClient를 사용할 땐, 같은 위치에서 이와 유사한 스태틱 헬퍼 메소드 verify()를 사용하면 된다.
jsonPath, contentType 메소드도 간편하지만, 다음과 같이 WireMock API를 사용해도 자동 생성된 스텁stub과 매칭되는 요청인지를 검증할 수 있다:
@Test
public void contextLoads() throws Exception {
	mockMvc.perform(post("/resource")
               .content("{\"id\":\"123456\",\"message\":\"Hello World\"}"))
			.andExpect(status().isOk())
			.andDo(verify()
					.wiremock(WireMock.post(urlPathEquals("/resource"))
					.withRequestBody(matchingJsonPath("$.id"))
					.andDo(document("post-resource"))));
}
WireMock API는 더 다채롭다. 헤더, 쿼리 파라미터, 요청 body를 JSON path뿐 아니라 정규식으로도 매칭시킬 수 있다. 이 기능을 활용하면 더 다양한 파라미터를 포함하는 스텁stub을 만들 수 있다. 위 예제는 다음과 유사한 스텁stub을 생성한다:
post-resource.json
{
  "request" : {
    "url" : "/resource",
    "method" : "POST",
    "bodyPatterns" : [ {
      "matchesJsonPath" : "$.id"
    }]
  },
  "response" : {
    "status" : 200,
    "body" : "Hello World",
    "headers" : {
      "X-Application-Context" : "application:-1",
      "Content-Type" : "text/plain"
    }
  }
}
요청 matcher를 생성할 땐
wiremock()을 사용해도 되고,jsonPath(),contentType()메소드 조합을 사용해도 되지만, 두 가지 방법을 동시에 사용할 수는 없다.
컨슈머consumer 측에서는 위에서 생성한 resource.json 파일을 클래스패스에 두고 사용할 수도 있다 (예를 들어 스텁stub을 JAR로 배포하는 식으로). 그런 다음 앞에서 설명한 대로 @AutoConfigureWireMock(stubs=“classpath:resource.json”)을 선언하는 등, 여러 가지 방법으로 WireMock 스텁stub을 생성할 수 있다.
Generating Contracts with REST Docs
Spring REST Docs를 사용하면 API 문서와 Spring Cloud Contract DSL 파일을 함께 생성할 수 있다. Spring Cloud WireMock과 같이 사용하면 명세contract와 스텁stub을 모두 만들 수 있다.
이 기능은 왜 필요한 걸까? 커뮤니티에서 올라온 질문들 중, 이미 작성해둔 스프링 MVC 테스트가 많은데, DSL 기반 명세contract로 전환하고 싶다면 어떻게 해야 하는지에 관한 문의가 있었다. 이 기능을 활용하면 명세contract 파일을 자동으로 생성하고 적당히 수정해서, 플러그인이 찾을 수 있는 폴더(설정에 정의한 폴더)로 옮길 수 있다.
이 기능이 왜 WireMock 모듈에 있는지 궁금할 수도 있다. 명세contract와 스텁stub을 함께 생성하는 것이 좋기 때문에 WireMock 모듈에 추가했다.
아래 테스트 코드를 살펴보자:
    this.mockMvc
       .perform(post("/foo").accept(MediaType.APPLICATION_PDF)
         .accept(MediaType.APPLICATION_JSON)
         .contentType(MediaType.APPLICATION_JSON)
         .content("{\"foo\": 23, \"bar\" : \"baz\" }"))
       .andExpect(status().isOk())
       .andExpect(content().string("bar"))
       // first WireMock
       .andDo(WireMockRestDocs.verify()
         .jsonPath("$[?(@.foo >= 20)]")
         .jsonPath("$[?(@.bar in ['baz','bazz','bazzz'])]")
         .contentType(MediaType.valueOf("application/json")))
       // then Contract DSL documentation
       .andDo(document("index", SpringCloudContractRestDocs.dslContract(Maps.of("priority", 1))));
이 테스트 코드에선 명세contract와 문서 파일을 모두 자동 생성하고, 위에서 보여준 스텁stub을 만든다.
명세contract 파일명은 index.groovy이며, 다음과 유사할 거다:
import org.springframework.cloud.contract.spec.Contract

Contract.make {
    request {
        method 'POST'
        url '/foo'
        body('''
            {"foo": 23 }
        ''')
        headers {
            header('''Accept''', '''application/json''')
            header('''Content-Type''', '''application/json''')
        }
    }
    response {
        status OK()
        body('''
        bar
        ''')
        headers {
            header('''Content-Type''', '''application/json;charset=UTF-8''')
            header('''Content-Length''', '''3''')
        }
        bodyMatchers {
            jsonPath('$[?(@.foo >= 20)]', byType())
        }
    }
}
포맷에 맞는 명세contract가 담긴 문서가 만들어진다 (여기서는 Asciidoc 포맷). 이 파일은 index/dsl-contract.adoc에 위치한다.
Specifying the priority attribute
SpringCloudContractRestDocs.dslContract() 메소드는 optional 파라미터로 Map을 하나 받는데, 여기에는 템플릿에서 사용할 추가 속성을 지정할 수 있다.
예를 들면, 다음과 같이 priority 필드를 속성에 추가할 수 있다:
SpringCloudContractRestDocs.dslContract(Map.of("priority", 1))
Overriding the DSL contract template
기본적으로 default-dsl-contract-only.snippet이라는 파일을 기반으로 명세contract가 만들어진다.
다음과 같이 getTemplate() 메소드를 재정의하면 커스텀 템플릿 파일을 제공할 수도 있다:
new ContractDslSnippet(){
    @Override
    protected String getTemplate() {
        return "custom-dsl-contract";
    }
}));
따라서, 위 예제에서 이 라인은
.andDo(document("index", SpringCloudContractRestDocs.dslContract()));
다음과 같이 변경된다:
.andDo(document("index", new ContractDslSnippet(){
                            @Override
                            protected String getTemplate() {
                                return "custom-dsl-template";
                            }
                        }));
템플릿들을 리졸브할 땐 클래스패스의 리소스를 스캔한다. 이땐 다음 경로를 순서대로 확인한다:
org/springframework/restdocs/templates/${templateFormatId}/${name}.snippetorg/springframework/restdocs/templates/${name}.snippetorg/springframework/restdocs/templates/${templateFormatId}/default-${name}.snippet
따라서, 위 예제에선 src/test/resources/org/springframework/restdocs/templates/ 경로에 custom-dsl-template.snippet이라는 파일을 추가해야 한다.
Next : 3.4.7. GraphQL
GraphQL 통합하기
전체 목차는 여기에 있습니다.