스프링 클라우드 데이터 플로우 공식 레퍼런스를 한글로 번역한 문서입니다.
전체 목차는 여기에 있습니다.
Spring Cloud Data Flow 스케일링의 기본 개념을 알아보려면 스케일링 가이드를 읽어봐라.
목차
Overview
이 솔루션에선 프로메테우스 Alert rule을 이용해서, 애플리케이션 처리량 메트릭을 기반으로 스케일 아웃scale out, 스케일 인scale in alert를 정의해본다. alert는 프로메테우스 AlertManager와 커스텀 웹훅을 통해 관리한다. 웹훅에선 alert가 시행fire되면 SCDF의 Scale API 호출을 트리거한다.
스트리밍 데이터 파이프라인 time | transform | log로 예시를 들어보자. 여기에선 time과 transform 애플리케이션 간의 처리 속도를 측정하는 방법을 소개한다. 따라서 속도차를 alert의 결정 요소로 활용할 수 있다. 이 문서에선 임계치로 정의한 메트릭이 설정한 rule을 초과했을 때 어떻게 alert가 트리거되고, 어떻게 오토스케일을 호출하게 되는지 설명한다. 다음은 이 alert rule의 로직을 보여주는 슈도 코드다:
rateDifference = rate(time) - rate(transform)                         // (1)
if rateDifference > 500 for 1 minute do fire HighThroughputDifference // (2)
if rateDifference == 0 for 3 minutes do fire ZeroThroughputDifference // (3)
(1) time과 transform 애플리케이션의 실시간 처리량의 차이(즉, 속도차)를 계산하는 쿼리 표현식.
(2) 1분 동안 속도차가 500msg/s를 넘어가면 시행fire되는 alert 룰 HighThroughputDifference.
(3) 최소 3분 동안 속도차가 0 msg/s로 유지되면 시행fire되는 alert 룰 ZeroThroughputDifference.
다음은 고수준 아키텍처를 나타낸 다이어그램이다:
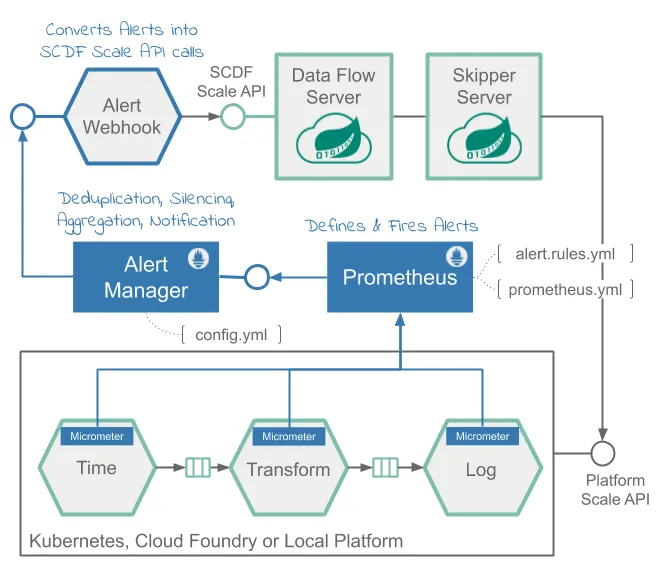
Data Flow 메트릭 아키텍처는 Micrometer 라이브러리의 도움을 받아 설계했다. 성능 분석을 위해 다양한 애플리케이션 메트릭을 수집할 모니터링 백엔드로 프로메테우스를 활용할 수 있으며, 프로메테우스에선 alert도 설정할 수 있다.
프로메테우스에서 알림을 전송하는 일은 다음과 같이 나뉜다:
Alert Rules: 프로메테우스 내부에 정의하며, 프로메테우스 서비스가 트리거링한다.Alertmanager: alert가 시행fire되면 받아서 관리하고, 미리 등록해둔 웹훅에 통지notification하는 독립형 서비스.
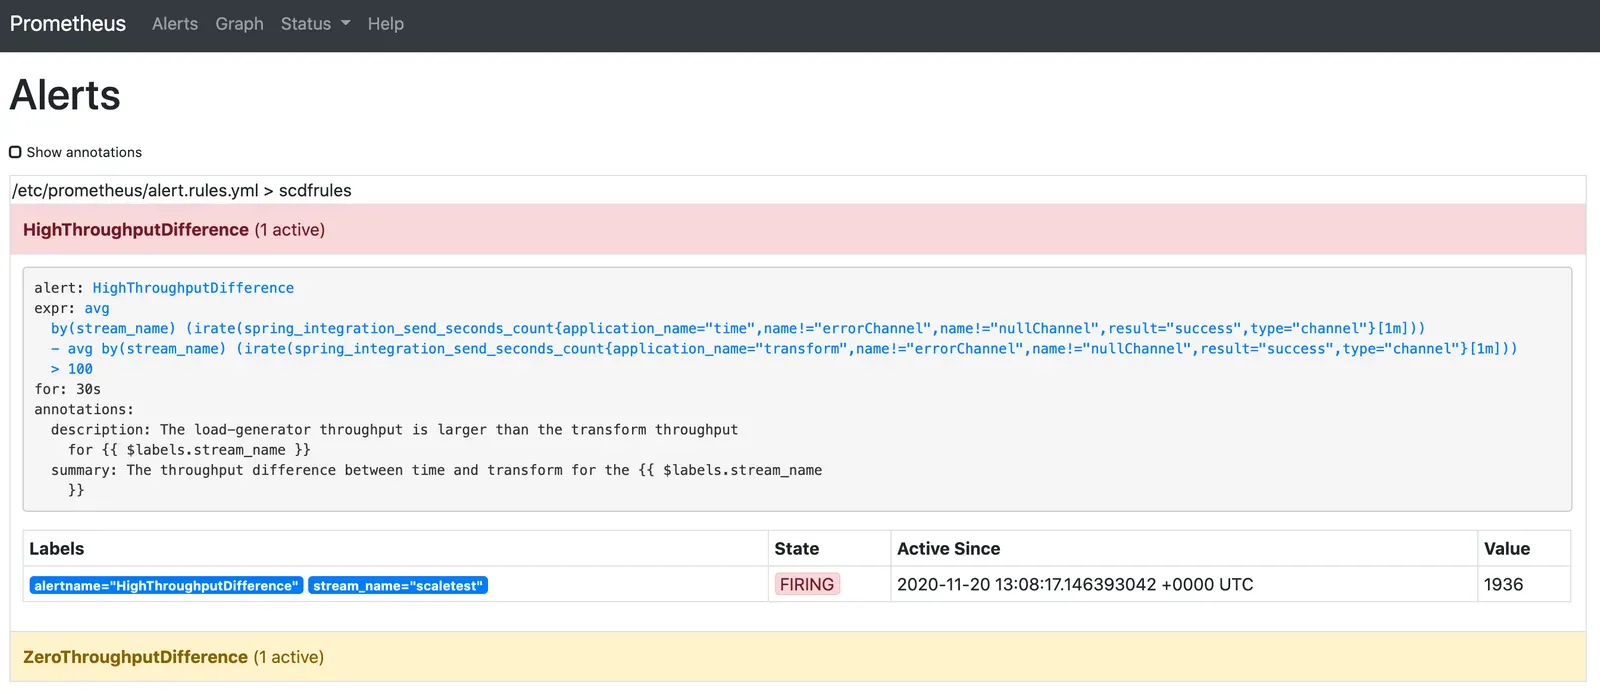
Alert rule은 PQLPrometheus Expression Language을 기반으로 작성한다. 이 alert 룰을 사용해 스케일 alert를 정의하고 Alertmanager로 전송할 수 있다. 예를 들어 스케일 아웃scale out alert 룰은 다음과 같이 정의할 수 있다:
alert: HighThroughputDifference
expr:  avg(irate(spring_integration_send_seconds_count{application_name="time"}[1m])) by(stream_name) -
       avg(irate(spring_integration_send_seconds_count{application_name="transform"}[1m])) by(stream_name) > 500
for: 30s
여기에서 사용하는 alert 룰들은 alert.rule.yml에서 확인할 수 있다 (kubectl로 설치할 땐 여기에서).
spring_integration_send_seconds_count메트릭은 메세지 속도를 계산하는 데 사용하는 메트릭으로,spring integration의 마이크로미터 기능을 통해 수집한다.
Alertmanager는 alert를 관리하는 독립형 서비스로, silencing, inhibition, aggregation과 함께 미리 설정해둔 웹훅에 알림을 전송하는 일을 담당한다.
AlertWebHookApplication은 커스텀 스프링 부트 애플리케이션이며 (스프링 부트 앱 scdf-alert-webhook에 들어 있다), config.yml에서 이 애플리케이션을 Alertmanager Webhook Receiver로 등록한다. 이 AlertWebHookApplication은 프로메테우스로부터 alert를 통지notification받는다 (JSON 형식으로). 통지를 받고 나면 SCDF의 Scale API의 도움을 받아 스케일 아웃scale out 요청을 트리거하고, SCDF의 alert 스트리밍 데이터 파이프라인에서 참조하는 애플리케이션에는 오토스케일링이 적용된다.
alert 통보notification에는 alert PQL 표현식에서 사용한 메트릭 레이블도 담겨있다. 따라서 이 예시에선
stream_name레이블이 함께 전달돼서,AlertWebHookApplication은 스케일링을 적용할 데이터 파이프라인의 이름을 결정할 수 있다.
Data Flow Scale REST API는 플랫폼에 관계없이 데이터 파이프라인 애플리케이션들을 확장할 수 있는 메커니즘을 제공한다.
AlertWebHookApplication은 spring.cloud.dataflow.client.server-uri 프로퍼티로 Scale API 엔드포인트를 설정한다. 전체적인 배포 설정은 alertwebhook-deployment.yaml을 참고해라.
다음은 Data Flow의 오토스케일링 흐름을 보여주는 동영상이다:
Prerequisite
이 레시피에선 쿠버네티스 플랫폼을 사용한다.
이 레시피는 5개의 노드를 가지고 있는 GKE 클러스터에서 테스트를 마쳤다.
앱 인스턴스를 여러 개 실행해 CPU를 대량으로 사용하기 때문에, 이 레시피를 minikube에서 실행하는 건 거의 불가능하다.
Kubectl 가이드를 따라 Spring Cloud Data Flow와 카프카 브로커를 세팅해라.
그 다음 Alertmanager와 AlertWebHook을 설치하고 Prometheus 서비스들을 재구성한다:
kubectl apply -f https://raw.githubusercontent.com/spring-cloud/spring-cloud-dataflow-samples/master/dataflow-website/recipes/scaling/kubernetes/alertwebhook/alertwebhook-svc.yaml
kubectl apply -f https://raw.githubusercontent.com/spring-cloud/spring-cloud-dataflow-samples/master/dataflow-website/recipes/scaling/kubernetes/alertwebhook/alertwebhook-deployment.yaml
kubectl apply -f https://raw.githubusercontent.com/spring-cloud/spring-cloud-dataflow-samples/master/dataflow-website/recipes/scaling/kubernetes/alertmanager/prometheus-alertmanager-service.yaml
kubectl apply -f https://raw.githubusercontent.com/spring-cloud/spring-cloud-dataflow-samples/master/dataflow-website/recipes/scaling/kubernetes/alertmanager/prometheus-alertmanager-deployment.yaml
kubectl apply -f https://raw.githubusercontent.com/spring-cloud/spring-cloud-dataflow-samples/master/dataflow-website/recipes/scaling/kubernetes/alertmanager/prometheus-alertmanager-configmap.yaml
wget https://raw.githubusercontent.com/spring-cloud/spring-cloud-dataflow-samples/master/dataflow-website/recipes/scaling/kubernetes/prometheus/prometheus-configmap.yaml
kubectl patch cm my-release-prometheus-server --patch "$(cat ./prometheus-configmap.yaml)"
kubectl delete pods -l app=prometheus
my-release-prometheus-server는 현재 프로메테우스 CM으로 변경해라. 설정들을 조회해보려면 kubectl get cm을 실행하면 된다.
Helm 가이드를 따라 Spring Cloud Data Flow와 카프카 브로커를 세팅해라. 스토리지 공간은 최소 10Gi로 설정하고, features.monitoring.enabled=true를 사용하면 된다.
helm install --name my-release stable/spring-cloud-data-flow --set features.monitoring.enabled=true,kafka.enabled=true,rabbitmq.enabled=false,kafka.persistence.size=10Gi
그 다음 Alertmanager와 AlertWebHook을 설치하고 Prometheus 서비스들을 재구성한다:
kubectl apply -f https://raw.githubusercontent.com/spring-cloud/spring-cloud-dataflow-samples/master/dataflow-website/recipes/scaling/kubernetes/helm/alertwebhook/alertwebhook-svc.yaml
kubectl apply -f https://raw.githubusercontent.com/spring-cloud/spring-cloud-dataflow-samples/master/dataflow-website/recipes/scaling/kubernetes/helm/alertwebhook/alertwebhook-deployment.yaml
kubectl apply -f https://raw.githubusercontent.com/spring-cloud/spring-cloud-dataflow-samples/master/dataflow-website/recipes/scaling/kubernetes/alertmanager/prometheus-alertmanager-service.yaml
kubectl apply -f https://raw.githubusercontent.com/spring-cloud/spring-cloud-dataflow-samples/master/dataflow-website/recipes/scaling/kubernetes/alertmanager/prometheus-alertmanager-deployment.yaml
kubectl apply -f https://raw.githubusercontent.com/spring-cloud/spring-cloud-dataflow-samples/master/dataflow-website/recipes/scaling/kubernetes/alertmanager/prometheus-alertmanager-configmap.yaml
wget https://raw.githubusercontent.com/spring-cloud/spring-cloud-dataflow-samples/master/dataflow-website/recipes/scaling/kubernetes/helm/prometheus/prometheus-configmap.yaml
kubectl patch cm my-release-prometheus-server --patch "$(cat ./prometheus-configmap.yaml)"
최신 kafka-docker 앱 스타터들을 등록해라.
app import --uri https://dataflow.spring.io/kafka-docker-latest
SCDF 쉘을 시작하고 Data Flow 서버에 연결한다:
server-unknown:>dataflow config server http://<SCDF IP>
Autoscaling Recipe
이 섹션에선 오토스케일링을 세팅하는 방법을 보여준다.
Create a Data Pipeline
stream create --name scaletest --definition "time --fixed-delay=995 --time-unit=MILLISECONDS | transform --expression=\"payload + '-' + T(java.lang.Math).exp(700)\" | log"
이 time 소스는 고정 간격(995ms = ~1msg/s)으로 현재 타임스탬프 메세지를 생성하고, transform 프로세서는 수학 연산을 실행해서 높은 CPU 처리를 시뮬레이션하고 있으며, log 싱크는 변환된 메세지 페이로드를 출력한다.
Deploy a Data Pipeline with Data Partitioning
stream deploy --name scaletest --properties "app.time.producer.partitionKeyExpression=payload,app.transform.spring.cloud.stream.kafka.binder.autoAddPartitions=true,app.transform.spring.cloud.stream.kafka.binder.minPartitionCount=4"
producer.partitionKeyExpression=payload 프로퍼티는 파티셔닝에 쓸 소스의 출력을 바인딩한다. 파티션 키 표현식은 메세지 페이로드(즉, 현재 타임스탬프의 toString() 값)를 이용해 데이터를 다운스트림 출력 채널로 파티셔닝할 방법을 결정한다. 배포 프로퍼티 spring.cloud.stream.kafka.binder.autoAddPartitions는 카프카 바인더에게 필요하면 새 파티션을 생성하도록 지시한다. 토픽을 미리 충분히 파티셔닝해두지 않았다면 이 프로퍼티가 필요하다. spring.cloud.stream.kafka.binder.minPartitionCount 프로퍼티는 카프카 바인더에서 transform 프로세서가 구독하는 토픽에 설정할 최소 파티션 수다.
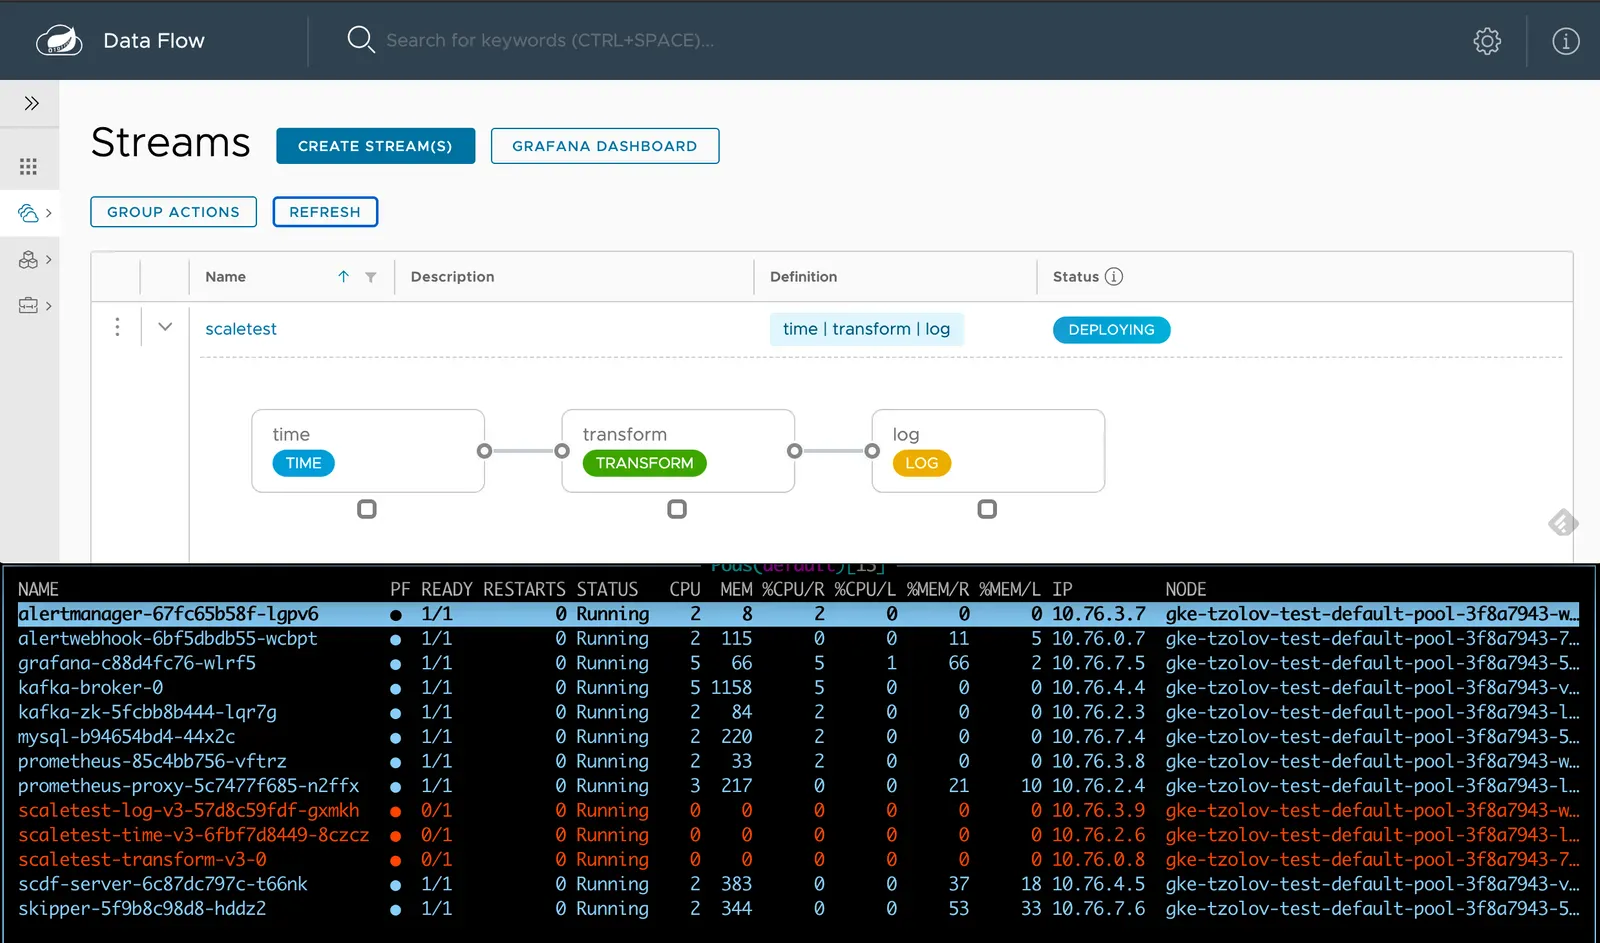
SCDF의 내장 그라파나 대시보드를 이용해 스트림 애플리케이션의 처리량과 기타 다른 메트릭들을 검토해보자.

time, transform, log 애플리케이션은 메세지 처리량(~1msg/s)을 동일하게 유지하고 있다. transform은 현재 부하를 모두 처리해주고 있다.
Increase a Data Pipeline Load
이제 time 소스의 메세지 생성 속도를 높여서 부하를 만들어보자. time 소스의 time-unit 프로퍼티를 MILLISECONDS에서 MICROSECONDS로 변경하면, 입력 속도가 초당 메세지 1개에서 수천 개로 늘어난다. 참고로, 스트림 롤링 업데이트 기능을 사용하면 전체 스트림을 중단하지 않고 time 애플리케이션에서만 롤링 업데이트를 진행할 수 있다:
stream update --name scaletest --properties "app.time.trigger.time-unit=MICROSECONDS"
그러면 time 앱은 새 time-unit 프로퍼티로 다시 배포된다:

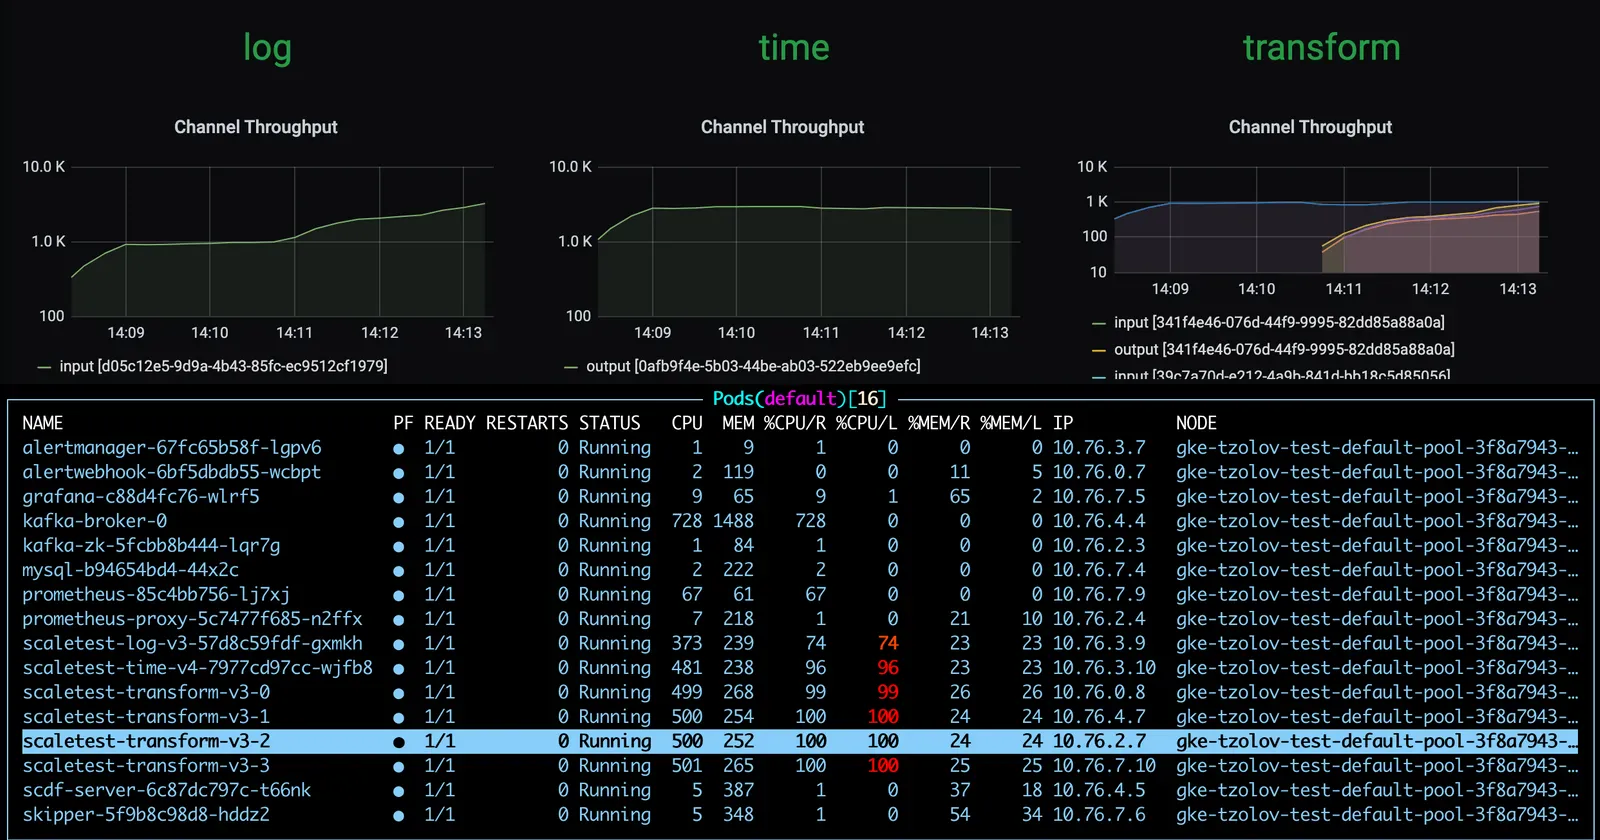
이제 time 소스는 메세지를 ~5000msg/s 속도로 방출한다. 하지만 transform 프로세서는 약 1000msg/s 정도에 머물러있다. 결국 전체 스트림의 처리량은 일정 수준에서 멈춘다. transform이 병목이 되고 있음을 의미한다.

이때 프로메테우스 alert 룰 HighThroughputDifference는 속도가 일치하지 않는 것을 감지하고 스케일 아웃scale out alert를 시행fire한다:
그러고 나면 transform 인스턴스 3개가 추가로 더 배포된다:
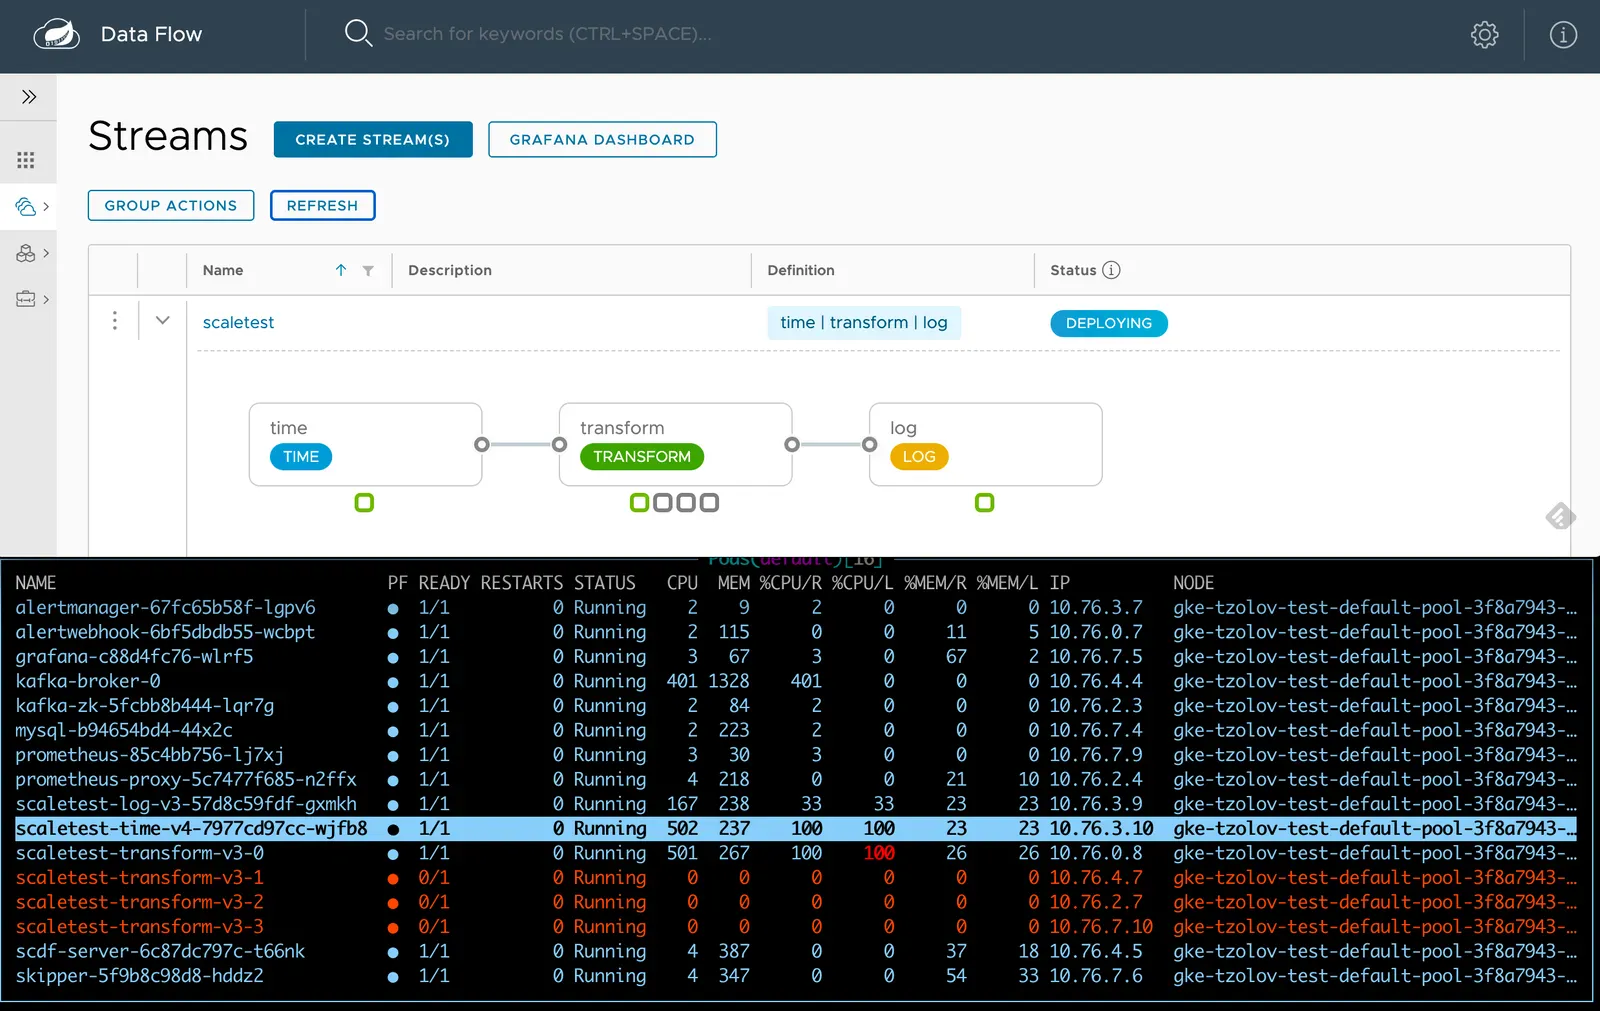
transform 프로세서 인스턴스를 추가로 배포한 덕분에, 전체 데이터 파이프라인은 time 소스의 생산 속도를 따라잡는다.
Reduce a Data Pipeline Load
이제 소스의 데이터 생성 속도를 원래 속도(1msg/s)로 다시 낮춘다고 가정해보자:
stream update --name scaletest --properties "app.time.trigger.time-unit=MILLISECONDS"
새로 추가한 transform 프로세서 인스턴스가 있다고 해서 더 이상 전체적인 처리량이 높아지진 않는다. 결국 속도차는 0이 되고 ZeroThroughputDifference alert가 시행fire된다. 결과적으로 이 alert는 스케일 인scale in 작업을 트리거하고, 여유 인스턴스들은 다시 축소된다:

단일 transform 인스턴스에선, 전체 데이터 파이프라인의 처리량이 다시 ~1 msg/s로 돌아간다.
Next : Batch
Batch
스프링 배치 관련 레시피 모음집
전체 목차는 여기에 있습니다.