스프링 시큐리티 공식 레퍼런스를 한글로 번역한 문서입니다.
전체 목차는 여기에 있습니다.
목차:
- 10.1. SecurityContextHolder
- 10.2. SecurityContext
- 10.3. Authentication
- 10.4. GrantedAuthority
- 10.5. AuthenticationManager
- 10.6. ProviderManager
- 10.7. AuthenticationProvider
- 10.8. Request Credentials with AuthenticationEntryPoint
- 10.9. AbstractAuthenticationProcessingFilter
- 10.10. Username/Password Authentication
- 10.11. Session Management
- 10.12. Remember-Me Authentication
- 10.13. OpenID Support
- 10.14. Anonymous Authentication
- 10.15. Pre-Authentication Scenarios
- 10.16. Java Authentication and Authorization Service (JAAS) Provider
- 10.17. CAS Authentication
- 10.18. X.509 Authentication
- 10.19. Run-As Authentication Replacement
- 10.20. Handling Logouts
- 10.21. Authentication Events
스프링 시큐리티는 종합적인 인증을 지원한다. 이번 섹션에서 다루는 내용은 다음과 같다:
Architecture Components
이 섹션에선 서블릿 인증에서 사용하는 스프링 시큐리티의 주요 아키텍처 컴포넌트를 설명한다. 이 컴포넌트가 어떻게 함께 동작하는지 구체적인 플로우를 그려보고 싶다면 인증 메커니즘 섹션을 참고하라.
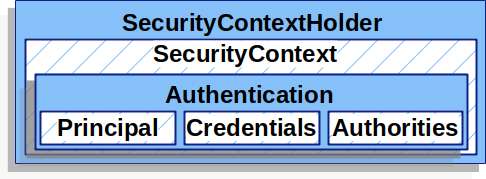
- SecurityContextHolder - 스프링 시큐리티에서 인증한 대상에 대한 상세 정보는
SecurityContextHolder에 저장한다. - SecurityContext -
SecurityContextHolder로 접근할 수 있으며, 현재 인증한 사용자의Authentication을 가지고 있다. - Authentication - 사용자가 제공한 인증용 credential이나
SecurityContext에 있는 현재 사용자의 credential을 제공하며,AuthenticationManager의 입력으로 사용한다. - GrantedAuthority -
Authentication에서 접근 주체(principal)에 부여한 권한 (i.e. role, scope 등.) - AuthenticationManager - 스프링 시큐리티의 필터가 인증을 어떻게 수행할지를 정의하는 API.
- ProviderManager - 가장 많이 사용하는
AuthenticationManager구현체. - AuthenticationProvider -
ProviderManager가 특정 인증 유형을 수행할 때 사용한다. - AuthenticationEntryPoint - 클라이언트에 credential을 요청할 때 사용한다. (i.e. 로그인 페이지로 리다이렉트하거나
WWW-Authenticate헤더를 전송하는 등) - AbstractAuthenticationProcessingFilter - 인증에 사용할
Filter의 베이스. 필터를 잘 이해하면 여러 컴포넌트를 조합해서 심도 있는 인증 플로우를 구성할 수 있다.
Authentication Mechanisms
- Username and Password - 사용자 이름/비밀번호로 인증하는 방법
- OAuth 2.0 Login - OpenID Connect를 사용한 OAuth 2.0 로그인과 비표준 OAuth 2.0 로그인 (i.e. GitHub)
- SAML 2.0 Login - SAML 2.0 로그인
- Central Authentication Server (CAS) - Central Authentication Server (CAS) 지원
- Remember Me - 세션이 만료된 사용자를 기억하는 방법
- JAAS Authentication - JAAS를 사용한 인증
- OpenID - OpenID 인증 (OpenID Connect와 혼동하지 말 것)
- 사전 인증 시나리오 - 인증은 SiteMinder나 Java EE security같은 외부 메커니즘으로 처리하면서, 스프링 시큐리티로 권한 인가와 주요 취약점 공격을 방어할 수 있다.
- X509 Authentication - X509 인증
10.1. SecurityContextHolder
스프링 시큐리티의 인증 모델 중심에는 SecurityContextHolder가 있다. 이 홀더는 SecurityContext를 가지고 있다.
SecurityContextHolder에는 스프링 시큐리티로 인증한 사용자의 상세 정보를 저장한다. 스프링 시큐리티는 SecurityContextHolder에 어떻게 값을 넣는지는 상관하지 않는다. 값이 있다면 현재 인증한 사용자 정보로 사용한다.
사용자가 인증됐음을 나타내는 가장 쉬운 방법은 직접 SecurityContextHolder를 설정하는 것이다.
Example 49. Setting SecurityContextHolder
SecurityContext context = SecurityContextHolder.createEmptyContext(); // (1)
Authentication authentication =
    new TestingAuthenticationToken("username", "password", "ROLE_USER"); // (2)
context.setAuthentication(authentication);

SecurityContextHolder.setContext(context); // (3)
(1) 비어있는 SecurityContext를 만드는 것으로 시작한다. 스레드 경합을 피하려면 SecurityContextHolder.getContext().setAuthentication(authentication)을 사용해선 안 되며, 새 SecurityContext 인스턴스를 생성해야 한다.
(2) 그다음 새 Authentication 객체를 생성한다. Authentication 구현체라면 모두 SecurityContext에 담을 수 있다. 여기선 간단하게 TestingAuthenticationToken을 사용했다. 프로덕션 환경에선 UsernamePasswordAuthenticationToken(userDetails, password, authorities)를 주로 사용한다.
(3) 마지막으로 SecurityContextHolder에 SecurityContext를 설정해 준다. 스프링 시큐리티는 이 정보를 사용해서 권한을 인가한다.
인증된 주체(principal) 정보를 얻어야 한다면 SecurityContextHolder에 접근하면 된다.
Example 50. Access Currently Authenticated User
SecurityContext context = SecurityContextHolder.getContext();
Authentication authentication = context.getAuthentication();
String username = authentication.getName();
Object principal = authentication.getPrincipal();
Collection<? extends GrantedAuthority> authorities = authentication.getAuthorities();
기본적으로 SecurityContextHolder는 ThreadLocal을 사용해서 정보를 저장하기 때문에, 메소드에 직접 SecurityContext를 넘기지 않아도 동일한 스레드라면 항상 SecurityContext에 접근할 수 있다. 기존 principal 요청을 처리한 다음에 비워주는 것만 잊지 않으면 ThreadLocal을 사용해도 안전하다. 스프링 시큐리티의 FilterChainProxy는 항상 SecurityContext를 비워준다.
어플리케이션의 스레드 처리 방식에 따라서 ThreadLocal이 전혀 적합하지 않을 때도 있다. 예를 들어 스윙 클라이언트에선 자바 가상머신에 있는 전체 스레드에서 보안 컨텍스트를 하나만 사용해야 할 수 있다. 이럴 때는 기동시점에 사용할 컨텍스트 저장 전략을 설정할 수 있다. standalone 어플리케이션에는 SecurityContextHolder.MODE_GLOBAL 전략을 적용할 수 있다. 인증 처리를 마친 스레드가 생성한 보안 컨텍스트를 다른 스레드에서도 그대로 사용해야 하는 어플리케이션이라면 SecurityContextHolder.MODE_INHERITABLETHREADLOCAL을 적용하면 된다. 디폴트 전략은 SecurityContextHolder.MODE_THREADLOCAL이며, 두 가지 방법으로 바꿀 수 있다. 첫 번째 방법은 시스템 프로퍼티를 설정하는 것이고, 두 번째 방법은 SecurityContextHolder에 있는 스태틱 메소드를 사용하는 것이다. 대부분은 디폴트 전략으로도 충분하지만, 바꿔야 한다면 SecurityContextHolder JavaDoc을 참고하라.
10.2. SecurityContext
SecurityContext는 SecurityContextHolder로 접근할 수 있다. SecurityContext는 Authentication 객체를 가지고 있다.
10.3. Authentication
스프링 시큐리티에서 Authentication이 주로 담당하는 일은 다음과 같다:
AuthenticationManager의 입력으로 사용되어, 인증에 사용할 사용자의 credential을 제공한다. 이 상황에선isAuthenticated()는false를 리턴한다.- 현재 인증된 사용자를 나타낸다. 현재
Authentication은 SecurityContext에서 가져올 수 있다.
Authentication은 다음과 같은 정보를 가지고 있다:
principal- 사용자를 식별한다. 사용자 이름/비밀번호로 인증할 땐 보통UserDetails인스턴스다.credentials- 주로 비밀번호. 대부분은 유출되지 않도록 사용자를 인증한 다음 비운다.authorities- 사용자에게 부여한 권한은GrantedAuthority로 추상화한다. 예시로 role이나 scope가 있다.
10.4. GrantedAuthority
사용자에게 부여한 권한은 GrantedAuthority로 추상화한다. 예시로 role이나 scope가 있다.
GrantedAuthority는 Authentication.getAuthorities() 메소드로 접근할 수 있다. 이 메소드는 GrantedAuthority 객체의 Collection을 리턴한다. GrantedAuthority는 말 그대로 인증한 주체(principal)에게 부여된 권한이다. 권한은 보통 ROLE_ADMINISTRATOR나 ROLE_HR_SUPERVISOR같은 “역할 (role)”이다. 이런 역할은 이후에 웹 인가, 메소드 인가, 도메인 객체 인가에서 사용한다. 스프링 시큐리티의 다른 코드에선 role을 해석하고 필요한 권한을 확인한다. 이름/비밀번호 기반 인증을 사용한다면 보통 UserDetailsService가 GrantedAuthority를 로드한다.
GrantedAuthority 객체는 일반적으로 어플리케이션 전체에 걸친 권한을 의미한다. 특정 도메인 객체에 국한되지 않는다. 따라서 Employee 객체 번호 54의 권한을 나타내는 GrantedAuthority, 이런 식으로는 잘 쓰지 않는다. 이렇게 사용하면 권한을 수천 개 만들게 될 수도 있고, 메모리가 부족해지기 십상이다 (그렇지 않더라도 최소한 사용자를 인증하는 시간이 길어진다). 물론, 스프링 시큐리티는 이런 일반적인 요구사항을 처리하도록 설계했지만, 원한다면 도메인 객체 단위로도 보안을 적용할 수 있다.
10.5. AuthenticationManager
AuthenticationManager는 스프링 시큐리티 필터의 인증 수행 방식을 정의하는 API다. 매니저가 리턴한 Authentication을 SecurityContextHolder에 설정하는 건, AuthenticationManager를 호출한 객체 (i.e. 스프링 시큐리티의 필터)가 담당한다. 스프링 시큐리티의 Filters를 사용하지 않는다면 AuthenticationManager를 사용할 필요 없이 직접 SecurityContextHolder를 설정하면 된다.
AuthenticationManager 구현체는 어떤 것을 사용해도 좋지만, 가장 많이 사용하는 구현체는 ProviderManager다.
10.6. ProviderManager
ProviderManager는 가장 많이 쓰는 AuthenticationManager 구현체다. ProviderManager는 동작을 AuthenticationProvider List에 위임한다. 모든 AuthenticationProvider는 인증을 성공시키거나, 실패시키거나, 아니면 결정을 내릴 수 없는 것으로 판단하고 다운스트림에 있는 AuthenticationProvider가 결정하도록 만들 수 있다. 설정해둔 AuthenticationProvider가 전부 인증하지 못하면 ProviderNotFoundException과 함께 실패한다. 이 예외는 AuthenticationException의 하위클래스로, 넘겨진 Authentication 유형을 지원하는 ProviderManager를 설정하지 않았음을 의미한다.
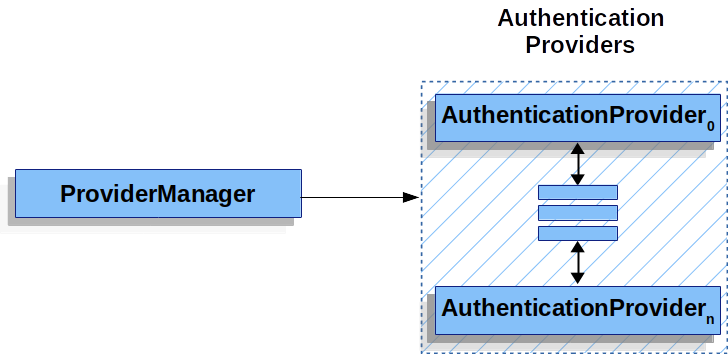
보통은 AuthenticationProvider마다 각자가 맡은 인증을 수행하는 법을 알고 있다. 예를 들어 AuthenticationProvider 하나로 이름/비밀번호를 검증할 수 있고, 다른 하나는 SAML 인증을 담당할 수 있다. 이렇게 하면 인증 유형마다 담당 AuthenticationProvider가 있기 때문에, AuthenticationManager 빈 하나만 외부로 노출하면서도 여러 인증 유형을 지원할 수 있다.
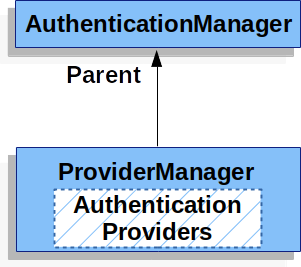
원한다면 ProviderManager에 인증을 수행할 수 있는 AuthenticationProvider가 없을 때 사용할, 부모 AuthenticationManager를 설정할 수도 있다. 부모는 AuthenticationManager의 어떤 구현체도 될 수 있지만 보통 ProviderManager 인스턴스를 많이 사용한다.
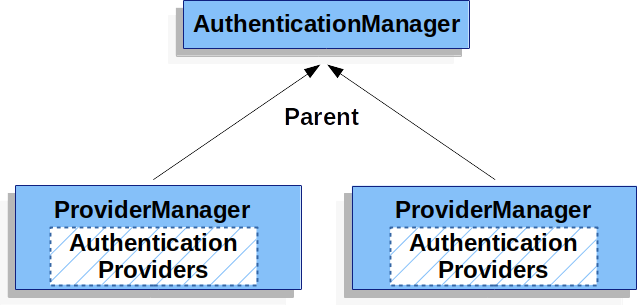
사실은 여러 ProviderManager 인스턴스에 동일한 부모 AuthenticationManager를 공유하는 것도 가능하다. 각각 인증 메커니즘이 다른 (ProviderManager 인스턴스가 다른) SecurityFilterChain 여러 개가 공통 인증을 사용하는 경우에 (부모 AuthenticationManager를 공유) 흔히 쓰는 패턴이다.
기본적으로 ProviderManager는 인증에 성공하면 반환받은 Authentication 객체에 있는 모든 민감한 credential 정보를 지운다. 이로써 비밀번호같은 정보를 HttpSession에 필요 이상으로 길게 유지하지 않는 것이다.
하지만 상태가 없는 어플리케이션에서 성능 향상 등을 위해 사용자 객체를 캐시한다면 문제가 될 수 있다. Authentication이 캐시 안에 있는 객체를 참조하고 있는데 (UserDetails 인스턴스 등) credential을 제거한다면, 캐시된 값으로는 더 이상 인증할 수 없다. 캐시를 사용한다면 이 점을 반드시 고려해야 한다. 캐시 구현부나 Authentication 객체를 생성하는 AuthenticationProvider에서 객체의 복사본을 만들면 명쾌하게 해결된다. 아니면 ProviderManager의 eraseCredentialsAfterAuthentication 프로퍼티를 비활성화시켜도 된다. 자세한 정보는 Javadoc을 참고하라.
10.7. AuthenticationProvider
ProviderManager엔 AuthenticationProvider를 여러 개 주입할 수 있다. AuthenticationProvider마다 담당하는 인증 유형이 다르다. 예를 들어 DaoAuthenticationProvider는 이름/비밀번호 기반 인증을, JwtAuthenticationProvider는 JWT 토큰 인증을 지원한다.
10.8. Request Credentials with AuthenticationEntryPoint
AuthenticationEntryPoint는 클라이언트의 credential을 요청하는 HTTP 응답을 보낼 때 사용한다.
클라이언트가 리소스를 요청할 때 미리 이름/비밀번호 같은 credential을 함께 보낼 때도 있다. 이럴 때는 credential을 요청하는 HTTP 응답을 만들 필요가 없다.
하지만 어떨 땐 클라이언트가 접근 권한이 없는 리소스에 인증되지 않은 요청을 보내기도 한다. 이때는 AuthenticationEntryPoint 구현체가 클라이언트에 credential을 요청한다. AuthenticationEntryPoint는 로그인 페이지로 리다이렉트하거나, WWW-Authenticate 헤더로 응답하는 등의 일을 담당한다.
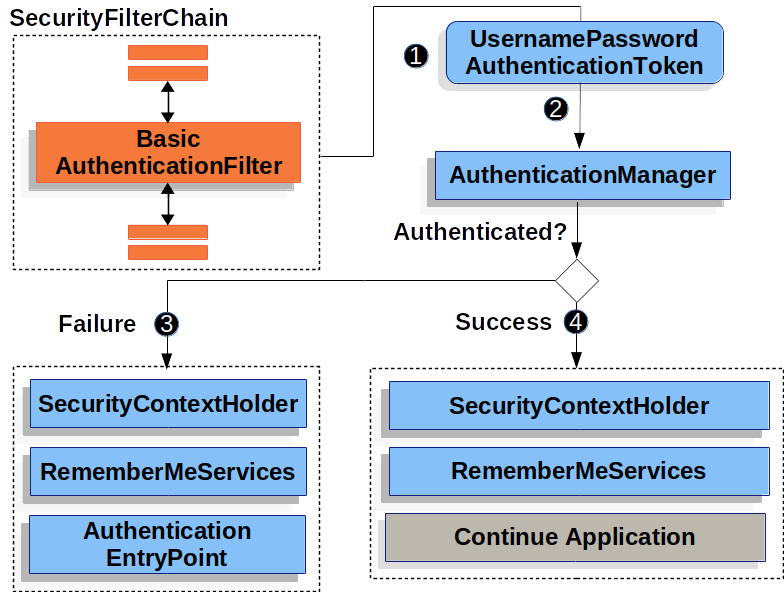
10.9. AbstractAuthenticationProcessingFilter
AbstractAuthenticationProcessingFilter는 사용자의 credential을 인증하기 위한 베이스 Filter다. credential을 인증할 수 없다면, 스프링 시큐리티는 보통 AuthenticationEntryPoint로 credential을 요청한다.
그러고 나면 AbstractAuthenticationProcessingFilter는 제출한 모든 인증 요청을 처리할 수 있다.
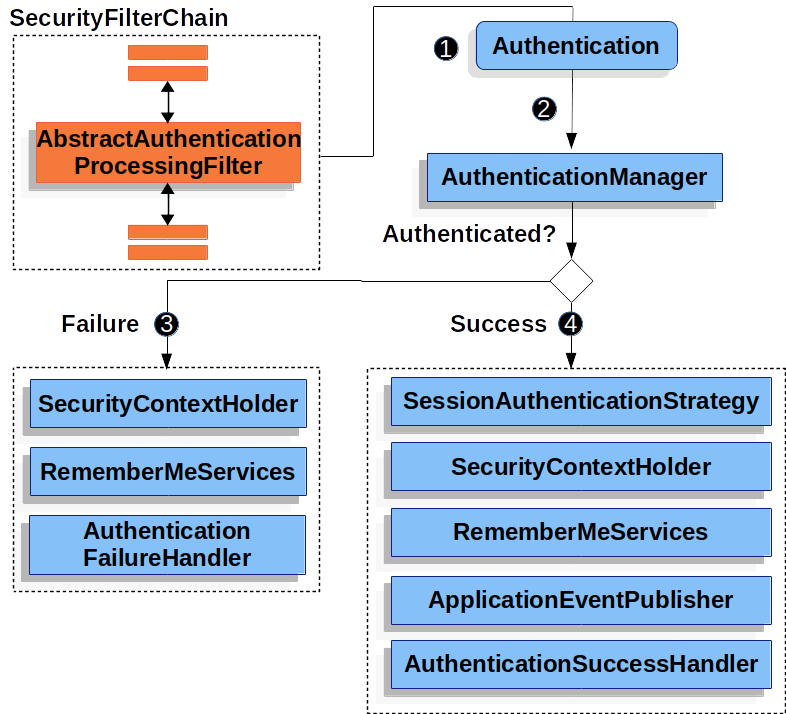
- (1) 사용자가 credential을 제출하면
AbstractAuthenticationProcessingFilter는 인증할HttpServletRequest로부터Authentication을 만든다. 생성하는Authentication타입은AbstractAuthenticationProcessingFilter하위 클래스에 따라 다르다. 예를 들어UsernamePasswordAuthenticationFilter는HttpServletRequest에 있는 username과 password로UsernamePasswordAuthenticationToken을 생성한다. - (2) 그다음엔
Authentication을AuthenticationManager로 넘겨서 인증한다. - (3) 인증에 실패하면 (Failure)
- SecurityContextHolder를 비운다.
RememberMeServices.loginFail을 실행한다. remember me를 설정하지 않았다면 아무 동작도 하지 않는다.AuthenticationFailureHandler를 실행한다.
- (4) 인증에 성공하면 (Success)
SessionAuthenticationStrategy에 새로 로그인했음을 통보한다.- SecurityContextHolder에 Authentication을 세팅한다. 이후
SecurityContextPersistenceFilter가HttpSession에SecurityContext를 저장한다. RememberMeServices.loginSuccess를 실행한다. remember me를 설정하지 않았다면 아무 동작도 하지 않는다.ApplicationEventPublisher는InteractiveAuthenticationSuccessEvent를 발생시킨다.
10.10. Username/Password Authentication
사용자 이름과 비밀번호 검증은 사용자를 인증할 때 가장 많이 사용하는 방법 중 하나다. 그렇기 때문에 스프링 시큐리티는 이름과 비밀번호로 인증할 수 있는 방법을 종합적으로 지원한다.
Reading the Username & Password
스프링 시큐리티는 HttpServletRequest에서 이름과 비밀번호를 읽을 수 있는 다음 메커니즘을 기본으로 제공한다:
Storage Mechanisms
이름/비밀번호 조회 메커니즘은 지원하는 저장 메커니즘 중 어떤 것과도 조합할 수 있다:
- 인메모리 인증과 심플 스토리지
- JDBC 인증과 관계형 데이터베이스
- UserDetailsService와 커스텀 데이터 스토어
- LDAP 인증과 LDAP 스토리지
10.10.1. Form Login
스프링 시큐리티는 html 폼 기반 사용자 이름/비밀번호 인증을 지원한다. 이번 섹션에선 스프링 시큐리티의 폼 기반 인증 동작 방식을 설명한다.
스프링 시큐리티에서 폼 기반 로그인이 어떻게 동작하는지 살펴보자. 먼저 로그인 폼으로 리다이렉트하는 방법을 설명한다.
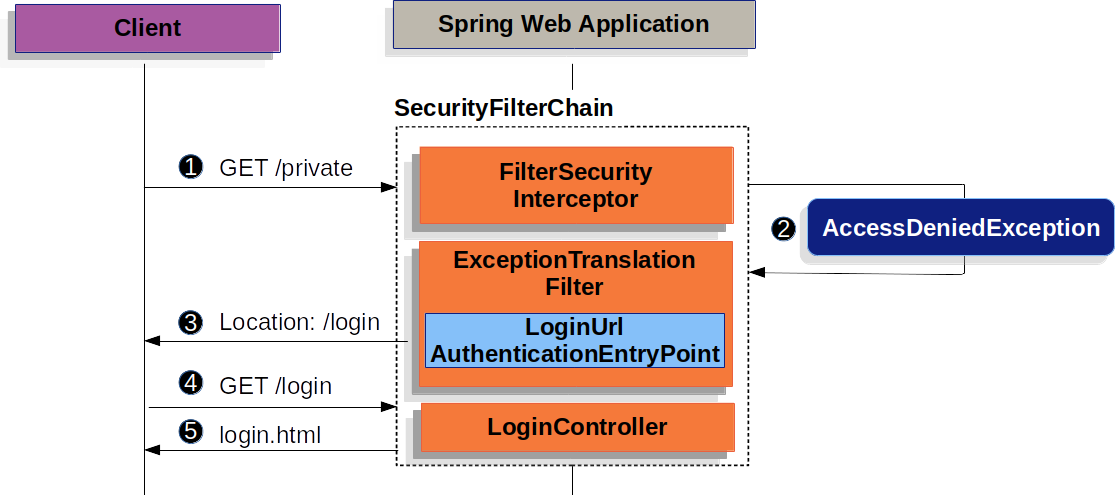
이전에 설명했던 SecurityFilterChain 다이어그램을 기반으로 그린 그림이다.
- (1) 먼저 사용자가 권한이 없는 리소스
/private에 인증되지 않은 요청을 보낸다. - (2) 스프링 시큐리티의
FilterSecurityInterceptor에서AccessDeniedException을 던져 인증되지 않은 요청을 거절했음을 알린다. - (3) 인증되지 않은 사용자이므로
ExceptionTranslationFilter에서 인증을 시작하고, 설정한AuthenticationEntryPoint로 로그인 페이지로의 리다이렉트 응답을 전송한다.AuthenticationEntryPoint는 대부분LoginUrlAuthenticationEntryPoint인스턴스다. - (4) 그러면 브라우저는 리다이렉트된 로그인 페이지를 요청한다.
- (5) 어플리케이션에선 로그인 페이지를 렌더링해야 한다.
username과 password를 제출하면 UsernamePasswordAuthenticationFilter가 이 값을 인증한다. UsernamePasswordAuthenticationFilter는 AbstractAuthenticationProcessingFilter를 상속했기 때문에 다이어그램도 비슷하다.
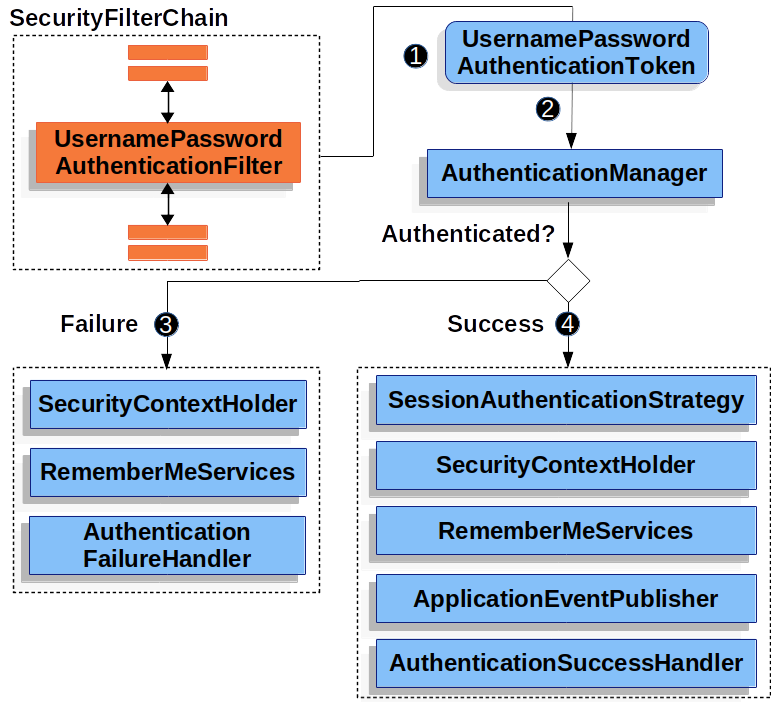
이전에 설명했던 SecurityFilterChain 다이어그램을 기반으로 그린 그림이다.
- (1) 사용자가 username과 password를 제출하면
UsernamePasswordAuthenticationFilter는HttpServletRequest에서 이 값을 추출해Authentication유형 중 하나인UsernamePasswordAuthenticationToken을 만든다. - (2) 그다음엔
UsernamePasswordAuthenticationToken을AuthenticationManager로 넘겨 인증한다.AuthenticationManager상세 동작은 사용자 정보를 저장한 방식에 따라 다르다. - (3) 인증에 실패하면 (Failure)
- SecurityContextHolder를 비운다.
RememberMeServices.loginFail을 실행한다. remember me를 설정하지 않았다면 아무 동작도 하지 않는다.AuthenticationFailureHandler를 실행한다.
- (4) 인증에 성공하면 (Success)
SessionAuthenticationStrategy에 새로 로그인했음을 통보한다.- SecurityContextHolder에 Authentication을 세팅한다.
RememberMeServices.loginSuccess를 실행한다. remember me를 설정하지 않았다면 아무 동작도 하지 않는다.ApplicationEventPublisher는InteractiveAuthenticationSuccessEvent를 발생시킨다.AuthenticationSuccessHandler를 실행한다. 보통 로그인 페이지로 리다이렉트할 때는SimpleUrlAuthenticationSuccessHandler가ExceptionTranslationFilter에 저장된 요청으로 리다이렉트한다.
스프링 시큐리티에선 폼 로그인이 디폴트로 활성화된다. 하지만 서블릿 기반 설정을 사용한다면 폼 기반 로그인을 명시해야 한다. 최소한 아래와 같은 설정이 있어야 한다:
Example 51. Form Log In
protected void configure(HttpSecurity http) {
    http
        // ...
        .formLogin(withDefaults());
}
<http>
    <!-- ... -->
    <form-login />
</http>
fun configure(http: HttpSecurity) {
    http {
        // ...
        formLogin { }
    }
}
이 설정에선 디폴트 로그인 페이지로 렌더링한다. 프로덕션에서 사용할 어플리케이션은 대부분 커스텀 로그인 폼이 필요하다.
커스텀 로그인 폼을 설정하는 방법은 아래에 있다.
Example 52. Custom Log In Form Configuration
protected void configure(HttpSecurity http) throws Exception {
    http
        // ...
        .formLogin(form -> form
            .loginPage("/login")
            .permitAll()
        );
}
<http>
    <!-- ... -->
    <intercept-url pattern="/login" access="permitAll" />
    <form-login login-page="/login" />
</http>
fun configure(http: HttpSecurity) {
    http {
        // ...
        formLogin {
            loginPage = "/login"
            permitAll()
        }
    }
}
스프링 시큐리티 설정에 로그인 페이지를 명시했다면 페이지 렌더링을 직접 구현해야 한다. 다음은 로그인 페이지 /login에서 필요한 HTML 로그인 폼을 생성하는 타임리프 템플릿이다:
Example 53. Log In Form
src/main/resources/templates/login.html
<!DOCTYPE html>
<html xmlns="http://www.w3.org/1999/xhtml" xmlns:th="https://www.thymeleaf.org">
    <head>
        <title>Please Log In</title>
    </head>
    <body>
        <h1>Please Log In</h1>
        <div th:if="${param.error}">
            Invalid username and password.</div>
        <div th:if="${param.logout}">
            You have been logged out.</div>
        <form th:action="@{/login}" method="post">
            <div>
            <input type="text" name="username" placeholder="Username"/>
            </div>
            <div>
            <input type="password" name="password" placeholder="Password"/>
            </div>
            <input type="submit" value="Log in" />
        </form>
    </body>
</html>
디폴트 HTML 폼은 몇 가지 핵심 규칙을 따른다:
/login에post요청을 보내야 한다.- CSRF 토큰을 포함해야 하며, 타임리프에서는 자동으로 추가된다.
- 사용자 이름은
username파라미터로 명시해야 한다. - 비밀번호는
password파라미터로 명시해야 한다. - HTTP 파라미터 error가 있으면 사용자가 유효한 username / password를 제공하지 못했음을 나타낸다.
- HTTP 파라미터 logout이 있으면 사용자가 로그아웃에 성공한 것을 나타낸다.
대부분은 로그인 페이지를 더 커스텀할 필요가 없을 것이다. 하지만 위에 있는 것 이상으로 더 커스텀하고 싶다면 추가 설정을 넣으면 된다.
스프링 MVC를 사용한다면 GET /login 요청을 직접 만든 로그인 템플릿으로 매핑하는 컨트롤러가 필요하다. 다음 코드는 최소한으로 작성한 샘플 LoginController다:
Example 54. LoginController
src/main/java/example/LoginController.java
@Controller
class LoginController {
    @GetMapping("/login")
    String login() {
        return "login";
    }
}
10.10.2. Basic Authentication
이번 섹션에서는 스프링 시큐리티가 어떻게 서블릿 기반 어플리케이션에서 기본 HTTP 인증을 지원하는지 다룬다.
스프링 시큐리티에서 HTTP 기본 인증이 어떻게 동작하는지 살펴보자. 먼저 인증되지 않은 클라이언트에게 WWW-Authenticate 헤더를 다시 전송하는 것을 확인할 것이다.
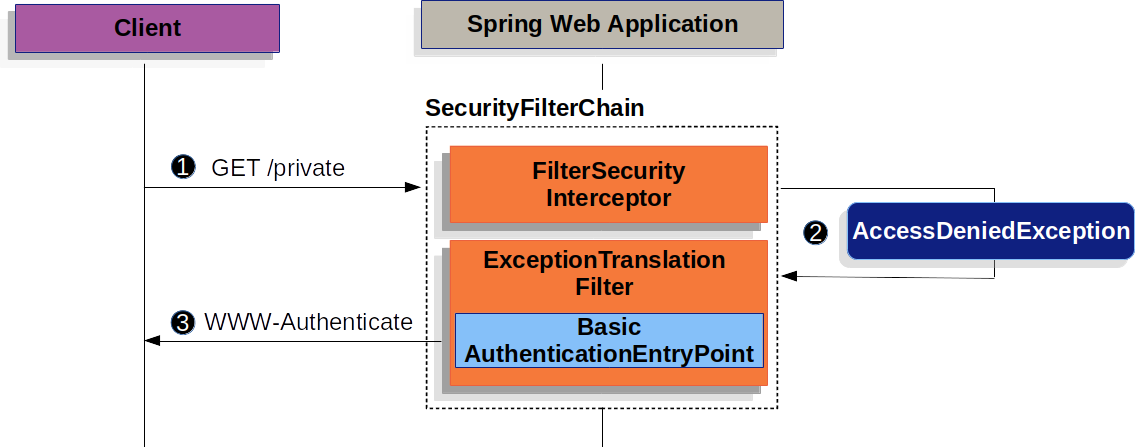
이전에 설명했던 SecurityFilterChain 다이어그램을 기반으로 그린 그림이다.
- (1) 먼저 사용자가 권한이 없는 리소스
/private에 인증되지 않은 요청을 보낸다. - (2) 스프링 시큐리티의
FilterSecurityInterceptor에서AccessDeniedException을 던져 인증되지 않은 요청을 거절했음을 알린다. - (3) 인증되지 않은 사용자이므로
ExceptionTranslationFilter에서 인증을 시작한다. 설정한AuthenticationEntryPoint는BasicAuthenticationEntryPoint인스턴스로, WWW-Authenticate 헤더를 전송한다. 이때는 클라이언트가 기존 요청을 다시 전송할 수 있으므로RequestCache는 보통 요청을 저장하지 않는NullRequestCache를 사용한다.
클라이언트는 WWW-Authenticate 헤더를 받으면 username과 password로 재시도해야 한다는 것을 알고 있다. 다음은 username과 password를 처리하는 플로우다:
이전에 설명했던 SecurityFilterChain 다이어그램을 기반으로 그린 그림이다.
- (1) 사용자가 username과 password를 제출하면
UsernamePasswordAuthenticationFilter는HttpServletRequest에서 이 값을 추출해Authentication유형 중 하나인UsernamePasswordAuthenticationToken을 만든다. - (2) 그다음엔
UsernamePasswordAuthenticationToken을AuthenticationManager로 넘겨 인증한다.AuthenticationManager상세 동작은 사용자 정보를 저장한 방식에 따라 다르다. - (3) 인증에 실패하면 (Failure)
- SecurityContextHolder를 비운다.
RememberMeServices.loginFail을 실행한다. remember me를 설정하지 않았다면 아무 동작도 하지 않는다.AuthenticationEntryPoint를 실행해서 WWW-Authenticate 전송을 트리거한다.
- (4) 인증에 성공하면 (Success)
- SecurityContextHolder에 Authentication을 세팅한다.
RememberMeServices.loginSuccess을 실행한다. remember me를 설정하지 않았다면 아무 동작도 하지 않는다.BasicAuthenticationFilter에서FilterChain.doFilter(request,response)를 호출해서 나머지 어플리케이션 로직을 실행한다.
스프링 시큐리티에선 HTTP 기본 인증을 디폴트로 활성화한다. 하지만 서블릿 기반 설정을 하나라도 사용하고 있다면 HTTP Basic을 명시해야 한다.
다음 코드는 최소한의 설정이다:
Example 55. Explicit HTTP Basic Configuration
protected void configure(HttpSecurity http) {
    http
        // ...
        .httpBasic(withDefaults());
}
<http>
    <!-- ... -->
    <http-basic />
</http>
fun configure(http: HttpSecurity) {
    http {
        // ...
        httpBasic { }
    }
}
10.10.3. Digest Authentication
이번 섹션에선 DigestAuthenticationFilter가 제공하는 다이제스트 인증 지원 방식을 자세히 다룬다.
다이제스트 인증은 안전하지 않으므로 최신 어플리케이션에선 사용하지 말아야 한다. 비밀번호를 일반 텍스트나 암호화 형식 또는 MD5 형식으로 저장해야 한다는 게 가장 큰 문제다. 이 저장 형식은 전부 안전하지 않다. 그대신 다이제스트에선 지원하지 않는, 단방향 적응형 비밀번호 해시 (i.e. bCrypt, PBKDF2, SCrypt 등)를 사용해서 credential을 저장해야 한다.
다이제스트 인증은 기본 인증의 많은 문제점을 개선하기 위한 시도였다. 특히 네트워크 상에서 credential을 일반 텍스트로 전달하지 않아도 된다. 많은 브라우저가 다이제스트 인증을 지원하고 있다.
HTTP 다이제스트 인증 관리 표준은 RFC 2617에 정의돼 있으며, RFC 2069에서 업데이트됐다. user agent 대부분은 RFC 2617을 구현하고 있다. 스프링 시큐리티가 지원하는 다이제스트 인증은 RFC 2617에서 규정한 “auth” quality of protection(qop)과 호환되며, 이전 버전 RFC 2069와도 호환된다. 암호화하지 않은 HTTP (i.e. TLS/HTTPS 미적용) 통신에서 최대한 안전하게 인증을 처리하고 싶다면 다이제스트 인증이 더 매력적으로 느껴질 것이다. 하지만 HTTPS는 무조건 적용하는 게 좋다.
다이제스트 인증의 핵심은 “nonce”다. 서버에서 생성하는 값으로, 스프링 시큐리티의 nonce는 다음 형식을 따른다:
Example 56. Digest Syntax
base64(expirationTime + ":" + md5Hex(expirationTime + ":" + key))
expirationTime:   밀리세컨드로 표현한 nonce의 만료 시각
key:              nonce 토큰 수정을 방지할 개인키
안전하지 않은 일반 텍스트 비밀번호를 저장할 땐 NoOpPasswordEncoder를 사용하도록 설정했는지 확인해야 한다. 다음은 다이제스트 인증 설정 예시다:
Example 57. Digest Authentication
@Autowired
UserDetailsService userDetailsService;

DigestAuthenticationEntryPoint entryPoint() {
    DigestAuthenticationEntryPoint result = new DigestAuthenticationEntryPoint();
    result.setRealmName("My App Relam");
    result.setKey("3028472b-da34-4501-bfd8-a355c42bdf92");
}

DigestAuthenticationFilter digestAuthenticationFilter() {
    DigestAuthenticationFilter result = new DigestAuthenticationFilter();
    result.setUserDetailsService(userDetailsService);
    result.setAuthenticationEntryPoint(entryPoint());
}

protected void configure(HttpSecurity http) throws Exception {
    http
        // ...
        .exceptionHandling(e -> e.authenticationEntryPoint(authenticationEntryPoint()))
        .addFilterBefore(digestFilter());
}
<b:bean id="digestFilter"
        class="org.springframework.security.web.authentication.www.DigestAuthenticationFilter"
    p:userDetailsService-ref="jdbcDaoImpl"
    p:authenticationEntryPoint-ref="digestEntryPoint"
/>

<b:bean id="digestEntryPoint"
        class="org.springframework.security.web.authentication.www.DigestAuthenticationEntryPoint"
    p:realmName="My App Realm"
    p:key="3028472b-da34-4501-bfd8-a355c42bdf92"
/>

<http>
    <!-- ... -->
    <custom-filter ref="userFilter" position="DIGEST_AUTH_FILTER"/>
</http>
10.10.4. In-Memory Authentication
스프링 시큐리티의 InMemoryUserDetailsManager는 메모리 기반으로 username/password를 인증하는 UserDetailsService 구현체다. InMemoryUserDetailsManager는 UserDetailsManager 인터페이스도 구현했기 때문에 UserDetails를 관리할 수 있다. username/password를 읽어 인증하도록 설정하면 스프링 시큐리티는 UserDetails를 통해 인증한다.
이 예제에선 스프링 부트 CLI로 비밀번호 password를 인코딩했으며, 인코딩된 값 {bcrypt}$2a$10$GRLdNijSQMUvl/au9ofL.eDwmoohzzS7.rmNSJZ.0FxO/BTk76klW를 얻었다.
Example 58. InMemoryUserDetailsManager Java Configuration
@Bean
public UserDetailsService users() {
    UserDetails user = User.builder()
        .username("user")
        .password("{bcrypt}$2a$10$GRLdNijSQMUvl/au9ofL.eDwmoohzzS7.rmNSJZ.0FxO/BTk76klW")
        .roles("USER")
        .build();
    UserDetails admin = User.builder()
        .username("admin")
        .password("{bcrypt}$2a$10$GRLdNijSQMUvl/au9ofL.eDwmoohzzS7.rmNSJZ.0FxO/BTk76klW")
        .roles("USER", "ADMIN")
        .build();
    return new InMemoryUserDetailsManager(user, admin);
}
<user-service>
    <user name="user"
        password="{bcrypt}$2a$10$GRLdNijSQMUvl/au9ofL.eDwmoohzzS7.rmNSJZ.0FxO/BTk76klW"
        authorities="ROLE_USER" />
    <user name="admin"
        password="{bcrypt}$2a$10$GRLdNijSQMUvl/au9ofL.eDwmoohzzS7.rmNSJZ.0FxO/BTk76klW"
        authorities="ROLE_USER,ROLE_ADMIN" />
</user-service>
@Bean
fun users(): UserDetailsService {
    val user = User.builder()
        .username("user")
        .password("{bcrypt}$2a$10\$GRLdNijSQMUvl/au9ofL.eDwmoohzzS7.rmNSJZ.0FxO/BTk76klW")
        .roles("USER")
        .build()
    val admin = User.builder()
        .username("admin")
        .password("{bcrypt}$2a$10\$GRLdNijSQMUvl/au9ofL.eDwmoohzzS7.rmNSJZ.0FxO/BTk76klW")
        .roles("USER", "ADMIN")
        .build()
    return InMemoryUserDetailsManager(user, admin)
}
위 예제는 비밀번호를 안전한 포맷으로 저장하지만, 아직 아쉬운 점이 많다.
아래 예제는 User.withDefaultPasswordEncoder로 메모리에 저장할 비밀번호를 보호한다. 하지만 소스 코드를 디컴파일하면 비밀번호를 쉽게 탈취할 수 있다. 따라서 User.withDefaultPasswordEncoder는 스프링 시큐리티를 처음 접할 때만 사용해야 하며, 프로덕션 코드엔 사용하면 안 된다.
Example 59. InMemoryUserDetailsManager with User.withDefaultPasswordEncoder
@Bean
public UserDetailsService users() {
    // The builder will ensure the passwords are encoded before saving in memory
    UserBuilder users = User.withDefaultPasswordEncoder();
    UserDetails user = users
        .username("user")
        .password("password")
        .roles("USER")
        .build();
    UserDetails admin = users
        .username("admin")
        .password("password")
        .roles("USER", "ADMIN")
        .build();
    return new InMemoryUserDetailsManager(user, admin);
}
@Bean
fun users(): UserDetailsService {
    // The builder will ensure the passwords are encoded before saving in memory
    val users = User.withDefaultPasswordEncoder()
    val user = users
        .username("user")
        .password("password")
        .roles("USER")
        .build()
    val admin = users
        .username("admin")
        .password("password")
        .roles("USER", "ADMIN")
        .build()
    return InMemoryUserDetailsManager(user, admin)
}
XML 기반으로는 간단하게 User.withDefaultPasswordEncoder를 설정할 방법이 없다. 데모 프로젝트나 단순 연습용 코드라면 앞에 {noop}을 프리픽스로 달아서 인코딩하지 않음을 지정하는 방법도 있다.
Example 60. <user-service> {noop} XML Configuration
<user-service>
    <user name="user"
        password="{noop}password"
        authorities="ROLE_USER" />
    <user name="admin"
        password="{noop}password"
        authorities="ROLE_USER,ROLE_ADMIN" />
</user-service>
10.10.5. JDBC Authentication
스프링 시큐리티의 JdbcDaoImpl은 JDBC기반으로 username/password를 인증하는 UserDetailsService 구현체다. JdbcDaoImpl을 상속한 JdbcUserDetailsManager는 UserDetailsManager 인터페이스도 구현했기 때문에 UserDetails를 관리할 수 있다. username/password를 읽어 인증하도록 설정하면 스프링 시큐리티는 UserDetails를 통해 인증한다.
아래에서는 다음과 같은 내용을 다룬다:
- 스프링 시큐리티 JDBC 인증에서 사용하는 디폴트 스키마
- 데이터 소스 설정
- JdbcUserDetailsManager 빈
Default Schema
스프링 시큐리티는 JDBC 기반 인증을 위한 기본 쿼리를 제공한다. 여기에선 디폴트 쿼리에서 사용되는 디폴트 스키마를 다룬다. 쿼리나 데이터베이스 방언(dialect)을 커스텀한다면 스키마도 함께 바꿔야 한다.
User Schema
JdbcDaoImpl에서 사용자의 비밀번호, 계정 상태 (활성화/비활성화), 권한 (roles) 리스트를 로드하려면 테이블이 있어야 한다. 필요한 디폴트 사용자 스키마는 다음과 같다:
디폴트 스키마는 클래스 패스 리소스
org/springframework/security/core/userdetails/jdbc/users.ddl로도 접근할 수 있다.
Example 61. Default User Schema
create table users(
    username varchar_ignorecase(50) not null primary key,
    password varchar_ignorecase(50) not null,
    enabled boolean not null
);

create table authorities (
    username varchar_ignorecase(50) not null,
    authority varchar_ignorecase(50) not null,
    constraint fk_authorities_users foreign key(username) references users(username)
);
create unique index ix_auth_username on authorities (username,authority);
오라클도 많이 쓰는 데이터베이스 중 하나지만, 약간 다른 스키마가 필요하다. 오라클의 디폴트 사용자 스키마는 다음과 같다:
Example 62. Default User Schema for Oracle Databases
CREATE TABLE USERS (
    USERNAME NVARCHAR2(128) PRIMARY KEY,
    PASSWORD NVARCHAR2(128) NOT NULL,
    ENABLED CHAR(1) CHECK (ENABLED IN ('Y','N') ) NOT NULL
);


CREATE TABLE AUTHORITIES (
    USERNAME NVARCHAR2(128) NOT NULL,
    AUTHORITY NVARCHAR2(128) NOT NULL
);
ALTER TABLE AUTHORITIES ADD CONSTRAINT AUTHORITIES_UNIQUE UNIQUE (USERNAME, AUTHORITY);
ALTER TABLE AUTHORITIES ADD CONSTRAINT AUTHORITIES_FK1 FOREIGN KEY (USERNAME) REFERENCES USERS (USERNAME) ENABLE;
Group Schema
그룹을 사용하는 어플리케이션은 그룹 스키마도 필요하다. 디폴트 그룹 스키마는 다음과 같다:
Example 63. Default Group Schema
create table groups (
    id bigint generated by default as identity(start with 0) primary key,
    group_name varchar_ignorecase(50) not null
);

create table group_authorities (
    group_id bigint not null,
    authority varchar(50) not null,
    constraint fk_group_authorities_group foreign key(group_id) references groups(id)
);

create table group_members (
    id bigint generated by default as identity(start with 0) primary key,
    username varchar(50) not null,
    group_id bigint not null,
    constraint fk_group_members_group foreign key(group_id) references groups(id)
);
Setting up a DataSource
JdbcUserDetailsManager를 설정하려면 먼저 DataSource가 있어야 한다. 이 예제에서는 디폴트 사용자 스키마로 초기화하는 임베디드 데이터소스를 설정한다.
Example 64. Embedded Data Source
@Bean
DataSource dataSource() {
    return new EmbeddedDatabaseBuilder()
        .setType(H2)
        .addScript("classpath:org/springframework/security/core/userdetails/jdbc/users.ddl")
        .build();
}
<jdbc:embedded-database>
    <jdbc:script location="classpath:org/springframework/security/core/userdetails/jdbc/users.ddl"/>
</jdbc:embedded-database>
@Bean
fun dataSource(): DataSource {
    return EmbeddedDatabaseBuilder()
        .setType(H2)
        .addScript("classpath:org/springframework/security/core/userdetails/jdbc/users.ddl")
        .build()
}
프로덕션 환경에선 외부 데이터베이스 커넥션을 설정해야 한다.
JdbcUserDetailsManager Bean
이 예제에선 스프링 부트 CLI로 비밀번호 password를 인코딩했으며, 인코딩된 값 {bcrypt}$2a$10$GRLdNijSQMUvl/au9ofL.eDwmoohzzS7.rmNSJZ.0FxO/BTk76klW를 얻었다. 비밀번호를 저장하는 방법은 PasswordEncoder 섹션을 참고하라.
Example 65. JdbcUserDetailsManager
@Bean
UserDetailsManager users(DataSource dataSource) {
    UserDetails user = User.builder()
        .username("user")
        .password("{bcrypt}$2a$10$GRLdNijSQMUvl/au9ofL.eDwmoohzzS7.rmNSJZ.0FxO/BTk76klW")
        .roles("USER")
        .build();
    UserDetails admin = User.builder()
        .username("admin")
        .password("{bcrypt}$2a$10$GRLdNijSQMUvl/au9ofL.eDwmoohzzS7.rmNSJZ.0FxO/BTk76klW")
        .roles("USER", "ADMIN")
        .build();
    JdbcUserDetailsManager users = new JdbcUserDetailsManager(dataSource);
    users.createUser(user);
    users.createUser(admin);
    return users;
}
<jdbc-user-service>
    <user name="user"
        password="{bcrypt}$2a$10$GRLdNijSQMUvl/au9ofL.eDwmoohzzS7.rmNSJZ.0FxO/BTk76klW"
        authorities="ROLE_USER" />
    <user name="admin"
        password="{bcrypt}$2a$10$GRLdNijSQMUvl/au9ofL.eDwmoohzzS7.rmNSJZ.0FxO/BTk76klW"
        authorities="ROLE_USER,ROLE_ADMIN" />
</jdbc-user-service>
@Bean
fun users(dataSource: DataSource): UserDetailsManager {
    val user = User.builder()
            .username("user")
            .password("{bcrypt}$2a$10\$GRLdNijSQMUvl/au9ofL.eDwmoohzzS7.rmNSJZ.0FxO/BTk76klW")
            .roles("USER")
            .build();
    val admin = User.builder()
            .username("admin")
            .password("{bcrypt}$2a$10\$GRLdNijSQMUvl/au9ofL.eDwmoohzzS7.rmNSJZ.0FxO/BTk76klW")
            .roles("USER", "ADMIN")
            .build();
    val users = JdbcUserDetailsManager(dataSource)
    users.createUser(user)
    users.createUser(admin)
    return users
}
10.10.6. UserDetails
UserDetails는 UserDetailsService가 리턴하는 값이다. DaoAuthenticationProvider가 UserDetails를 인증하고, 이 UserDetails를 principal로 가진 Authentication을 리턴한다.
10.10.7. UserDetailsService
UserDetailsService는 DaoAuthenticationProvider가 username/password로 인증할 때 필요한 username, password와 다른 속성을 조회할 때 사용한다. 스프링 시큐리티가 제공하는 UserDetailsService는 인메모리와 JDBC 기반 구현체가 있다.
커스텀 인증을 정의하려면 커스텀 UserDetailsService를 빈으로 만들면 된다. 예를 들어 CustomUserDetailsService가 UserDetailsService를 구현했다고 가정하고, 인증을 커스텀해보자:
AuthenticationManagerBuilder를 사용하지 않고AuthenticationProviderBean빈도 정의하지 않았을 때 사용하는 방법이다.
Example 66. Custom UserDetailsService Bean
@Bean
CustomUserDetailsService customUserDetailsService() {
    return new CustomUserDetailsService();
}
<b:bean class="example.CustomUserDetailsService"/>
@Bean
fun customUserDetailsService() = CustomUserDetailsService()
10.10.8. PasswordEncoder
서블릿에서 스프링 시큐리티를 사용하면 PasswordEncoder를 통합해 비밀번호를 안전하게 저장할 수 있다. 스프링 시큐리티가 사용하는 PasswordEncoder 구현체를 커스텀하려면 PasswordEncoder 빈을 정의하면 된다.
10.10.9. DaoAuthenticationProvider
DaoAuthenticationProvider는 UserDetailsService와 PasswordEncoder로 username/password를 인증하는 AuthenticationProvider 구현체다.
스프링 시큐리티에서 DaoAuthenticationProvider가 동작하는 방식을 살펴보자. 다음은 Username & Password 조회를 설명할 때 다룬 이미지에서 AuthenticationManager가 동작하는 방식을 더 상세히 나타낸 그림이다.
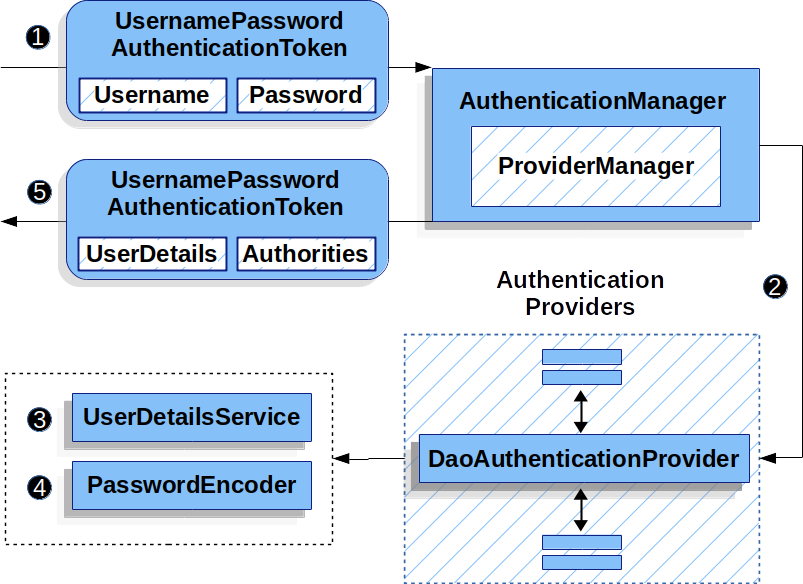
- (1) Username & Password를 조회하는 인증
Filter에서UsernamePasswordAuthenticationToken을AuthenticationManager로 넘긴다.AuthenticationManager는ProviderManager가 구현하고 있다. - (2) 이
ProviderManager는DaoAuthenticationProvider를 AuthenticationProvider로 사용하도록 설정돼 있다. - (3)
DaoAuthenticationProvider는UserDetailsService에서UserDetails를 조회한다. - (4) 그다음
DaoAuthenticationProvider는 이전 단계에서 얻은UserDetails에 있는 비밀번호를PasswordEncoder로 검증한다. - (5) 인증에 성공하면
UsernamePasswordAuthenticationToken타입의Authentication을 반환하며, 이 객체는UserDetailsService가 리턴한UserDetails를 principal로 가지고 있다. 결국에 리턴한UsernamePasswordAuthenticationToken은 인증Filter에서SecurityContextHolder로 세팅된다.
10.10.10. LDAP Authentication
LDAP은 조직에서 사용자 정보를 관리하기 위한 중앙 저장소와 인증 서비스로 많이 사용한다. 어플리케이션 사용자의 role을 저장할 때도 사용할 수 있다.
스프링 시큐리티의 LDAP 기반 인증은 username/password로 인증하도록 설정했을 때 사용한다. 하지만 username/password로 인증하더라도 UserDetailsService와 통합되지는 않는다. LDAP 서버는 bind 인증에서 비밀번호를 반환하지 않기 때문에 어플리케이션에서 비밀번호를 인증할 수 없기 때문이다.
LDAP 서버의 설정 시나리오는 다양하므로 스프링 시큐리티는 전체 설정을 바꿀 수 있는 LDAP provider를 제공한다. 인증을 처리할 때와 role을 조회할 때는 별도의 전략 인터페이스를 사용하며, 다양한 상황에서 설정할 수 있는 디폴트 구현체를 제공한다.
Prerequisites
스프링 시큐리티에서 LDAP을 적용하기 전에 먼저 LDAP을 숙지해야 한다. 이 페이지에선 관련 개념을 소개하고 무료 LDAP 서버 OpenLDAP으로 디렉토리를 설정하는 가이드를 제공하고 있다: https://www.zytrax.com/books/ldap/. 자바에서 LDAP에 접근할 때 사용하는 JNDI API를 알아두면 유용할 때도 있다. 스프링 시큐리티의 LDAP provider에선 외부 LDAP 라이브러리를 사용하지 않지만 (Mozilla, JLDAP 등), 스프링 LDAP을 종합적으로 사용하므로 스프링 LDAP 프로젝트를 잘 알아두면 커스텀할 때 도움이 될 것이다.
LDAP 인증을 사용한다면 LDAP 커넥션 풀을 제대로 설정하는 것도 중요하다. 방법을 잘 모르겠다면 자바 LDAP 문서를 참고하라.
Setting up an Embedded LDAP Server
가장 먼저 설정에서 가리킬 LDAP 서버가 필요하다. 보통 임베디드 LDAP 서버로 시작하는 게 가장 간단하다. 스프링 시큐리티는 두 가지 임베디드 서버를 지원한다:
아래 있는 샘플은 password란 비밀번호를 가진 user와 admin 사용자로 임베디드 LDAP 서버를 초기화하며, 이 users.ldif 파일은 클래스패스 리소스에서도 볼 수 있다.
users.ldif
dn: ou=groups,dc=springframework,dc=org
objectclass: top
objectclass: organizationalUnit
ou: groups

dn: ou=people,dc=springframework,dc=org
objectclass: top
objectclass: organizationalUnit
ou: people

dn: uid=admin,ou=people,dc=springframework,dc=org
objectclass: top
objectclass: person
objectclass: organizationalPerson
objectclass: inetOrgPerson
cn: Rod Johnson
sn: Johnson
uid: admin
userPassword: password

dn: uid=user,ou=people,dc=springframework,dc=org
objectclass: top
objectclass: person
objectclass: organizationalPerson
objectclass: inetOrgPerson
cn: Dianne Emu
sn: Emu
uid: user
userPassword: password

dn: cn=user,ou=groups,dc=springframework,dc=org
objectclass: top
objectclass: groupOfNames
cn: user
uniqueMember: uid=admin,ou=people,dc=springframework,dc=org
uniqueMember: uid=user,ou=people,dc=springframework,dc=org

dn: cn=admin,ou=groups,dc=springframework,dc=org
objectclass: top
objectclass: groupOfNames
cn: admin
uniqueMember: uid=admin,ou=people,dc=springframework,dc=org
Embedded UnboundID Server
UnboundID를 사용하려면 아래 의존성을 추가해라:
Example 67. UnboundID Dependencies
<dependency>
    <groupId>com.unboundid</groupId>
    <artifactId>unboundid-ldapsdk</artifactId>
    <version>4.0.14</version>
    <scope>runtime</scope>
</dependency>
depenendencies {
    runtimeOnly "com.unboundid:unboundid-ldapsdk:4.0.14"
}
그러면 임베디드 LDAP 서버를 설정할 수 있다.
Example 68. Embedded LDAP Server Configuration
@Bean
UnboundIdContainer ldapContainer() {
    return new UnboundIdContainer("dc=springframework,dc=org",
                "classpath:users.ldif");
}
<b:bean class="org.springframework.security.ldap.server.UnboundIdContainer"
    c:defaultPartitionSuffix="dc=springframework,dc=org"
    c:ldif="classpath:users.ldif"/>
@Bean
fun ldapContainer(): UnboundIdContainer {
    return UnboundIdContainer("dc=springframework,dc=org","classpath:users.ldif")
}
Embedded ApacheDS Server
스프링 시큐리티에서 사용하는 ApacheDS 1.x는 더 이상 유지보수하지 않고 있다. 안타깝게도 ApacheDS 2.x는 안정화된 릴리즈 버전은 없으며 마일스톤 버전만 있다. ApacheDS 2.x의 안정화된 릴리즈 버전이 배포되면 업데이트를 고려해 보겠다.
Apache DS를 사용하려면 아래 의존성을 추가해라:
Example 69. ApacheDS Dependencies
<dependency>
    <groupId>org.apache.directory.server</groupId>
    <artifactId>apacheds-core</artifactId>
    <version>1.5.5</version>
    <scope>runtime</scope>
</dependency>
<dependency>
    <groupId>org.apache.directory.server</groupId>
    <artifactId>apacheds-server-jndi</artifactId>
    <version>1.5.5</version>
    <scope>runtime</scope>
</dependency>
depenendencies {
    runtimeOnly "org.apache.directory.server:apacheds-core:1.5.5"
    runtimeOnly "org.apache.directory.server:apacheds-server-jndi:1.5.5"
}
그러면 임베디드 LDAP 서버를 설정할 수 있다.
Example 70. Embedded LDAP Server Configuration
@Bean
ApacheDSContainer ldapContainer() {
    return new ApacheDSContainer("dc=springframework,dc=org",
                "classpath:users.ldif");
}
<b:bean class="org.springframework.security.ldap.server.ApacheDSContainer"
    c:defaultPartitionSuffix="dc=springframework,dc=org"
    c:ldif="classpath:users.ldif"/>
@Bean
fun ldapContainer(): ApacheDSContainer {
    return ApacheDSContainer("dc=springframework,dc=org", "classpath:users.ldif")
}
LDAP ContextSource
LDAP 서버를 설정했다면, 스프링 시큐리티에서도 사용자를 인증할 때 사용할 LDAP 서버를 가리키도록 해야 한다. LDAP ContextSource를 생성하면 되는데, 이는 JDBC의 DataSource와 동일하다고 보면 된다.
ContextSource contextSource(UnboundIdContainer container) {
    return new DefaultSpringSecurityContextSource("ldap://localhost:53389/dc=springframework,dc=org");
}
<ldap-server
    url="ldap://localhost:53389/dc=springframework,dc=org" />
fun contextSource(container: UnboundIdContainer): ContextSource {
    return DefaultSpringSecurityContextSource("ldap://localhost:53389/dc=springframework,dc=org")
}
Authentication
LDAP bind 인증을 사용하면 클라이언트에선 비밀번호는 물론, 비밀번호 해시값도 조회할 수 없으므로, 스프링 시큐리티에선 LDAP 인증에 UserDetailsService를 사용하지 않는다. 즉, 스프링 시큐리티가 직접 비밀번호를 조회해서 인증하진 못한다.
그대신 LDAP 전용 LdapAuthenticator 인터페이스를 지원한다. LdapAuthenticator는 필요한 모든 사용자의 속성을 조회하는 일도 담당한다. 사용하는 인증 유형에 따라 속성에 대한 권한이 다르기 때문이다. 예를 들어 사용자로 바인딩한다면 사용자의 permission으로 읽어야 할 수 있다.
스프링 시큐리티는 두 가지 LdapAuthenticator 구현체를 제공한다.
Using Bind Authentication
Bind 인증은 LDAP에서 가장 많이 사용하는 사용자 인증 메커니즘이다. bind 인증에선 LDAP 서버로 사용자 credential을 (i.e. username/password) 전송하고, 서버에서 이를 인증한다. bind 인증의 장점은 사용자의 비밀 정보를 (i.e. 비밀번호) 클라이언트에 노출할 필요가 없어서 유출될 가능성이 적다는 것이다.
다음은 bind 인증 설정 예시다:
Example 72. Bind Authentication
@Bean
BindAuthenticator authenticator(BaseLdapPathContextSource contextSource) {
    BindAuthenticator authenticator = new BindAuthenticator(contextSource);
    authenticator.setUserDnPatterns(new String[] { "uid={0},ou=people" });
    return authenticator;
}

@Bean
LdapAuthenticationProvider authenticationProvider(LdapAuthenticator authenticator) {
    return new LdapAuthenticationProvider(authenticator);
}
<ldap-authentication-provider
    user-dn-pattern="uid={0},ou=people"/>
@Bean
fun authenticator(contextSource: BaseLdapPathContextSource): BindAuthenticator {
    val authenticator = BindAuthenticator(contextSource)
    authenticator.setUserDnPatterns(arrayOf("uid={0},ou=people"))
    return authenticator
}

@Bean
fun authenticationProvider(authenticator: LdapAuthenticator): LdapAuthenticationProvider {
    return LdapAuthenticationProvider(authenticator)
}
이 예제에서는 설정 패턴에 로그인한 사용자 이름을 반영하고, 비밀번호와 함께 사용자로 바인딩해 해당 사용자의 DN을 가져온다. 이 방법은 모든 사용자를 디렉토리 내 단일 노드에 저장했을 때 사용하는 방법이다. 사용자 위치를 찾기 위한 LDAP 검색 필터를 설정하려면 아래처럼 사용해야 한다:
Example 73. Bind Authentication with Search Filter
@Bean
BindAuthenticator authenticator(BaseLdapPathContextSource contextSource) {
    String searchBase = "ou=people";
    String filter = "(uid={0})";
    FilterBasedLdapUserSearch search =
        new FilterBasedLdapUserSearch(searchBase, filter, contextSource);
    BindAuthenticator authenticator = new BindAuthenticator(contextSource);
    authenticator.setUserSearch(search);
    return authenticator;
}

@Bean
LdapAuthenticationProvider authenticationProvider(LdapAuthenticator authenticator) {
    return new LdapAuthenticationProvider(authenticator);
}
<ldap-authentication-provider
        user-dn-pattern="uid={0},ou=people">
    <password-compare />
</ldap-authentication-provider>
@Bean
fun authenticator(contextSource: BaseLdapPathContextSource): BindAuthenticator {
    val searchBase = "ou=people"
    val filter = "(uid={0})"
    val search = FilterBasedLdapUserSearch(searchBase, filter, contextSource)
    val authenticator = BindAuthenticator(contextSource)
    authenticator.setUserSearch(search)
    return authenticator
}

@Bean
fun authenticationProvider(authenticator: LdapAuthenticator): LdapAuthenticationProvider {
    return LdapAuthenticationProvider(authenticator)
}
위에서 정의한 ContextSource를 사용하면 DN ou=people,dc=springframework,dc=org에서 (uid={0}) 필터로 검색할 것이다. 다시 한 번 말하자면, 필터 이름 안에 있는 파라미터는 로그인한 사용자 이름으로 대체되기 때문에 사용자 이름과 동일한 uid 속성을 가진 엔트리를 검색할 것이다. search base를 제공하지 않으면 루트에서 검색한다.
Using Password Authentication
비밀번호 비교 방식은 사용자가 제공한 비밀번호와 레포지토리에 저장된 비밀번호를 비교한다. 로컬에서 비밀번호 속성을 조회하고 검사할 수도 있고, LDAP “compare” 연산자를 실행해서 사용자가 제공한 비밀번호를 서버로 보내 서버에서 비교하고, 로컬에서는 실제 비밀번호를 조회하지 않는 방법도 있다. 비밀번호를 랜덤 솔트(salt)와 함께 해싱했다면 LDAP compare를 실행할 수 없다.
Example 74. Minimal Password Compare Configuration
@Bean
PasswordComparisonAuthenticator authenticator(BaseLdapPathContextSource contextSource) {
    return new PasswordComparisonAuthenticator(contextSource);
}

@Bean
LdapAuthenticationProvider authenticationProvider(LdapAuthenticator authenticator) {
    return new LdapAuthenticationProvider(authenticator);
}
<ldap-authentication-provider
        user-dn-pattern="uid={0},ou=people">
    <password-compare />
</ldap-authentication-provider>
@Bean
fun authenticator(contextSource: BaseLdapPathContextSource): PasswordComparisonAuthenticator {
    return PasswordComparisonAuthenticator(contextSource)
}

@Bean
fun authenticationProvider(authenticator: LdapAuthenticator): LdapAuthenticationProvider {
    return LdapAuthenticationProvider(authenticator)
}
다음은 일부를 커스텀한 고급 설정 예시다:
Example 75. Password Compare Configuration
@Bean
PasswordComparisonAuthenticator authenticator(BaseLdapPathContextSource contextSource) {
    PasswordComparisonAuthenticator authenticator =
        new PasswordComparisonAuthenticator(contextSource);
    authenticator.setPasswordAttributeName("pwd"); // (1)
    authenticator.setPasswordEncoder(new BCryptPasswordEncoder()); // (2)
    return authenticator;
}

@Bean
LdapAuthenticationProvider authenticationProvider(LdapAuthenticator authenticator) {
    return new LdapAuthenticationProvider(authenticator);
}
<ldap-authentication-provider
        user-dn-pattern="uid={0},ou=people">
    <password-compare password-attribute="pwd"> <!-- (1) -->
        <password-encoder ref="passwordEncoder" /> <!-- (2) -->
    </password-compare>
</ldap-authentication-provider>
<b:bean id="passwordEncoder"
    class="org.springframework.security.crypto.bcrypt.BCryptPasswordEncoder" />
@Bean
fun authenticator(contextSource: BaseLdapPathContextSource): PasswordComparisonAuthenticator {
    val authenticator = PasswordComparisonAuthenticator(contextSource)
    authenticator.setPasswordAttributeName("pwd") // (1)
    authenticator.setPasswordEncoder(BCryptPasswordEncoder()) // (2)
    return authenticator
}

@Bean
fun authenticationProvider(authenticator: LdapAuthenticator): LdapAuthenticationProvider {
    return LdapAuthenticationProvider(authenticator)
}
(1) 비밀번호 속성을 pwd로 지정한다.
(2) BCryptPasswordEncoder를 사용한다.
LdapAuthoritiesPopulator
스프링 시큐리티는 LdapAuthoritiesPopulator로 사용자에게 돌려줄 권한을 결정한다.
Example 76. Minimal Password Compare Configuration
@Bean
LdapAuthoritiesPopulator authorities(BaseLdapPathContextSource contextSource) {
    String groupSearchBase = "";
    DefaultLdapAuthoritiesPopulator authorities =
        new DefaultLdapAuthoritiesPopulator(contextSource, groupSearchBase);
    authorities.setGroupSearchFilter("member={0}");
    return authorities;
}

@Bean
LdapAuthenticationProvider authenticationProvider(LdapAuthenticator authenticator, LdapAuthoritiesPopulator authorities) {
    return new LdapAuthenticationProvider(authenticator, authorities);
}
<ldap-authentication-provider
    user-dn-pattern="uid={0},ou=people"
    group-search-filter="member={0}"/>
@Bean
fun authorities(contextSource: BaseLdapPathContextSource): LdapAuthoritiesPopulator {
    val groupSearchBase = ""
    val authorities = DefaultLdapAuthoritiesPopulator(contextSource, groupSearchBase)
    authorities.setGroupSearchFilter("member={0}")
    return authorities
}

@Bean
fun authenticationProvider(authenticator: LdapAuthenticator, authorities: LdapAuthoritiesPopulator): LdapAuthenticationProvider {
    return LdapAuthenticationProvider(authenticator, authorities)
}
Active Directory
Active Directory는 자체 비표준 인증 옵션을 지원하며, 일반적인 사용 패턴이 표준 LdapAuthenticationProvider에 그렇게 들어 맞지는 않는다. 보통 LDAP의 distinguished name이 아닌 도메인 username으로 (user@domain 양식) 인증한다. 스프링 시큐리티는 편의를 위해 전형적인 Active Directory 설정으로 커스텀한 인증 provider를 제공한다.
ActiveDirectoryLdapAuthenticationProvider 설정은 꽤 간단하다. 도메인 이름과 서버 주소를 제공할 LDAP URL만 설정하면 된다. 다음은 설정 예시이다:
Example 77. Example Active Directory Configuration
@Bean
ActiveDirectoryLdapAuthenticationProvider authenticationProvider() {
    return new ActiveDirectoryLdapAuthenticationProvider("example.com", "ldap://company.example.com/");
}
<bean id="authenticationProvider"
        class="org.springframework.security.ldap.authentication.ad.ActiveDirectoryLdapAuthenticationProvider">
    <constructor-arg value="example.com" />
    <constructor-arg value="ldap://company.example.com/" />
</bean>
@Bean
fun authenticationProvider(): ActiveDirectoryLdapAuthenticationProvider {
    return ActiveDirectoryLdapAuthenticationProvider("example.com", "ldap://company.example.com/")
}
10.11. Session Management
HTTP 세션 관련 기능은 SessionManagementFilter와, 이 필터가 위임하는 SessionAuthenticationStrategy 인터페이스가 처리한다. 전형적으로 session-fixation 공격을 방어하고, 세션 타임아웃을 감지하고, 인증된 사용자가 동시에 열 수 있는 세션 수를 제한하는 등에 사용한다.
10.11.1. Detecting Timeouts
스프링 시큐리티는 유효하지 않은 세션 ID를 제출하면 이를 감지해서 적절한 URL로 리다이렉트할 수 있다. 이는 session-management 요소로 설정한다.
<http>
...
<session-management invalid-session-url="/invalidSession.htm" />
</http>
이 메커니즘으로 세션 타임아웃도 감지하도록 설정했다면, 로그아웃한 사용자가 브라우저를 닫지 않고 다시 로그인했을 때 에러로 오인할 수 있다. 세션을 무효화할 때 세션 쿠키를 비우지 않으면 로그아웃했더라도 같은 쿠키를 제출하기 때문이다. 아래와 같은 방식으로 로그아웃할 때 로그아웃 핸들러에서 JSESSIONID 쿠키를 제거할 수 있다.
<http>
<logout delete-cookies="JSESSIONID" />
</http>
안타깝게도 모든 서블릿 컨테이너에서 동작하는지는 보장할 수 없으므로, 맞는 환경에서 테스트해봐야 한다.
어플리케이션 앞단에 프록시가 있다면 프록시 서버 설정으로도 세션 쿠키를 삭제할 수 있다. 예를 들어 아래와 같이 로그아웃 요청에 대한 응답에서 아파치 HTTPD의 mod_headers로
JSESSIONID쿠키를 만료시킬 수 있다 (어플리케이션을/tutorial경로로 배포했다고 가정):<LocationMatch "/tutorial/logout"> Header always set Set-Cookie "JSESSIONID=;Path=/tutorial;Expires=Thu, 01 Jan 1970 00:00:00 GMT" </LocationMatch>
10.11.2. Concurrent Session Control
스프링 시큐리티에서는 간단하게 몇 가지만 추가하면 같은 사용자가 여러 번 로그인할 수 없도록 제한할 수 있다. 먼저 web.xml 파일에 아래 리스너를 추가하면, 스프링 시큐리티는 세션 라이프사이클 이벤트를 통지받는다:
<listener>
<listener-class>
    org.springframework.security.web.session.HttpSessionEventPublisher
</listener-class>
</listener>
그 다음 어플리케이션 컨텍스트에 다음을 추가해라:
<http>
...
<session-management>
    <concurrency-control max-sessions="1" />
</session-management>
</http>
이렇게 하면 같은 사용자는 로그인을 여러 번 할 수 없다 - 이후 다시 로그인하면 그 전 로그인을 무효로 만든다. 재로그인을 아예 방지하려면 다음과 같이 사용해라:
<http>
...
<session-management>
    <concurrency-control max-sessions="1" error-if-maximum-exceeded="true" />
</session-management>
</http>
이제 두 번째 로그인부터는 거부한다. “거부”란, 폼 기반으로 로그인한 사용자는 authentication-failure-url로 이동됨을 의미한다. 두 번째 인증이 “remember-me”같은, 상호작용이 없는 다른 메커니즘을 통한 인증이었다면, “unauthorized” (401) 에러로 응답한다. 에러 페이지가 따로 있다면 session-management 요소에 session-authentication-error-url 속성을 추가하면 된다.
폼 기반 로그인에서 사용하는 커스텀 인증 필터가 따로 있다면, 세션 동시 제어 설정을 명시해야 한다. 자세한 정보는 세션 관리 챕터를 참고하라.
10.11.3. Session Fixation Attack Protection
Session fixation 공격은 사이트에 접근해서 세션을 생성한 뒤, 다른 사용자가 이 세션으로 로그인하도록 유도한다 (세션 식별자를 파라미터로 가지고 있는 링크를 보내는 식으로). 스프링 시큐리티는 사용자가 로그인하면 자동으로 새 세션을 만들거나, 세션 ID를 바꿔서 이 공격을 방어한다. 방어할 필요 없거나 다른 요구사항과 충돌된다면, <session-management>의 session-fixation-protection 속성으로 설정을 바꿀 수 있다. 사용할 수 있는 옵션은 네 가지다.
none- 아무 일도 하지 않는다. 기존 세션을 유지한다.newSession- “깨끗한” 새 세션을 만들고 기존 세션 데이터는 복사해 가지 않는다 (스프링 시큐리티 관련 속성은 복사한다).migrateSession- 새 세션을 만들고 기존 세션 속성을 모두 새 세션으로 복사한다. 서블릿 3.0과 이전 컨테이너에서 디폴트로 사용한다.changeSessionId- 새 세션을 만들지 않는다. 대신에 서블릿 컨테이너가 제공하는 방식으로 session fixation 공격을 방어한다 (HttpServletRequest#changeSessionId()). 이 옵션은 서블릿 3.1 (자바 EE 7)과 그 이상의 컨테이너에서만 사용할 수 있다. 구버전 컨테이너에서 이 옵션을 사용하면 예외가 발생한다. 서블릿 3.1과 이후 컨테이너에서 디폴트로 사용한다.
session fixation을 방어할 땐 어플리케이션 컨텍스트에서 SessionFixationProtectionEvent가 발생한다. changeSessionId 옵션으로 설정하면 모든 javax.servlet.http.HttpSessionIdListener에도 통보하므로, 어플리케이션이 두 이벤트를 모두 수신 중이라면 주의해서 사용해야 한다. 추가 정보는 세션 관리 챕터를 확인하라.
10.11.4. SessionManagementFilter
SessionManagementFilter는 SecurityContextRepository 컨텐츠를 SecurityContextHolder에 있는 현재 컨텐츠와 비교해서 현재 요청을 처리하는 동안 사용자를 인증했는지를 확인한다. 보통은 pre-authentication이나 remember-me같은 상호작용이 없는 인증에서 사용한다. 필터는 레포지토리에 인증 컨텍스트가 있으면 아무런 처리도 하지 않는다. 반대로 레포지토리에 인증 컨텍스트가 없고 스레드 로컬 SecurityContext에 (익명이 아닌) Authentication 객체가 있다면, 이전 필터에서 인증한 것으로 간주한다. 이땐 설정해둔 SessionAuthenticationStrategy를 실행한다.
현재 사용자가 인증된 사용자가 아니면 필터는 유효하지 않은 세션 ID로 요청됐는지 확인해서 (예를 들어 타임아웃 등으로) 설정해둔 InvalidSessionStrategy가 있으면 실행한다. 보통은 고정된 URL로 리다이렉트하는 식으로 가장 많이 사용하며, 표준 구현체 SimpleRedirectInvalidSessionStrategy로 캡슐화한다. 후자는 앞에서 설명한 것처럼 네임스페이스로 유효하지 않은 세션 요청을 리다이렉트할 URL을 설정할 때도 사용한다.
10.11.5. SessionAuthenticationStrategy
SessionAuthenticationStrategy는 SessionManagementFilter, AbstractAuthenticationProcessingFilter 둘 다 사용하므로 커스텀 폼 로그인 클래스를 만드는 등의 상황에선 둘 모두에 주입해줘야 한다. 네임스페이스와 커스텀 빈을 결합하는 전형적인 설정은 다음과 같다:
<http>
<custom-filter position="FORM_LOGIN_FILTER" ref="myAuthFilter" />
<session-management session-authentication-strategy-ref="sas"/>
</http>

<beans:bean id="myAuthFilter" class=
"org.springframework.security.web.authentication.UsernamePasswordAuthenticationFilter">
    <beans:property name="sessionAuthenticationStrategy" ref="sas" />
    ...
</beans:bean>

<beans:bean id="sas" class=
"org.springframework.security.web.authentication.session.SessionFixationProtectionStrategy" />
디폴트 SessionFixationProtectionStrategy를 사용한다면, HttpSessionBindingListener를 구현한 빈을 세션에 저장하면 제대로 동작하지 않을 수 있으며, 스프링 세션 스코프 빈도 마찬가지다. 자세한 정보는 SessionFixationProtectionStrategy Javadoc을 참고해라.
10.11.6. Concurrency Control
스프링 시큐리티는 사용자(principal)가 같은 어플리케이션에 동시에 인증할 수 있는 횟수를 제한할 수 있다. 많은 ISV는 이를 사용해서 라이센스를 관리하며, 네트워크 관리자들은 이를 통해 사람들이 로그인 이름을 공유하는 것을 막는다. 예를 들어 “Batman”이란 사용자가 세션 2개로 웹 어플리케이션에 로그인하지 못하게 막을 수 있다. 이전 로그인을 만료시키거나 재로그인 시 에러를 발생시키는 식으로 말이다. 두 번째 방법을 사용한다면 직접 로그아웃하지 않은 사용자는 (예를 들어 단순히 브라우저를 닫은 경우) 기존 세션이 만료되기 전까진 다시 로그인 할 수 없다는 점에 주의해야 한다.
동시성 제어는 네임스페이스로 지원한다. 최소 설정은 이전 네임스페이스 챕터를 확인하라. 설정 일부를 커스텀해야 할 수도 있다.
동시성 제어는 SessionAuthenticationStrategy를 구현한 ConcurrentSessionControlAuthenticationStrategy가 담당한다.
이전에는
ProviderManager에ConcurrentSessionController를 설정해서 동시 인증을 체크했다.ConcurrentSessionController는 사용자가 허용하는 세션 횟수를 넘겼는지 체크한다. 하지만 이 방법은 HTTP 세션을 미리 만들어야 해서 바람직하지 않다. 스프링 시큐리티 3에서는AuthenticationManager가 먼저 사용자를 인증한 다음, 인증에 성공하면 세션을 만들고 다른 세션을 열 수 있는지를 체크한다.
동시 세션을 제어하려면 먼저 web.xml에 다음을 추가해야 한다:
<listener>
    <listener-class>
    org.springframework.security.web.session.HttpSessionEventPublisher
    </listener-class>
</listener>
그다음 FilterChainProxy에 ConcurrentSessionFilter를 추가해야 한다. ConcurrentSessionFilter는 생성자에 2개의 인자가 필요하다. 일반적으로 SessionRegistryImpl을 가리키는 sessionRegistry와, 세션 만료 시 적용할 전략을 정의하는 sessionInformationExpiredStrategy다. 다음은 네임스페이스로 FilterChainProxy와 다른 디폴트 빈을 설정하는 예시다:
<http>
<custom-filter position="CONCURRENT_SESSION_FILTER" ref="concurrencyFilter" />
<custom-filter position="FORM_LOGIN_FILTER" ref="myAuthFilter" />

<session-management session-authentication-strategy-ref="sas"/>
</http>

<beans:bean id="redirectSessionInformationExpiredStrategy"
class="org.springframework.security.web.session.SimpleRedirectSessionInformationExpiredStrategy">
<beans:constructor-arg name="invalidSessionUrl" value="/session-expired.htm" />
</beans:bean>

<beans:bean id="concurrencyFilter"
class="org.springframework.security.web.session.ConcurrentSessionFilter">
<beans:constructor-arg name="sessionRegistry" ref="sessionRegistry" />
<beans:constructor-arg name="sessionInformationExpiredStrategy" ref="redirectSessionInformationExpiredStrategy" />
</beans:bean>

<beans:bean id="myAuthFilter" class=
"org.springframework.security.web.authentication.UsernamePasswordAuthenticationFilter">
<beans:property name="sessionAuthenticationStrategy" ref="sas" />
<beans:property name="authenticationManager" ref="authenticationManager" />
</beans:bean>

<beans:bean id="sas" class="org.springframework.security.web.authentication.session.CompositeSessionAuthenticationStrategy">
<beans:constructor-arg>
    <beans:list>
    <beans:bean class="org.springframework.security.web.authentication.session.ConcurrentSessionControlAuthenticationStrategy">
        <beans:constructor-arg ref="sessionRegistry"/>
        <beans:property name="maximumSessions" value="1" />
        <beans:property name="exceptionIfMaximumExceeded" value="true" />
    </beans:bean>
    <beans:bean class="org.springframework.security.web.authentication.session.SessionFixationProtectionStrategy">
    </beans:bean>
    <beans:bean class="org.springframework.security.web.authentication.session.RegisterSessionAuthenticationStrategy">
        <beans:constructor-arg ref="sessionRegistry"/>
    </beans:bean>
    </beans:list>
</beans:constructor-arg>
</beans:bean>

<beans:bean id="sessionRegistry"
    class="org.springframework.security.core.session.SessionRegistryImpl" />
web.xml에 리스너를 추가하면 HttpSession을 시작하고 종료할 때마다 스프링 ApplicationContext에 ApplicationEvent를 발생시킨다. 세션이 끝나면 SessionRegistryImpl에 통지할 수 있기 때문에 매우 중요한 기능이다. 리스너가 없다면, 세션 허용치를 초과한 사용자는 다른 세션을 로그아웃하거나 타임아웃이 나도 절대 다시 로그인할 수 없을 것이다.
Querying the SessionRegistry for currently authenticated users and their sessions
네임스페이스을 사용했던 일반 빈을 사용했던, 동시성 제어를 설정했다면 어플리케이션에서 직접 SessionRegistry를 참조할 수 있다. 따라서 사용자의 세션 수를 제한하고 싶지 않더라도 동시성 제어를 설정하는 건 나름의 가치가 있다. 세션을 제한하지 않으려면 maximumSession 프로퍼티를 -1로 설정하면 된다. 네임스페이스를 사용한다면 session-registry-alias 속성으로 내부에서 생성한 SessionRegistry의 alias를 설정할 수 있으며, 다른 원하는 빈에 주입할 때 참조로 사용할 수 있다.
getAllPrincipals() 메소드는 현재 인증된 사용자 리스트를 제공한다. getAllSessions(Object principal, boolean includeExpiredSessions) 메소드는 사용자의 세션 리스트를 SessionInformation 객체 리스트로 리턴한다. SessionInformation 인스턴스의 expireNow() 메소드를 호출하면 세션을 만료시킬 수도 있다. 세션을 만료시키면 사용자가 다시 돌아왔을 때는 다른 작업을 이어갈 수 없다. 어드민성 어플리케이션 등에선 이 메런 메소드가 유용할 것이다. 자세한 정보는 Javadoc을 참고하라.
10.12. Remember-Me Authentication
10.12.1. Overview
Remember-me 또는 persistent-login 인증은 인증 주체(principal)의 식별자를 기억하고 여러 세션에 사용할 수 있는 웹사이트를 말한다. 보통 브라우저에서 전송한 쿠키를 이후 세션에서 감지하고 자동으로 로그인하는 식으로 동작한다. 스프링 시큐리티는 이를 위한 훅과 두 가지 remember-me 구현체를 제공한다. 구현체 하나는 해시처리한 쿠키로 토큰을 유지하고, 다른 하나는 데이터베이스 등의 영구 스토리지 메커니즘으로 토큰을 저장한다.
두 구현체 모두 UserDetailsService가 있어야 한다는 점을 주의해라. UserDetailsService를 사용하지 않는 인증 provider를 쓴다면 (LDAP provider 등), 어플리케이션 컨텍스트에 UserDetailsService 빈을 따로 추가해야 한다.
10.12.2. Simple Hash-Based Token Approach
이 방법은 해시를 사용해서 remember-me 전략을 구현한다. 쿠키 자체는 인증 상호작용에 성공하면 브라우저가 보내는 값이며, 다음과 같이 구성된다:
base64(username + ":" + expirationTime + ":" +
md5Hex(username + ":" + expirationTime + ":" password + ":" + key))

username:          UserDetailsService에서 식별자로 사용
password:          UserDetailsService가 리턴한 UserDetails 안에 있는 값과 비교
expirationTime:    밀리세컨드로 표현한 remember-me 토큰의 만료 시각
key:               remember-me 토큰 수정을 방지할 개인키
따라서 remember-me 토큰은 명시한 기간에만 유효하며, 사용자 이름이나 비밀번호, 키가 변경되면 더 이상 유효하지 않다. 특히 remember-me 토큰은 유출되면 만료되기 전까지 모든 user agent에서 사용할 수 있다는 보안 이슈가 있다. 다이제스트 인증을 사용할 때와 같은 이슈다. 사용자(principal)가 토큰이 탈취됐음을 알 수 있다면 비밀번호를 바꿔서 즉시 모든 remember-me 토큰을 무효화시킬 수 있다. 보안이 더 중요한 서비스라면 다음 섹션에 있는 방법을 사용해야 한다. 아니면 차라리 remember-me 인증을 사용하지 말아야 한다.
네임스페이스 설정 챕터에 있는 주제가 익숙하다면, <remember-me> 요소만 더하면 remember-me 인증을 활성화할 수 있다:
<http>
...
<remember-me key="myAppKey"/>
</http>
보통은 자동으로 UserDetailsService를 선택한다. 어플리케이션에 UserDetailsService가 둘 이상이라면 user-service-ref 속성에 UserDetailsService 사용할 빈 이름을 지정해야 한다.
10.12.3. Persistent Token Approach
이 방법은 http://jaspan.com/improved_persistent_login_cookie_best_practice 문서 내용을 기반으로 동작하며, 사소하게 수정된 부분도 있다. 네임스페이스 설정으로 이 방법을 사용하려면 데이터소스 레퍼런스를 제공해야 한다:
<http>
...
<remember-me data-source-ref="someDataSource"/>
</http>
데이터베이스엔 아래 SQL로 생성한 (또는 이에 상응하는) persistent_logins 테이블이 있어야 한다:
create table persistent_logins (username varchar(64) not null,
                                series varchar(64) primary key,
                                token varchar(64) not null,
                                last_used timestamp not null)
10.12.4. Remember-Me Interfaces and Implementations
Remember-me는 UsernamePasswordAuthenticationFilter와 함께 사용하며, AbstractAuthenticationProcessingFilter 클래스에 있는 훅으로 구현한다. BasicAuthenticationFilter와도 사용할 수 있다. 훅에선 적당할 때 RememberMeServices 구현체를 실행한다. RememberMeServices 인터페이스는 다음과 같다:
Authentication autoLogin(HttpServletRequest request, HttpServletResponse response);

void loginFail(HttpServletRequest request, HttpServletResponse response);

void loginSuccess(HttpServletRequest request, HttpServletResponse response,
    Authentication successfulAuthentication);
여기선 AbstractAuthenticationProcessingFilter는 loginFail()과 loginSuccess()만 호출한다는 점만 기억해두자. 메소드가 하는 일은 Javadoc에 자세히 나와 있다. RememberMeAuthenticationFilter는 SecurityContextHolder에 Authentication이 없으면 항상 autoLogin() 메소드를 호출한다. 따라서 이 필터가 기본적인 remember-me 기능을 제공하며, 인증 관련 이벤트를 통지해주고, 웹 요청에 있는 쿠키를 기억해야 할 땐 구현체에 위임해 준다. 이 설계 덕분에 remember-me 구현 전략은 얼마든지 적용할 수 있다. 위에서 스프링 시큐리티는 두 가지 구현체를 제공한다고 했는데, 이제 차례대로 살펴볼 것이다.
TokenBasedRememberMeServices
이 구현체는 Simple Hash-Based Token Approach에서 설명한 더 간단한 방식을 구현한다. TokenBasedRememberMeServices는 RememberMeAuthenticationToken을 생성하며, 이는 RememberMeAuthenticationProvider가 처리한다. 이 인증 provider와 TokenBasedRememberMeServices는 key를 공유한다. TokenBasedRememberMeServices는 서명을 비교할 때 사용자 이름과 비밀번호를 조회할 UserDetailsService 하나가 필요하며, 정확한 GrantedAuthority 컬렉션을 가지고 있는 RememberMeAuthenticationToken을 생성한다. 로그아웃 명령은 사용자가 요청했을 때 어플리케이션에서 쿠키를 무효화하는 식으로 구현해야 한다. TokenBasedRememberMeServices는 스프링 시큐리티의 LogoutHandler도 구현하고 있기 때문에 LogoutFilter를 함께 사용하면 자동으로 쿠키를 비울 수 있다.
remember-me 서비스를 활성화하려면 다음과 같은 빈을 어플리케이션 컨텍스트에 추가해야 한다:
<bean id="rememberMeFilter" class=
"org.springframework.security.web.authentication.rememberme.RememberMeAuthenticationFilter">
<property name="rememberMeServices" ref="rememberMeServices"/>
<property name="authenticationManager" ref="theAuthenticationManager" />
</bean>

<bean id="rememberMeServices" class=
"org.springframework.security.web.authentication.rememberme.TokenBasedRememberMeServices">
<property name="userDetailsService" ref="myUserDetailsService"/>
<property name="key" value="springRocks"/>
</bean>

<bean id="rememberMeAuthenticationProvider" class=
"org.springframework.security.authentication.RememberMeAuthenticationProvider">
<property name="key" value="springRocks"/>
</bean>
RememberMeServices 구현체는 UsernamePasswordAuthenticationFilter.setRememberMeServices() 프로퍼티에, RememberMeAuthenticationProvider는 AuthenticationManager.setProviders() 리스트에, RememberMeAuthenticationFilter는 FilterChainProxy에 (보통 UsernamePasswordAuthenticationFilter 바로 다음에) 추가해야한 다는 점을 잊지 말자.
PersistentTokenBasedRememberMeServices
이 클래스도 TokenBasedRememberMeServices처럼 사용할 수 있지만, 토큰을 저장할 PersistentTokenRepository를 추가로 설정해야 한다. 표준 구현체는 두 가지가 있다:
- 테스트 전용
InMemoryTokenRepositoryImpl - 데이터베이스에 토큰을 저장하는
JdbcTokenRepositoryImpl
데이터베이스 스키마는 위의 Persistent Token Approach 섹션에 나와 있다.
10.13. OpenID Support
네임스페이스는 OpenID 로그인을 지원하며, 일반적인 폼 기반 로그인을 약간만 바꿔서 함께 사용할 수도 있다.
<http>
<intercept-url pattern="/**" access="ROLE_USER" />
<openid-login />
</http>
그다음엔 OpenID provider에 사용할 사이트를 등록하고 (myopenid.com 등) 인메모리 <user-service>에 사용자 정보를 추가해야 한다:
<user name="https://jimi.hendrix.myopenid.com/" authorities="ROLE_USER" />
인증하려면 myopenid.com 사이트로 로그인할 수 있어야 한다. openid-login 요소에 있는 user-service-ref 속성을 설정하면 OpenID를 사용할 UserDetailsService를 지정할 수 있다. 위에 있는 사용자 데이터는 해당 사용자의 권한을 로드할때만 사용하기 때문에, 비밀번호 속성은 생략했다. 내부에서 랜덤 비밀번호를 생성해서, 다른 설정에서 실수로 이 사용자 데이터로 인증하지 않도록 방지한다.
10.13.1. Attribute Exchange
OpenID attribute exchange를 지원한다. 예를 들어 다음 설정은 OpenID provider로부터 이메일과 성명(full name)을 받아오기 위한 어플리케이션 설정이다:
<openid-login>
<attribute-exchange>
    <openid-attribute name="email" type="https://axschema.org/contact/email" required="true"/>
    <openid-attribute name="name" type="https://axschema.org/namePerson"/>
</attribute-exchange>
</openid-login>
각 OpenID 속성의 “type” 값은 URL로, 특정 스키마로 정해진다 (여기선 https://axschema.org/). 인증에 꼭 필요한 속성은 required로 지정한다. 정확한 스키마와 속성은 OpenID provider에 따라 다르다. 속성값은 인증을 처리할 때 반환하며, 이후엔 다음과 같은 코드로 접근할 수 있다:
OpenIDAuthenticationToken token =
    (OpenIDAuthenticationToken)SecurityContextHolder.getContext().getAuthentication();
List<OpenIDAttribute> attributes = token.getAttributes();
OpenIDAuthenticationToken은 SecurityContextHolder에서 얻을 수 있다. OpenIDAttribute는 속성 타입과 반환된 값을 가지고 있다 (속성에 따라 값이 여러 개일 수 있음). attribute-exchange 요소를 여러 개 사용할 수도 있는데, 이땐 요소마다 identifier-matcher 속성을 사용한다. 이 속성에는 OpenID 식별자와 매치할 정규식을 지정한다. 설정 예시는 코드에 있는 OpenID 샘플 어플리케이션을 참고하라. 구글 야후, MyOpenID provider에서 지원하는 각 속성 리스트를 제공한다.
10.14. Anonymous Authentication
10.14.1. Overview
보안에서 주로 권장하는 방식은 허용할 것을 명시하고 나머지는 허용하지 않는 “deny-by-default”다. 같은 맥락으로 웹 어플리케이션이라면, 인증하지 않은 사용자가 접근할 수 있는 페이지를 따로 정의할 수 있다. 많은 사이트에서 몇 가지 URL만 (홈이나 로그인 페이지) 제외하고는 인증을 요구한다. 이럴 때는 모든 안전한 리소스를 명시하는 것보다 접근을 허용할 몇 가지 URL만 가지고 접근 속성을 설정하는 게 가장 쉽다. 달리 말하면, 디폴트로 ROLE_SOMETHING이 필요하다고 정의하고 로그인이나 로그아웃, 기본 홈 등에서만 이 룰에 예외를 적용하는 게 나을 때가 많다. 원한다면 이런 예외 페이지에 접근할 땐 필터 체인을 완전히 생략해서 접근 제어를 우회하도록 만들 수 있지만, 해당 페이지가 인증된 사용자에게는 다른 정보를 보여주는 페이지라면 바람직한 방법은 아니다.
따라서 익명 인증이란 개념이 있는 것이다. “익명으로 인증된” 사용자와 “인증되지 않은 사용자”는 개념적으로 아무 차이가 없다. 스프링 시큐리티의 익명 인증은 그저 접근 제어 속성을 좀 더 편리하게 설정하게 해줄 뿐이다. 예를 들어 getCallerPrincipal같은 서블릿 API를 호출하면 null을 리턴하는 건 마찬가지지만, 실제로 SecurityContextHolder에는 익명 인증 객체가 담겨있다.
익명 인증은 다른 이유에서도 유용하다. 인터셉터가 SecurityContextHolder를 사용해 principal이 해당 작업을 실행할 권한이 있는지 확인할 때가 그렇다. SecurityContextHolder엔 항상 null이 아닌 Authentication 객체가 있다는 점을 알면 좀 더 견고한 방법으로 권한을 부여할 수 있다.
10.14.2. Configuration
스프링 시큐리티 3.0 HTTP 설정을 사용하면 자동으로 익명 인증을 지원하며 <anonymous> 요소로 커스텀하거나 비활성화할 수 있다. 전통적인 빈 설정을 사용하고 있지 않으면 여기 있는 빈을 설정할 필요는 없다.
익명 인증 기능은 세 가지 클래스가 함께 제공한다. AnonymousAuthenticationToken은 Authentication 구현체로, 익명 principal에 적용할 여러 GrantedAuthority를 저장한다. 이에 맞는 AnonymousAuthenticationProvider가 ProviderManager에 연결되면 AnonymousAuthenticationToken을 허용한다. 마지막으로 AnonymousAuthenticationFilter가 있다. 이 필터는 필터 체인에서 다른 평범한 인증 메커니즘보다 뒤에 있으며, SecurityContextHolder에 Authentication이 없으면 자동으로 AnonymousAuthenticationToken을 추가한다. 필터와 인증 provider 정의는 다음과 같다:
<bean id="anonymousAuthFilter"
    class="org.springframework.security.web.authentication.AnonymousAuthenticationFilter">
<property name="key" value="foobar"/>
<property name="userAttribute" value="anonymousUser,ROLE_ANONYMOUS"/>
</bean>

<bean id="anonymousAuthenticationProvider"
    class="org.springframework.security.authentication.AnonymousAuthenticationProvider">
<property name="key" value="foobar"/>
</bean>
필터와 인증 provider가 동일한 key를 공유하므로, 인증 provider는 필터가 생성한 토큰을 허용한다. userAttribute는 usernameInTheAuthenticationToken,grantedAuthority[,grantedAuthority] 형식으로 표현한다. InMemoryDaoImpl의 userMap 프로퍼티에서 등호 뒤에 사용하는 문법과 동일하다.
앞에서 말했듯이 익명 인증을 사용하면 모든 URI 패턴에 보안 로직을 적용할 수 있다. 예를 들어:
<bean id="filterSecurityInterceptor"
    class="org.springframework.security.web.access.intercept.FilterSecurityInterceptor">
<property name="authenticationManager" ref="authenticationManager"/>
<property name="accessDecisionManager" ref="httpRequestAccessDecisionManager"/>
<property name="securityMetadata">
    <security:filter-security-metadata-source>
    <security:intercept-url pattern='/index.jsp' access='ROLE_ANONYMOUS,ROLE_USER'/>
    <security:intercept-url pattern='/hello.htm' access='ROLE_ANONYMOUS,ROLE_USER'/>
    <security:intercept-url pattern='/logoff.jsp' access='ROLE_ANONYMOUS,ROLE_USER'/>
    <security:intercept-url pattern='/login.jsp' access='ROLE_ANONYMOUS,ROLE_USER'/>
    <security:intercept-url pattern='/**' access='ROLE_USER'/>
    </security:filter-security-metadata-source>" +
</property>
</bean>
10.14.3. AuthenticationTrustResolver
익명 인증 처리에서 마지막으로 살펴볼 것은 AuthenticationTrustResolver 인터페이스로, 구현체는 AuthenticationTrustResolverImpl이 있다. 이 인터페이스의 isAnonymous(Authentication) 메소드를 사용하면 다른 클래스에서도 이 특별한 인증 상태를 계산에 넣을 수 있다. 바로 ExceptionTranslationFilter가 이 인터페이스를 사용해 AccessDeniedException을 처리한다. AccessDeniedException이 던져졌고 인증 유형이 익명이라면, 403(forbidden)을 던지는 대신 AuthenticationEntryPoint를 시작해 principal을 올바르게 인증할 수 있다. 이 둘은 반드시 구별해야 한다. 그렇지 않으면 항상 principal을 “인증된 상태”로 인지해서 폼이나, 기본, 다이제스트, 아니면 다른 어떤 기본 인증 메커니즘으로도 로그인할 수 없다.
위 인터셉터 설정에 있는 ROLE_ANONYMOUS 속성 대신 IS_AUTHENTICATED_ANONYMOUSLY를 사용하는 경우도 있다. 접근 제어를 정의할 땐 이 둘은 사실상 동일하다. 이는 인가 챕터에서 살펴볼 AuthenticatedVoter에서 활용하는 속성이다. AuthenticatedVoter는 AuthenticationTrustResolver를 사용해서 이 IS_AUTHENTICATED_ANONYMOUSLY 설정 속성을 처리하고 익명 사용자에게 접근 권한을 부여한다. AuthenticatedVoter로 접근하면 익명 사용자와 remember-me 사용자, 완전히 인증된 사용자를 구분할 수 있다. 그래도 이런 기능이 필요하지 않다면 ROLE_ANONYMOUS를 유지해서 스프링 시큐리티의 표준 RoleVoter가 처리하도록 놔두면 된다.
10.15. Pre-Authentication Scenarios
스프링 시큐리티를 사용해서 인가를 구현하고 싶지만, 사용자가 어플리케이션에 접근하기 전에 이미 신뢰할 수 있는 외부 시스템에서 인증받았을 수도 있다. 이런 상황을 “사전에 인증된” 시나리오라고 부른다. 예를 들어 X.509, Siteminder나 실행 중인 어플리케이션 안에 있는 자바 EE 컨테이너 인증 등이 있다. 사전 인증을 사용하면 스프링 시큐리티에선 다음과 같은 처리를 한다:
- 요청을 만든 사용자를 식별한다.
- 사용자의 권한을 가져온다.
자세한 내용은 외부 인증 메커니즘에 따라 다르다. X.509는 인증서 정보로 사용자를 식별하며, Siteminder는 HTTP 요청 헤더로 식별한다. 컨테이너 인증을 사용한다면 HTTP request의 getUserPrincipal()을 호출해서 사용자를 식별한다. 사용자의 role/authority 정보를 제공하는 외부 메커니즘도 있지만 UserDetailsService같은 별도 소스로 권한을 얻어야 하는 경우도 있다.
10.15.1. Pre-Authentication Framework Classes
사전 인증 메커니즘은 대부분 같은 패턴을 사용하므로, 스프링 시큐리티는 사전 인증 프로바이더를 구현하기 위한 내부 뼈대로, 몇 가지 클래스 셋을 제공한다. 이 클래스를 사용하면 중복을 제거할 수 있으며, 모든 것을 처음부터 작성하지 않고도 구조화된 틀 안에 새 구현체를 추가할 수 있다. X.509 인증 등을 사용한다면, 사용하기도 시작하기도 쉬운 네임스페이스 설정 옵션이 있기 때문에 이 클래스를 알아야 할 필욘 없다. 물론, 빈 설정을 지정하거나 자체 구현체를 사용할 거라면, 구현체들이 어떻게 동작하는 지 알아두면 유용하다. 이 클래스들은 org.springframework.security.web.authentication.preauth 패키지 밑에 있다. 여기에선 개요만 다루기 때문에 javadoc이나 소스 코드를 참고하도록 해라.
AbstractPreAuthenticatedProcessingFilter
이 클래스는 현재 보안 컨텍스트에 있는 정보를 확인하고, 비어있다면 HTTP 요청에서 사용자 정보를 추출해 AuthenticationManager로 제출한다. 인증 정보를 가져오는 아래 메소드는 하위 클래스에서 재정의한다:
protected abstract Object getPreAuthenticatedPrincipal(HttpServletRequest request);

protected abstract Object getPreAuthenticatedCredentials(HttpServletRequest request);
필터는 이 두 메소드를 호출한 다음, 반환받은 데이터로 PreAuthenticatedAuthenticationToken을 만들어 인증 매니저에 제출한다. 여기서 “인증”이란, 단순히 사용자 권한을 로드하기 위한 부가적인 처리를 의미하지만, 표준 스프링 시큐리티 인증 아키텍처를 따른다.
다른 스프링 시큐리티 인증 필터처럼 사전 인증 필터도 기본적으로 WebAuthenticationDetails 객체를 만드는 authenticationDetailsSource 프로퍼티를 가지고 있다. 이 프로퍼티를 통해 Authentication 객체의 details 프로퍼티 안에 세션 식별자, 요청 IP 주소 등의 정보를 저장한다. 사전 인증 메커니즘으로 사용자의 role 정보를 가져올 수 있으면, GrantedAuthoritiesContainer 인터페이스 구현체를 사용해 이 데이터도 프로퍼티에 함께 저장한다. 이렇게 하면 인증 provider는 외부에서 사용자에 할당한 권한을 조회할 수 있다. 구체적인 예제는 더 밑에서 살펴보겠다.
J2eeBasedPreAuthenticatedWebAuthenticationDetailsSource
필터의 authenticationDetailsSource 프로퍼티를 이 클래스 인스턴스로 설정하면, 미리 결정해둔 “mappable roles” 셋을 사용하는 isUserInRole(String role) 메소드로 권한 정보를 확인한다. role 셋은 설정해둔 MappableAttributesRetriever에서 가져온다. MappableAttributesRetriever는 어플리케이션 컨텍스트에 리스트를 하드 코딩하거나 web.xml 파일에 있는 <security-role>에서 role 정보를 읽는 식으로 구현할 수 있다. pre-authentication 샘플 어플리케이션은 두 번째 방법을 사용한다.
이 클래스는 하는 일이 하나 더 있는데, 설정한 Attributes2GrantedAuthoritiesMapper를 사용해서 roles를(또는 attributes) 스프링 시큐리티 GrantedAuthority 객체들로 매핑한다. 디폴트로는 이름에 일반적인 ROLE_ 프리픽스를 추가하지만, 전체 동작을 직접 제어할 수도 있다.
PreAuthenticatedAuthenticationProvider
사전 인증 provider는 사용자의 UserDetails 객체를 로드하는 것 외에도 하는 일이 조금 더 있다. 객체를 로드하는 일은 AuthenticationUserDetailsService에 위임한다. AuthenticationUserDetailsService는 표준 UserDetailsService와 유사하지만 단순한 사용자 이름 대신 Authentication 객체를 받는다.
public interface AuthenticationUserDetailsService {
    UserDetails loadUserDetails(Authentication token) throws UsernameNotFoundException;
}
이 인터페이스는 다른 용도로도 사용할 수 있지만, 사전 인증에선 이전 섹션에서 살펴본 것처럼 Authentication 객체에 있는 권한에 접근할 수 있게 해준다. 사전 인증에서 사용하는 구현체는 PreAuthenticatedGrantedAuthoritiesUserDetailsService 클래스다. 또는 UserDetailsByNameServiceWrapper 구현체를 통해 표준 UserDetailsService에 위임할 수도 있다.
Http403ForbiddenEntryPoint
AuthenticationEntryPoint는 인증되지 않은 사용자의 인증 처리를 시작하지만 (인증이 필요한 리소스에 접근하려고 할 때), 사전 인증 메커니즘에는 적용되지 않는다. 사전 인증이 유일한 인증 메커니즘이라면, ExceptionTranslationFilter와 Http403ForbiddenEntryPoint 클래스 인스턴스만 설정할 것이다. Http403ForbiddenEntryPoint를 호출하는 시점은 authentication이 null이어서 AbstractPreAuthenticatedProcessingFilter에서 사용자 요청을 거절했을 때다. 이때는 항상 403-forbidden 응답을 리턴한다.
10.15.2. Concrete Implementations
X.509 인증은 별도 챕터에서 다룬다. 여기선 다른 사전 인증 시나리오를 지원하는 몇 가지 클래스를 살펴볼 것이다.
Request-Header Authentication (Siteminder)
외부 인증 시스템은 HTTP 요청에 특정 헤더를 설정하는 식으로 어플리케이션에 정보를 제공할 수도 있다. 잘 알려진 예로는 SM_USER 헤더로 username을 전달하는 Siteminder가 있다. 이 메커니즘은 단순히 헤더에서 username을 추출하는 RequestHeaderAuthenticationFilter가 제공한다. 디폴트로 사용하는 헤더 이름은 SM_USER다. 자세한 내용은 Javadoc을 참고하라.
이렇게 외부 인증 시스템을 사용한다면 프레임워크에선 전혀 인증을 체크하지 않는다는 점에 주의해라. 반드시 외부 시스템을 제대로 설정하고, 어플리케이션의 모든 접근을 보호해야 한다. 공격 감지해내지 못하면 기존 요청 헤더를 위조하는 식으로 username을 마음대로 변경할 수도 있다.
Siteminder Example Configuration
다음은 RequestHeaderAuthenticationFilter를 사용하는 전형적인 설정이다:
<security:http>
<!-- Additional http configuration omitted -->
<security:custom-filter position="PRE_AUTH_FILTER" ref="siteminderFilter" />
</security:http>

<bean id="siteminderFilter" class="org.springframework.security.web.authentication.preauth.RequestHeaderAuthenticationFilter">
<property name="principalRequestHeader" value="SM_USER"/>
<property name="authenticationManager" ref="authenticationManager" />
</bean>

<bean id="preauthAuthProvider" class="org.springframework.security.web.authentication.preauth.PreAuthenticatedAuthenticationProvider">
<property name="preAuthenticatedUserDetailsService">
    <bean id="userDetailsServiceWrapper"
        class="org.springframework.security.core.userdetails.UserDetailsByNameServiceWrapper">
    <property name="userDetailsService" ref="userDetailsService"/>
    </bean>
</property>
</bean>

<security:authentication-manager alias="authenticationManager">
<security:authentication-provider ref="preauthAuthProvider" />
</security:authentication-manager>
여기선 시큐리티 네임스페이스로 설정한다고 가정한다. 또한 사용자의 role을 조회하는, “userDetailsService”란 이름을 가진 UserDetailsService를 설정했다고 가정했다.
Java EE Container Authentication
J2eePreAuthenticatedProcessingFilter 클래스는 HttpServletRequest의 userPrincipal 속성에서 username을 추출한다. 보통 이 필터를 사용할 땐 J2eeBasedPreAuthenticatedWebAuthenticationDetailsSource에서 설명한 자바 EE role을 함께 사용한다.
이 방식을 사용하는 샘플 어플리케이션도 있으므로, 관심 있다면 깃허브 코드를 받아 어플리케이션 컨텍스트 파일을 살펴봐라. 코드는 samples/xml/preauth 디렉토리 안에 있다.
10.16. Java Authentication and Authorization Service (JAAS) Provider
10.16.1. Overview
스프링 시큐리티는 인증 요청을 Java Authentication and Authorization Service (JAAS)로 위임할 수 있는 패키지를 제공한다. 이 패키지는 아래에서 자세히 설명한다.
10.16.2. AbstractJaasAuthenticationProvider
AbstractJaasAuthenticationProvider는 스프링 시큐리티가 제공하는 JAAS AuthenticationProvider 구현체의 기반 클래스다. 하위 클래스는 LoginContext를 생성하는 메소드를 반드시 구현해야 한다. AbstractJaasAuthenticationProvider는 주입할 수 있는 의존성이 아주 많으며, 아래에서 설명한다.
JAAS CallbackHandler
JAAS LoginModule 대부분은 일종의 콜백이 필요하다. 보통 콜백으로 사용자 이름과 비밀번호를 가져온다.
스프링 시큐리티를 사용한다면, 스프링 시큐리티가 이런 사용자 상호작용을 대신 처리해 준다 (인증 메커니즘으로). 따라서 인증 요청을 JAAS로 위임할 때쯤엔 스프링 시큐리티의 인증 메커니즘이 이미 Authentication에 JAAS LoginModule에서 필요한 모든 정보를 채웠을 것이다.
따라서 스프링 시큐리티의 JAAS 패키지는 JaasNameCallbackHandler와 JaasPasswordCallbackHandler라는 두 가지 디폴트 콜백 핸들러를 제공한다. 둘 모두 JaasAuthenticationCallbackHandler를 구현하고 있다. 대부분은 내부 메커니즘은 몰라도 쉽게 사용할 수 있다.
AbstractJaasAuthenticationProvider는 내부적으로 여러 JaasAuthenticationCallbackHandler를 InternalCallbackHandler로 감싸기 때문에, 콜백 동작을 완전히 제어할 수도 있다. InternalCallbackHandler는 실제로 일반적인 JAAS CallbackHandler 인터페이스를 구현한 클래스다. LoginModule을 사용할 때마다 어플리케이션 컨텍스트에 설정한 InternalCallbackHandler 리스트를 전달한다. LoginModule에서 InternalCallbackHandler로 콜백을 요청하면 감싸고 있는 JaasAuthenticationCallbackHandler에 차례대로 전달한다.
JAAS AuthorityGranter
JAAS는 principal로 동작한다. 심지어 JAAS에선 “role”도 principal로 표현한다. 하지만 스프링 시큐리티는 이와 달리 Authentication 객체로 동작한다. 각 Authentication 객체는 principal 하나와 GrantedAuthority 여러 개를 가진다. 스프링 시큐리티의 JAAS 패키지엔 각기 다른 개념을 매핑하기 위한 AuthorityGranter 인터페이스가 있다.
AuthorityGranter는 JAAS principal을 검사해서 해당 princial에 할당된 권한을 나타내는 String 셋을 리턴한다. AbstractJaasAuthenticationProvider는 각 권한 문자열로 JaasGrantedAuthority을 생성한다 (스프링 시큐리티의 GrantedAuthority 인터페이스를 구현하고 있는). JaasGrantedAuthority는 권한 문자열과 AuthorityGranter에 전달한 JAAS principal을 가지고 있다. AbstractJaasAuthenticationProvider는 먼저 JAAS LoginModule로 사용자의 credential 인증에 성공한 다음 반환된 LoginContext에 접근해 JAAS principal을 가져온다. 그 다음 LoginContext.getSubject().getPrincipals()를 호출해 결과로 받아온 각 principal을 AbstractJaasAuthenticationProvider.setAuthorityGranters(List)로 정의한 프로퍼티에 있는 각 AuthorityGranter에 전달한다.
모든 JAAS principal은 구현체마다 의미가 다르기 때문에 스프링 시큐리티는 프로덕션용 AuthorityGranter를 제공하진 않는다. 대신에 유닛 테스트에 TestAuthorityGranter라는 간단한 AuthorityGranter 구현체가 있다.
10.16.3. DefaultJaasAuthenticationProvider
DefaultJaasAuthenticationProvider엔 JAAS Configuration 객체를 의존성으로 주입할 수 있으며, 이 Configuration을 사용해서 LoginContext를 생성한다. 즉, DefaultJaasAuthenticationProvider는 JaasAuthenticationProvider와는 달리 Configuration 구현체에 얽매이지 않는다.
InMemoryConfiguration
스프링 시큐리티는 DefaultJaasAuthenticationProvider에 쉽게 주입할 수 있는 InMemoryConfiguration이란 디폴트 인메모리 Configuration 구현체를 제공한다. 구현체의 생성자는 Map을 받으며, 각 키는 로그인 설정 이름을, 값은 AppConfigurationEntry의 Array를 나타낸다. InMemoryConfiguration은 Map으로 매핑을 제공하지 않았을 때 사용할 디폴트 AppConfigurationEntry 객체의 Array도 지원한다. 자세한 내용은 InMemoryConfiguration의 클래스 레벨 javadoc을 참고하라.
DefaultJaasAuthenticationProvider Example Configuration
스프링 설정으로 InMemoryConfiguration을 사용하면 표준 JAAS 설정 파일보다 장황하다고 느낄 수 있지만, DefaultJaasAuthenticationProvider와 함께 사용하면 디폴트 Configuration 구현체에 의존하지 않으므로 JaasAuthenticationProvider보다 유연하다.
다음은 InMemoryConfiguration을 사용하는 DefaultJaasAuthenticationProvider 설정 예시이다. DefaultJaasAuthenticationProvider엔 Configuration의 커스텀 구현체도 쉽게 주입할 수 있다.
<bean id="jaasAuthProvider"
class="org.springframework.security.authentication.jaas.DefaultJaasAuthenticationProvider">
<property name="configuration">
<bean class="org.springframework.security.authentication.jaas.memory.InMemoryConfiguration">
<constructor-arg>
    <map>
    <!--
    SPRINGSECURITY is the default loginContextName
    for AbstractJaasAuthenticationProvider
    -->
    <entry key="SPRINGSECURITY">
    <array>
    <bean class="javax.security.auth.login.AppConfigurationEntry">
        <constructor-arg value="sample.SampleLoginModule" />
        <constructor-arg>
        <util:constant static-field=
            "javax.security.auth.login.AppConfigurationEntry$LoginModuleControlFlag.REQUIRED"/>
        </constructor-arg>
        <constructor-arg>
        <map></map>
        </constructor-arg>
        </bean>
    </array>
    </entry>
    </map>
    </constructor-arg>
</bean>
</property>
<property name="authorityGranters">
<list>
    <!-- You will need to write your own implementation of AuthorityGranter -->
    <bean class="org.springframework.security.authentication.jaas.TestAuthorityGranter"/>
</list>
</property>
</bean>
10.16.4. JaasAuthenticationProvider
JaasAuthenticationProvider는 디폴트 Configuration이 ConfigFile 인스턴스라고 가정한다. 이는 Configuration을 수정할 수 있게 하기 위함이다. JaasAuthenticationProvider는 디폴트 Configuration으로 LoginContext를 만든다.
다음과 같은 JAAS 로그인 설정 파일 /WEB-INF/login.conf가 있다고 가정해보자:
JAASTest {
    sample.SampleLoginModule required;
};
모든 스프링 시큐리티 빈이 그렇듯, JaasAuthenticationProvider는 어플리케이션 컨텍스트로 설정한다. 다음은 위에 있는 JAAS 로그인 설정 파일을 사용하는 빈 정의다:
<bean id="jaasAuthenticationProvider"
class="org.springframework.security.authentication.jaas.JaasAuthenticationProvider">
<property name="loginConfig" value="/WEB-INF/login.conf"/>
<property name="loginContextName" value="JAASTest"/>
<property name="callbackHandlers">
<list>
<bean
    class="org.springframework.security.authentication.jaas.JaasNameCallbackHandler"/>
<bean
    class="org.springframework.security.authentication.jaas.JaasPasswordCallbackHandler"/>
</list>
</property>
<property name="authorityGranters">
    <list>
    <bean class="org.springframework.security.authentication.jaas.TestAuthorityGranter"/>
    </list>
</property>
</bean>
10.16.5. Running as a Subject
설정하고 나면 JaasApiIntegrationFilter는 JaasAuthenticationToken에서 얻은 Subject로 동작을 실행한다. 즉 다음과 같이 Subject에 접근할 수 있다는 뜻이다:
Subject subject = Subject.getSubject(AccessController.getContext());
jaas-api-provision 속성을 사용하면 쉽게 설정을 통합할 수 있다. 이 기능은 값을 채운 JAAS Subject에 의존하는 레거시 API나 외부 API와 통합할 때 유용하다.
10.17. CAS Authentication
10.17.1. Overview
JA-SIG은 CAS로 알려진 엔터프라이즈급 싱글사인온 시스템을 제공한다. 다른 이니셔티브와는 달리 JA-SIG의 중앙 인증 서비스는 오픈 소스이며, 널리 사용되고, 이해하기도 쉽고, 플랫폼 독립적이며, 프록시 기능을 지원한다. 스프링 시큐리티는 CAS를 전부 지원하며, 스프링 시큐리티의 단일 어플리케이션 배포를 엔터프라이즈급 CAS 서버로 보호하는 멀티 어플리케이션 배포로 쉽게 마이그레이션할 수 있는 방법을 제공한다.
CAS에 대해 더 알고 싶으면 https://www.apereo.org를 참고하라. CAS 서버 파일을 다운받을 때도 이 사이트에 방문해야 한다.
10.17.2. How CAS Works
CAS 웹사이트엔 CAS 아키텍처를 자세히 설명하는 문서가 있지만, 여기선 스프링 시큐리티 컨텍스트에서 필요한 전반적인 개요만 다룬다. 스프링 시큐리티 3.X는 CAS 3을 지원한다. 이 문서를 작성하는 시점의 CAS 서버는 3.4 버전이다.
엔터프라이즈 환경 내에 어딘가엔 CAS 서버를 세팅해야 한다. CAS 서버는 간단한 표준 WAR 파일이기 때문에 서버를 세팅하는 게 어렵진 않다. 사용자에게 보여지는 로그인이나 다른 싱글사인온 페이지는 WAR 파일 안에서 커스텀한다.
CAS 3.4 서버를 배포할 땐 CAS에 포함되어 있는 deployerConfigContext.xml에 AuthenticationHandler를 지정해야 한다. AuthenticationHandler엔 주어진 Credentials 셋이 유효한지를 나타내는 간단한 메소드가 하나 있다. AuthenticationHandler 구현체는 LDAP 서버나 데이터베이스같은 백엔드 인증 레포지토리를 연결해야 한다. CAS 자체에서 지원하는 AuthenticationHandler도 아주 많다. war 파일을 다운로드해서 서버를 배포하면, 사용자 이름과 일치하는 비밀번호를 입력한 사용자를 인증할 수 있도록 세팅되기 때문에 테스트할 때 유용할 것이다.
CAS 서버 자체를 제외하면 당연히 엔터프라이즈 환경 내에 배포된 안전한 웹 어플리케이션이 핵심 역할을 담당한다. 이런 웹 어플리케이션은 “서비스”라고 한다. 서비스엔 세 종류가 있다. 서비스 티켓을 인증하는 서비스와 프록시 티켓을 받아오는 서비스, 프록시 티켓을 인증하는 서비스다. 프록시 티켓을 인증하는 것은 또 다른 일이다. 프록시 리스트를 반드시 검증해야 하고 종종 프록시 티켓을 재사용하기 때문이다.
Spring Security and CAS Interaction Sequence
웹 브라우저와 CAS 서버, 스프링 시큐리티로 보호 중인 서비스의 기본 상호작용은 다음과 같다:
- 웹 사용자가 서비스의 공개된 페이지를 탐색하고 있다. CAS나 스프링 시큐리티는 관여하지 않는다.
- 드디어 사용자가 보호 중인 페이지, 또는 사용 중인 빈 일부가 보호 중인 페이지를 요청한다. 스프링 시큐리티의
ExceptionTranslationFilter에서AccessDeniedException이나AuthenticationException을 감지한다. - 사용자의
Authentication객체가 (또는 이 객체가 없어서)AuthenticationException을 유발했기 때문에ExceptionTranslationFilter는 설정해둔AuthenticationEntryPoint를 호출할 것이다. CAS를 사용한다면 해당 클래스는CasAuthenticationEntryPoint다. CasAuthenticationEntryPoint는 사용자의 브라우저를 CAS 서버로 리다이렉트한다. 스프링 시큐리티 서비스(당신의 어플리케이션)에 대한 콜백 URL을 의미하는service파라미터도 함께 지정한다. 예를 들어 브라우저가 리다이렉트하는 URL은 https://my.company.com/cas/login?service=https%3A%2F%2Fserver3.company.com%2Fwebapp%2Flogin/cas가 될 수 있다.- 사용자의 브라우저가 CAS로 리다이렉트하고 나면, 사용자 이름과 비밀번호를 입력하라는 메세지가 표시된다. 이전에 로그인했음을 나타내는 세션 쿠키가 있다면 다시 로그인하지 않아도 된다 (여기엔 예외가 있는데, 뒤에서 설명한다). CAS는 위에서 설명한
PasswordHandler로 (CAS 3.0은AuthenticationHandler) 사용자 이름과 비밀번호가 유효한지 판단한다. - 로그인에 성공하면 CAS는 사용자의 브라우저를 다시 기존 서비스로 리다이렉트한다. 이땐 “서비스 티켓”을 나타내는 알아보기 힘든 문자열을
ticket파라미터로 사용한다. 위에서 사용한 예시대로면 브라우저가 리다이렉트하는 URL은 https://server3.company.com/webapp/login/cas?ticket=ST-0-ER94xMJmn6pha35CQRoZ다. - 다시 서비스 웹 어플리케이션으로 돌아가서,
CasAuthenticationFilter는 항상/login/cas요청을 수신하고 있다 (설정을 바꿀 수 있지만 이 예시에선 디폴트를 사용할 것이다). 이 필터는 서비스 티켓을 나타내는UsernamePasswordAuthenticationToken을 생성한다. 이때 principal은CasAuthenticationFilter.CAS_STATEFUL_IDENTIFIER이며, credential은 서비스 티켓 문자열이다. 이 인증 요청은 설정에 있는AuthenticationManager가 처리한다. AuthenticationManager구현체는CasAuthenticationProvider를 가지고 있는ProviderManager다.CasAuthenticationProvider는 CAS 전용 princiapal(CasAuthenticationFilter.CAS_STATEFUL_IDENTIFIER등)과CasAuthenticationToken(뒤에서 설명한다)을 가지고 있는UsernamePasswordAuthenticationToken에만 응답한다.CasAuthenticationProvider는TicketValidator구현체로 서비스 티켓을 검증한다. 보통 CAS 클라이언트 라이브러리에 있는 클래스 중 하나인Cas20ServiceTicketValidator를 사용한다.Cas20ProxyTicketValidator는 어플리케이션에서 프록시 티켓을 검증할 때 사용한다. 이TicketValidator은 서비스 티켓 검증을 위해 CAS 서버에 HTTPS 요청을 보낸다. 이땐 프록시 콜백 URL을 함께 보내며, 위 예시대로면 https://my.company.com/cas/proxyValidate?service=https%3A%2F%2Fserver3.company.com%2Fwebapp%2Flogin/cas&ticket=ST-0-ER94xMJmn6pha35CQRoZ&pgtUrl=https://server3.company.com/webapp/login/cas/proxyreceptor다.- CAS 서버로 돌아와서, 이제 검증 요청을 받는다. 제출한 서비스 티켓이 발행된 서비스 URL과 일치하면, CAS는 사용자 이름을 표시한 XML로 긍정의 응답을 보낸다. 인증에 프록시가 관여한다면 (아래에서 설명) 프록시 리스트도 XML 응답에 포함된다.
- [OPTIONAL] CAS 검증 서비스에 보낸 요청에 프록시 콜백 URL이 있으면 (
pgtUrl파라미터) CAS는 XML 응답에pgtIou란 문자열을 포함시킨다.pgtIou는 프록시 승인 티켓 IOU를 나타낸다. CAS 서버는pgtUrl에 자체 HTTPS 커넥션을 만든다. 덕분에 CAS 서버와 요청한 서비스 URL을 상호 인증할 수 있다. 이 HTTPS 커넥션으로 기존 웹 어플리케이션에 프록시 승인 티켓을 전송한다. 예를 들어 https://server3.company.com/webapp/login/cas/proxyreceptor?pgtIou=PGTIOU-0-R0zlgrl4pdAQwBvJWO3vnNpevwqStbSGcq3vKB2SqSFFRnjPHt&pgtId=PGT-1-si9YkkHLrtACBo64rmsi3v2nf7cpCResXg5MpESZFArbaZiOKH. Cas20TicketValidator는 CAS 서버에서 받은 XML을 파싱하고CasAuthenticationProvider에TicketResponse를 돌려준다.TicketResponse엔 사용자 이름과(필수), 프록시 리스트 (프록시가 있다면), 프록시 승인 티켓 IOU (프록시 콜백을 요청했다면)가 있다.- 그다음
CasAuthenticationProvider는 설정한CasProxyDecider를 호출한다.CasProxyDecider는TicketResponse에 있는 프록시 리스트를 서비스에서 수용할 수 있는지를 알려준다. 스프링 시큐리티가 제공하는 구현체는RejectProxyTickets,AcceptAnyCasProxy,NamedCasProxyDecider가 있다.NamedCasProxyDecider는 신뢰할 수 있는 프록시List를 가릴 수 있으며, 나머지는 이름이 나타내는 역할 그대로다. CasAuthenticationProvider는 그다음엔AuthenticationUserDetailsService로 요청을 보내Assertion에 있는 사용자에게 적용할GrantedAuthority객체들을 로드한다.- 아무 문제 없이 잘 로드했다면
CasAuthenticationProvider는TicketResponse와GrantedAuthority에 있는 세부 정보로CasAuthenticationToken을 만든다. - 그다음
CasAuthenticationFilter로 제어가 넘어가서 생성한CasAuthenticationToken을 시큐리티 컨텍스트에 담는다. - 사용자의 브라우저는
AuthenticationException을 일으켰던 기존 페이지로 리다이렉트 한다 (설정에 따라 커스텀할 수 있음).
여기까지 왔다면 잘 한 것이다! 이제 CAS를 설정하는 법을 알아보자.
10.17.3. Configuration of CAS Client
스프링 시큐리티덕분에 쉽게 CAS의 웹 어플리케이션 사이드를 만들 수 있다. 스프링 시큐리티 기초를 이미 알고있다고 가정하고 아래에서 기본적인 내용을 다시 다루진 않는다. 네임스페이스 기반 설정을 사용한다고 가정하고 필요한 CAS 빈을 추가할 것이다. 각 섹션은 이전 섹션 설정을 토대로 이어나갈 것이다. 전체 CAS 샘플 어플리케이션은 스프링 시큐리티 샘플에서 찾아볼 수 있다.
Service Ticket Authentication
이번 섹션에선 서비스 티켓을 인증하기 위한 스프링 시큐리티 설정을 다룬다. 이 설정이 웹 어플리케이션에서 필요한 전부일 때도 많다. 어플리케이션 컨텍스트에 추가해야 하는 빈은 ServiceProperties다. 다음은 CAS 서비스를 설정한다:
<bean id="serviceProperties"
    class="org.springframework.security.cas.ServiceProperties">
<property name="service"
    value="https://localhost:8443/cas-sample/login/cas"/>
<property name="sendRenew" value="false"/>
</bean>
service 값은 반드시 CasAuthenticationFilter가 모니터링하는 URL과 일치해야 한다. sendRenew의 디폴트 값은 false인데, 더 민감한 서비스라면 true로 설정해야 한다. 이 파라미터는 CAS 로그인 서비스에 싱글사인온 로그인을 허용하지 않는다는 것을 알린다. 사용자가 사용자 이름과 비밀번호를 다시 입력해야 서비스에 접근할 수 있다.
CAS 인증 프로세스를 시작하려면 다음과 같은 빈을 설정해야 한다 (네임스페이스 설정을 사용한다고 가정한다):
<security:http entry-point-ref="casEntryPoint">
...
<security:custom-filter position="CAS_FILTER" ref="casFilter" />
</security:http>

<bean id="casFilter"
    class="org.springframework.security.cas.web.CasAuthenticationFilter">
<property name="authenticationManager" ref="authenticationManager"/>
</bean>

<bean id="casEntryPoint"
    class="org.springframework.security.cas.web.CasAuthenticationEntryPoint">
<property name="loginUrl" value="https://localhost:9443/cas/login"/>
<property name="serviceProperties" ref="serviceProperties"/>
</bean>
CAS가 동작하려면 ExceptionTranslationFilter의 authenticationEntryPoint 프로퍼티를 CasAuthenticationEntryPoint 빈으로 설정해야 한다. 위 예시처럼 entry-point-ref를 사용하면 쉽게 구성할 수 있다. CasAuthenticationEntryPoint는 엔터프라이즈 환경에 있는 CAS 로그인 서버에 URL을 제공해 주는 ServiceProperties 빈(위에서 설명한)을 반드시 참조해야 한다. 사용자의 브라우저는 이 URL로 리다이렉트한다.
CasAuthenticationFilter가 가지고 있는 프로퍼티는 UsernamePasswordAuthenticationFilter(폼 기반 로그인에 사용하는)와 매우 유사하다. 이 프로퍼티로 인증 성공/실패 시 동작 등을 커스텀할 수 있다.
그 다음 CasAuthenticationProvider와 이와 함께 동작하는 몇 가지를 더 추가해야 한다:
<security:authentication-manager alias="authenticationManager">
<security:authentication-provider ref="casAuthenticationProvider" />
</security:authentication-manager>

<bean id="casAuthenticationProvider"
    class="org.springframework.security.cas.authentication.CasAuthenticationProvider">
<property name="authenticationUserDetailsService">
    <bean class="org.springframework.security.core.userdetails.UserDetailsByNameServiceWrapper">
    <constructor-arg ref="userService" />
    </bean>
</property>
<property name="serviceProperties" ref="serviceProperties" />
<property name="ticketValidator">
    <bean class="org.jasig.cas.client.validation.Cas20ServiceTicketValidator">
    <constructor-arg index="0" value="https://localhost:9443/cas" />
    </bean>
</property>
<property name="key" value="an_id_for_this_auth_provider_only"/>
</bean>

<security:user-service id="userService">
<!-- Password is prefixed with {noop} to indicate to DelegatingPasswordEncoder that
NoOpPasswordEncoder should be used.
This is not safe for production, but makes reading
in samples easier.
Normally passwords should be hashed using BCrypt -->
<security:user name="joe" password="{noop}joe" authorities="ROLE_USER" />
...
</security:user-service>
CasAuthenticationProvider는 사용자를 CAS로 인증하고나면 UserDetailsService로 사용자의 권한을 로드한다. 여기에선 간단한 인메모리 설정을 다뤘다. CasAuthenticationProvider가 실제로 사용하는 정보는 비밀번호가 아닌 권한 정보다.
How CAS Works 섹션을 다시 보면 이 빈들이 하는 일이 뭔지 바로 알 수 있을 거다.
이것으로 CAS의 가장 기본적인 설정은 마쳤다. 실수만 없었다면 웹 어플리케이션은 CAS 싱글사인온 프레임워크 내에서 잘 동작할 것이다. 다른 코드에서 스프링 시큐리티를 사용할 땐 CAS로 인증한다는 사실을 신경쓰지 않아도 된다. 이어지는 섹션에선 몇 가지 고급 설정을 다룬다 (생략 가능).
Single Logout
CAS 프로토콜은 싱글 로그아웃을 지원하며, 스프링 시큐리티 설정에 간단하게 추가할 수 있다. 다음은 스프링 시큐리티 설정에 싱글 로그아웃 처리를 추가한 것이다:
<security:http entry-point-ref="casEntryPoint">
...
<security:logout logout-success-url="/cas-logout.jsp"/>
<security:custom-filter ref="requestSingleLogoutFilter" before="LOGOUT_FILTER"/>
<security:custom-filter ref="singleLogoutFilter" before="CAS_FILTER"/>
</security:http>

<!-- This filter handles a Single Logout Request from the CAS Server -->
<bean id="singleLogoutFilter" class="org.jasig.cas.client.session.SingleSignOutFilter"/>

<!-- This filter redirects to the CAS Server to signal Single Logout should be performed -->
<bean id="requestSingleLogoutFilter"
    class="org.springframework.security.web.authentication.logout.LogoutFilter">
<constructor-arg value="https://localhost:9443/cas/logout"/>
<constructor-arg>
    <bean class=
        "org.springframework.security.web.authentication.logout.SecurityContextLogoutHandler"/>
</constructor-arg>
<property name="filterProcessesUrl" value="/logout/cas"/>
</bean>
logout 요소는 사용자를 로컬 어플리케이션에서 로그아웃 시키지만, CAS 서버나 로그인한 다른 어플리케이션의 세션을 종료하진 않는다. requestSingleLogoutFilter가 /spring_security_cas_logout URL 요청을, 설정해둔 CAS 서버 로그아웃 URL로 리다이렉트한다. 그러면 CAS 서버는 로그인한 모든 서비스에 싱글 로그아웃 요청을 보낸다. singleLogoutFilter는 스태틱 Map에 있는 HttpSession을 찾아 무효화시키는 식으로 싱글 로그아웃 요청을 처리한다.
logout 요소와 singleLogoutFilter가 왜 둘 다 필요한지 헷갈릴 수 있다. SingleSignOutFilter는 단순히 세션을 무효화시킬 수 있도록 스태틱 Map에 HttpSession을 저장하기 때문에 먼저 로컬에서 로그아웃하는 것이 가장 좋은 관행이다. 위 설정대로면 로그아웃 플로우는 다음과 같다:
- 사용자가
/logout을 요청하면 로컬 어플리케이션에서 로그아웃되며 사용자에게는 로그아웃 성공 페이지를 전송한다. - 모든 어플리케이션에서 로그아웃하려면 로그아웃 성공 페이지
/cas-logout.jsp에서/logout/cas링크를 클릭하도록 안내해야 한다. - 사용자가 이 링크를 클릭하면 CAS 싱글 로그아웃 URL로 리다이렉트된다 (https://localhost:9443/cas/logout).
- CAS 싱글 로그아웃 URL은, CAS 서버 사이드에선 모든 CAS 서비스에 싱글 로그아웃 요청을 제출한다. CAS 서비스 사이드에선 JASIG의
SingleSignOutFilter가 기존 세션을 무효화하는 식으로 로그아웃 요청을 처리한다.
다음 단계에선 web.xml에 아래 설정을 추가한다:
<filter>
<filter-name>characterEncodingFilter</filter-name>
<filter-class>
    org.springframework.web.filter.CharacterEncodingFilter
</filter-class>
<init-param>
    <param-name>encoding</param-name>
    <param-value>UTF-8</param-value>
</init-param>
</filter>
<filter-mapping>
<filter-name>characterEncodingFilter</filter-name>
<url-pattern>/*</url-pattern>
</filter-mapping>
<listener>
<listener-class>
    org.jasig.cas.client.session.SingleSignOutHttpSessionListener
</listener-class>
</listener>
SingleSignOutFilter를 사용할 땐 인코딩 이슈가 발생할 수 있다. 따라서 SingleSignOutFilter를 사용한다면 올바르게 문자를 인코딩할 수 있도록 CharacterEncodingFilter를 추가하는 것을 권장한다. 역시 자세한 내용은 JASIG의 문서를 참고하라. SingleSignOutHttpSessionListener는 HttpSession을 만료할 때 싱글 로그아웃에 사용한 매핑을 제거한다.
Authenticating to a Stateless Service with CAS
이번 섹션에선 CAS로 서비스를 인증하는 방법을 설명한다. 다시 말해, CAS로 인증하는 서비스를 사용하는 클라이언트를 설정하는 방법을 다룬다. 다음 섹션에선 상태가 없는(stateless) 서비스를 CAS로 인증하도록 설정하는 방법을 다룬다.
Configuring CAS to Obtain Proxy Granting Tickets
상태가 없는 서비스를 인증하려면 어플리케이션은 프록시 승인 티켓(PGT)을 획득해야 한다. 이번 섹션에선 CAS ST 설정 기반으로 PGT를 획득할 수 있는 스프링 시큐리티 설정을 다룬다.
첫 번째 단계는 스프링 시큐리티 설정에 ProxyGrantingTicketStorage를 추가하는 것이다. CasAuthenticationFilter에서 획득한 PGT는 ProxyGrantingTicketStorage에 저장하므로, ProxyGrantingTicketStorage로 프록시 티켓을 가져올 수 있다. 아래는 설정 예시다.
<!--
NOTE: In a real application you should not use an in memory implementation.
You will also want to ensure to clean up expired tickets by calling
ProxyGrantingTicketStorage.cleanup()
-->
<bean id="pgtStorage" class="org.jasig.cas.client.proxy.ProxyGrantingTicketStorageImpl"/>
다음은 CasAuthenticationProvider를 프록시 티켓을 획득할 수 있게 수정해야 한다. Cas20ServiceTicketValidator를 Cas20ProxyTicketValidator로 바꾸면 된다. proxyCallbackUrl은 어플리케이션에서 PGT를 받을 URL로 설정해야 한다. 마지막으로 설정에 ProxyGrantingTicketStorage도 추가해야 PGT로 프록시 티켓을 획득할 수 있다. 변경된 설정 예시는 아래에 있다.
<bean id="casAuthenticationProvider"
    class="org.springframework.security.cas.authentication.CasAuthenticationProvider">
...
<property name="ticketValidator">
    <bean class="org.jasig.cas.client.validation.Cas20ProxyTicketValidator">
    <constructor-arg value="https://localhost:9443/cas"/>
        <property name="proxyCallbackUrl"
        value="https://localhost:8443/cas-sample/login/cas/proxyreceptor"/>
    <property name="proxyGrantingTicketStorage" ref="pgtStorage"/>
    </bean>
</property>
</bean>
CasAuthenticationFilter를 PGT를 받아 ProxyGrantingTicketStorage에 저장하도록 수정하는 일이 남았다. proxyReceptorUrl은 반드시 Cas20ProxyTicketValidator의 proxyCallbackUrl과 일치해야 한다. 다음은 설정 예시이다.
<bean id="casFilter"
        class="org.springframework.security.cas.web.CasAuthenticationFilter">
    ...
    <property name="proxyGrantingTicketStorage" ref="pgtStorage"/>
    <property name="proxyReceptorUrl" value="/login/cas/proxyreceptor"/>
</bean>
Calling a Stateless Service Using a Proxy Ticket
스프링 시큐리티가 PGT를 획득하면 이를 사용해서 프록시 티켓을 만들고 상태가 없는 서비스를 인증할 수 있다. CAS 샘플 어플리케이션에는 ProxyTicketSampleServlet으로 동작하는 예제가 있다. 예제 코드는 아래에 있다:
protected void doGet(HttpServletRequest request, HttpServletResponse response)
    throws ServletException, IOException {
// NOTE: The CasAuthenticationToken can also be obtained using
// SecurityContextHolder.getContext().getAuthentication()
final CasAuthenticationToken token = (CasAuthenticationToken) request.getUserPrincipal();
// proxyTicket could be reused to make calls to the CAS service even if the
// target url differs
final String proxyTicket = token.getAssertion().getPrincipal().getProxyTicketFor(targetUrl);

// Make a remote call using the proxy ticket
final String serviceUrl = targetUrl+"?ticket="+URLEncoder.encode(proxyTicket, "UTF-8");
String proxyResponse = CommonUtils.getResponseFromServer(serviceUrl, "UTF-8");
...
}
Proxy Ticket Authentication
CasAuthenticationProvider는 상태가 있는(stateful) 클라이언트와 상태가 없는(stateless) 클라이언트를 구분한다. CasAuthenticationFilter의 filterProcessUrl로 요청하면 상태가 있는 클라이언트로 간주한다. filterProcessUrl이 아닌 다른 URL로 CasAuthenticationFilter에 인증을 요청하면 상태가 없는 클라이언트로 간주한다.
원격 프로토콜은 HttpSession 컨텍스트로 자신을 표현할 방법이 없기 때문에, 여러 요청에 걸쳐 사용하는 세션에 보안 컨텍스트를 저장하는 기본 전략에 의존할 수 없다. 게다가 CAS 서버는 TicketValidator로 티켓을 검증하고 나면 티켓을 무효화시키기 때문에 이후 다른 요청에서 같은 프록시 티켓을 재사용할 수 없다.
원격 프로토콜 클라이언트에선 CAS를 아예 사용하지 않는 것도 확실한 선택지다. 하지만 이렇게 하면 CAS의 많은 기능을 포기하는 것이다. 절충안으로 CasAuthenticationProvider는 StatelessTicketCache를 사용한다. 단, CasAuthenticationFilter.CAS_STATELESS_IDENTIFIER와 동일한 principal을 사용하는 상태가 없는 클라이언트일 때만 사용한다. 캐시를 사용하면 CasAuthenticationProvider는 StatelessTicketCache에 프록시 티켓 키와 함께 결과 CasAuthenticationToken을 저장한다. 따라서 원격 프로토콜 클라이언트는 같은 프록시 티켓을 표현할 수 있으며, CasAuthenticationProvider는 CAS 서버에 검증 요청을 보내지 않아도 된다 (첫 번째 요청은 제외). 한 번 인증되면 기존 타켓 서비스가 아닌 다른 URL에서도 프록시 티켓을 사용할 수 있다.
이 설정은 이전 섹션에 사용한 설정을 토대로 하며, 이어서 프록시 티켓 인증을 설정한다. 먼저 아래와 같이 모든 아티팩트를 인증하도록 명시해 준다.
<bean id="serviceProperties"
    class="org.springframework.security.cas.ServiceProperties">
...
<property name="authenticateAllArtifacts" value="true"/>
</bean>
다음은 CasAuthenticationFilter에 serviceProperties와 authenticationDetailsSource를 지정한다. serviceProperties 프로퍼티는 CasAuthenticationFilter가 filterProcessUrl이 아닌 다른 아티팩트도 모두 인증하게 만든다. ServiceAuthenticationDetailsSource는 티켓을 검증할 때 서비스 URL로 HttpServletRequest의 현재 URL을 사용하는 ServiceAuthenticationDetails를 생성한다. 커스텀 ServiceAuthenticationDetails를 리턴하는 AuthenticationDetailsSource를 주입하면 서비스 URL을 생성하는 메소드를 수정할 수 있다.
<bean id="casFilter"
    class="org.springframework.security.cas.web.CasAuthenticationFilter">
...
<property name="serviceProperties" ref="serviceProperties"/>
<property name="authenticationDetailsSource">
    <bean class=
    "org.springframework.security.cas.web.authentication.ServiceAuthenticationDetailsSource">
    <constructor-arg ref="serviceProperties"/>
    </bean>
</property>
</bean>
프록시 티켓을 처리하려면 CasAuthenticationProvider도 수정해야 한다. Cas20ServiceTicketValidator를 Cas20ProxyTicketValidator로 바꾸면 된다. statelessTicketCache와 허용할 프록시도 설정해야 한다. 아래는 모든 프록시를 허용하도록 수정한 예시다.
<bean id="casAuthenticationProvider"
    class="org.springframework.security.cas.authentication.CasAuthenticationProvider">
...
<property name="ticketValidator">
    <bean class="org.jasig.cas.client.validation.Cas20ProxyTicketValidator">
    <constructor-arg value="https://localhost:9443/cas"/>
    <property name="acceptAnyProxy" value="true"/>
    </bean>
</property>
<property name="statelessTicketCache">
    <bean class="org.springframework.security.cas.authentication.EhCacheBasedTicketCache">
    <property name="cache">
        <bean class="net.sf.ehcache.Cache"
            init-method="initialise" destroy-method="dispose">
        <constructor-arg value="casTickets"/>
        <constructor-arg value="50"/>
        <constructor-arg value="true"/>
        <constructor-arg value="false"/>
        <constructor-arg value="3600"/>
        <constructor-arg value="900"/>
        </bean>
    </property>
    </bean>
</property>
</bean>
10.18. X.509 Authentication
10.18.1. Overview
X.509 인증서는 보통 SSL을 사용할 때, 그 중에서도 브라우저에서 HTTPS로 통신할 때 주로 해당 서버가 인증된 서버가 맞는지를 확인할 때 쓴다. 브라우저가 알아서 서버에서 제공한 인증서가 신뢰할 수 있는 인증 기관, 즉 유지 관리되고 있는 인증 기관에서 발행한 것인지 (디지털 서명) 확인한다.
SSL로 “양방향 인증 (mutual authentication)”을 할 수도 있다. 이땐 SSL 핸드셰이킹 과정에서 서버가 클라이언트에 유효한 인증서를 요청한다. 서버에선 이 인증서를 발행한 기관을 확인해서 클라이언트를 인증한다. 인증서가 유효하다면 어플리케이션의 서블릿 API로 전달된다. 스프링 시큐리티 X.509 모듈은 필터를 사용해서 인증서를 추출한다. 그다음 인증서를 어플리케이션 사용자로 매핑하고 표준 스프링 시큐리티 인프라에서 사용할 허가된 권한 셋을 로드한다.
스프링 시큐리티를 적용하기 전에 앞서, 인증서 자체와 서블릿 컨테이너에 클라이언트 인증을 설정하는 법에 익숙해야 한다. 적절한 인증서와 키를 생성하고 설치하는 일이 대부분이다. 예를 들어 톰캣을 사용하고 있다면 여기 https://tomcat.apache.org/tomcat-6.0-doc/ssl-howto.html 가이드를 읽어봐라. 스프링 시큐리티를 적용하기 전 먼저 선행하는 게 좋다.
10.18.2. Adding X.509 Authentication to Your Web Application
X.509 클라이언트 인증을 설정하는 건 매우 쉽다. http 시큐리티 네임스페이스 설정에 <x509/> 요소를 넣기만 하면 된다.
<http>
...
    <x509 subject-principal-regex="CN=(.*?)," user-service-ref="userService"/>;
</http>
이 요소는 두 가지 속성이 있다:
subject-principal-regex. 인증서 소유자(subject) 이름에서 사용자 이름을 추출할 때 사용할 정규식. 위에 있는 값이 디폴트다. 이 값은UserDetailsService로 전달되며, 사용자의 권한을 로드할 때 사용한다.user-service-ref. X.509와 함께 사용할UserDetailsService의 빈 id. 어플리케이션에 해당 빈이 하나밖에 없으면 생략해도 된다.
subject-principal-regex엔 그룹이 하나 있어야 한다. 예를 들어 디폴트 값 “CN=(.*?),”는 common name 필드와 매칭한다. 따라서 인증서의 소유자(subject) 이름이 “CN=Jimi Hendrix, OU=…”라면, 사용자 이름은 “Jimi Hendrix”가 된다. 대소문자는 구분하지 않으므로 “emailAddress=(.*?),”는 “EMAILADDRESS=jimi@hendrix.org,CN=…”과 매치되며 이때 사용자 이름은 “jimi@hendrix.org”다. 클라이언트가 인증서를 제출했고 유효한 사용자 이름을 추출했으면, 시큐리티 컨텍스트 안에 Authentication 객체가 있을 것이다. 인증서를 제출하지 않았거나 해당하는 사용자가 없으면 시큐리티 컨텍스트는 그대로 비워 둔다. 즉, X.509 인증은 폼 기반 로그인같은 다른 인증과도 함께 사용할 수 있다.
10.18.3. Setting up SSL in Tomcat
스프링 시큐리티 프로젝트의 samples/certificate 디렉토리엔 미리 만들어둔 인증서가 몇 개 있다. 자체 인증서를 만들지 않는다면 이 인증서로 SSL을 테스트해볼 수 있다. server.jks 파일에는 서버 인증서와 개인키, 인증서 발급 기관의 인증서가 있다. 샘플 어플리케이션엔 몇 가지 클라이언트 인증서 파일도 있다. 브라우저에 이 인증서를 설치하면 SSL 클라이언트 인증을 활성화할 수 있다.
톰캣에서 SSL을 사용하려면 server.jks 파일을 conf 디렉토리에 넣고 server.xml 파일에 아래 커넥터를 추가해라.
<Connector port="8443" protocol="HTTP/1.1" SSLEnabled="true" scheme="https" secure="true"
            clientAuth="true" sslProtocol="TLS"
            keystoreFile="${catalina.home}/conf/server.jks"
            keystoreType="JKS" keystorePass="password"
            truststoreFile="${catalina.home}/conf/server.jks"
            truststoreType="JKS" truststorePass="password"
/>
클라이언트가 인증서를 제출하지 않아도 SSL 커넥션을 맺고 싶다면 clientAuth를 want로 설정해도 된다. 이렇게하면, 인증서를 제출하지 않은 클라이언트는 폼 인증 등 X.509 인증 외의 다른 메커니즘을 사용해야만 스프링 시큐리티가 보호하는 모든 객체에 접근할 수 있다.
10.19. Run-As Authentication Replacement
10.19.1. Overview
AbstractSecurityInterceptor는 SecurityContext와 SecurityContextHolder에 있는 Authentication 객체를 보안 객체 콜백 단계에서 잠시 동안 바꿀 수 있다. AuthenticationManager와 AccessDecisionManager가 기존 Authentication 객체를 문제없이 처리했을 때만 동작한다. RunAsManager는 대체할 Authentication 객체가 있으면 SecurityInterceptorCallback에서 사용할 새 객체를 만든다.
잠시 동안 Authentication 객체를 바꾸면 다른 인증이나 인가 credential이 필요한 다른 객체도 호출할 수 있다. 특정 GrantedAuthority 객체를 위한 내부 보안 검사를 수행할 수도 있다. 스프링 시큐리티는 SecurityContextHolder에 있는 내용을 기반으로 원격 프로토콜을 자동으로 설정해 주는 헬퍼 클래스를 많이 제공하기 때문에, run-as replacement라고 하는 이 기능은 원격 웹 서비스를 호출할 때 특히 유용하다.
10.19.2. Configuration
스프링 시큐리티는 RunAsManager 인터페이스를 제공한다:
Authentication buildRunAs(Authentication authentication, Object object,
    List<ConfigAttribute> config);

boolean supports(ConfigAttribute attribute);

boolean supports(Class clazz);
첫 번째 메소드는 메소드를 실행하는 동안 기존 Authentication 객체를 대체할 Authentication 객체를 리턴한다. 이 메소드가 null을 리턴하면 대체하지 말아야 한단 뜻이다. 두 번째는 AbstractSecurityInterceptor가 처음에 설정 속성을 검증할 때 사용하는 메소드다. supports(Class) 메소드는 시큐리티 인터셉터 구현체가 호출하며, 설정해둔 RunAsManager가 시큐리티 인터셉터가 제공하는 보안 객체 유형을 지원하는지를 확인한다.
스프링 시큐리티는 RunAsManager 구현체 한 가지를 제공한다. RunAsManagerImpl 클래스는 RUN_AS_로 시작하는 ConfigAttribute가 있으면 대체용으로 RunAsUserToken을 리턴한다. 이런 ConfigAttribute가 있다면, RunAsUserToken은 기존 Authentication 객체와 동일한 principal, credentials, 권한을 가지고 있으며, 각 RUN_AS_ ConfigAttribute마다 새 SimpleGrantedAuthority를 추가한다. 새로 추가한 SimpleGrantedAuthority 값은 모두 RUN_AS ConfigAttribute 앞에 ROLE_이란 프리픽스가 달린다. 예를 들어 RUN_AS_SERVER는 ROLE_RUN_AS_SERVER 권한을 가지고 있는 RunAsUserToken을 생성한다.
RunAsUserToken도 다른 Authentication과 똑같은 객체다. AuthenticationManager로 인증해야 하며, 아마도 적절한 AuthenticationProvider에 인증을 위임할 것이다. 여기선 RunAsImplAuthenticationProvider가 인증을 담당한다. 이 provider는 단순히 모든 RunAsUserToken을 허용한다.
RunAsImplAuthenticationProvider가 악성 코드로 만든 RunAsUserToken을 무조건적으로 수용하지 않게 만들려면, 키의 해시값을 생성한 모든 토큰에 저장해야 한다. 빈 컨텍스트에 추가하는 RunAsManagerImpl과 RunAsImplAuthenticationProvider는 같은 키를 사용한다:
<bean id="runAsManager"
    class="org.springframework.security.access.intercept.RunAsManagerImpl">
<property name="key" value="my_run_as_password"/>
</bean>

<bean id="runAsAuthenticationProvider"
    class="org.springframework.security.access.intercept.RunAsImplAuthenticationProvider">
<property name="key" value="my_run_as_password"/>
</bean>
같은 키를 사용하면 각 RunAsUserToken이 승인된 RunAsManagerImpl이 생성한 것인지를 검증할 수 있다. RunAsUserToken은 보안상의 이유로 생성 후에 수정할 수 없도록 되어 있다.
10.20. Handling Logouts
10.20.1. Logout Java Configuration
WebSecurityConfigurerAdapter를 사용했다면 자동으로 로그아웃 기능을 추가한다. 디폴트로는 /logout URL에 접근했을 때 다음과 같이 사용자를 로그아웃 시킨다:
- HTTP 세션 무효화
- 관련한 모든 RememberMe 인증 제거
SecurityContextHolder비우기/login?logout으로 리다이렉트
로그인을 설정할 때와 비슷하지만 로그아웃 요청은 커스텀할 수 있는 옵션이 좀 더 있다:
protected void configure(HttpSecurity http) throws Exception {
    http
        .logout(logout -> logout                              // (1)
            .logoutUrl("/my/logout")                          // (2)
            .logoutSuccessUrl("/my/index")                    // (3)
            .logoutSuccessHandler(logoutSuccessHandler)       // (4)
            .invalidateHttpSession(true)                      // (5)
            .addLogoutHandler(logoutHandler)                  // (6)
            .deleteCookies(cookieNamesToClear)                // (7)
        )
        ...
}
(1) 로그아웃 기능을 제공한다. WebSecurityConfigurerAdapter를 사용하면 자동으로 적용된다.
(2) 로그아웃을 일으킬 URL이다 (디폴트는 /logout). CSRF 방어를 사용하고 있다면 (디폴트), POST 요청이어야 한다. 자세한 정보는 JavaDoc을 참고하라.
(3) 로그아웃 이후 리다이렉트할 URL이다. 디폴트 값은 /login?logout이다. 자세한 정보는 JavaDoc을 참고하라.
(4) 커스텀 LogoutSuccessHandler를 지정해 보자. 이를 지정하면 logoutSuccessUrl()은 무시한다. 자세한 정보는 JavaDoc을 참고하라.
(5) 로그아웃할 때 HttpSession을 무효화시킬지 여부를 나타낸다. 디폴트는 true다. 내부에선 SecurityContextLogoutHandler에 설정한다. 자세한 정보는 JavaDoc을 참고하라.
(6) LogoutHandler를 추가한다. SecurityContextLogoutHandler는 기본적으로 마지막 LogoutHandler로 추가된다.
(7) 로그아웃에 성공하면 삭제할 쿠키 이름을 여러 개 지정할 수 있다. 직접 CookieClearingLogoutHandler를 추가하는 것과 동일하다.
로그아웃 기능은 당연히 XML 네임스페이스 표기법으로도 설정할 수 있다. 자세한 내용은 스프링 시큐리티 XML 네임스페이스 섹션에 있는 logout 요소를 참고하라.
일반적으로 로그아웃 기능을 커스텀할 땐 LogoutHandler나 LogoutSuccessHandler 구현체를 (또는 둘 다) 추가하는 식으로 구현한다. 스프링 시큐리티 설정 API를 사용하면 다양한 공통 시나리오 내부에서 이 핸들러를 사용한다.
10.20.2. Logout XML Configuration
logout 요소는 특정 URL로 이동하는 식으로 로그아웃을 지원한다. 기본 로그아웃 URL은 /logout이지만, logout-url 속성에 다른 값을 설정할 수 있다. 지원하는 다른 속성을 알고싶다면 네임스페이스 부록을 참고하라.
10.20.3. LogoutHandler
일반적으로 LogoutHandler 구현체는 로그아웃 처리에 참여하는 클래스를 나타낸다. 보통 필요한 clean-up 동작을 수행한다. 따라서 예외를 던지면 안 된다. 스프링 시큐리티는 다양한 구현체를 제공한다:
- PersistentTokenBasedRememberMeServices
- TokenBasedRememberMeServices
- CookieClearingLogoutHandler
- CsrfLogoutHandler
- SecurityContextLogoutHandler
- HeaderWriterLogoutHandler
자세한 내용은 Remember-Me 인터페이스와 구현체 섹션을 참고하라.
설정 API에 LogoutHandler 구현체를 직접 추가할 수도 있지만, 내부에서 대신 LogoutHandler 구현체를 적용해 주는 간단 메소드도 제공한다. 예를 들어 deleteCookies() 메소드로 로그아웃에 성공하면 삭제할 쿠키를 하나 이상 지정할 수 있다. 이 메소드는 직접 CookieClearingLogoutHandler를 추가하는 것보다 간단하다.
10.20.4. LogoutSuccessHandler
LogoutSuccessHandler는 로그아웃에 성공한 다음 LogoutFilter에서 호출하며, 적절한 곳으로 리다이렉트 또는 포워딩시키는 용도로 사용한다. 이 인터페이스는 LogoutHandler와 거의 동일하지만 예외를 던질 수 있다는 점에 유의해라.
스프링 시큐리티는 아래 구현체를 제공한다:
- SimpleUrlLogoutSuccessHandler
- HttpStatusReturningLogoutSuccessHandler
위에서 말했듯이 직접 SimpleUrlLogoutSuccessHandler를 지정하지 않아도 된다. 대신에 간단히 logoutSuccessUrl() 메소드로 설정할 수 있다. 이 메소드 내부에서 SimpleUrlLogoutSuccessHandler를 세팅한다. 로그아웃되면 설정해둔 URL로 리다이렉트한다. 디폴트는 /login?logout이다.
REST API를 사용한다면 HttpStatusReturningLogoutSuccessHandler가 괜찮을 것이다. 이 LogoutSuccessHandler는 로그아웃에 성공하면 URL로 리다이렉트하는 대신 반환할 HTTP 상태코드를 지정할 수 있다. 상태 코드를 지정하지 않으면 디폴트로 200을 반환한다.
10.20.5. Further Logout-Related References
- 로그아웃 핸들링
- 로그아웃 테스트
- HttpServletRequest.logout()
- Remember-Me 인터페이스와 구현체
- CSRF 주의사항 섹션에 있는 로그아웃 문서
- 싱글 로그아웃 섹션 (CAS 프로토콜)
- 스프링 시큐리티 XML 네임스페이스 섹션에 있는 logout 요소 문서
10.21. Authentication Events
인증에 성공하거나 실패할때 마다 각각 AuthenticationSuccessEvent와 AuthenticationFailureEvent가 발생한다.
이 이벤트를 수신하려면 먼저 AuthenticationEventPublisher를 설정해야 한다. 스프링 시큐리티의 DefaultAuthenticationEventPublisher로도 충분할 것이다:
@Bean
public AuthenticationEventPublisher authenticationEventPublisher
        (ApplicationEventPublisher applicationEventPublisher) {
    return new DefaultAuthenticationEventPublisher(applicationEventPublisher);
}
그러면 스프링의 @EventListener를 사용할 수 있다:
@Component
public class AuthenticationEvents {
    @EventListener
    public void onSuccess(AuthenticationSuccessEvent success) {
        // ...
    }

    @EventListener
    public void onFailure(AuthenticationFailureEvent failures) {
        // ...
    }
}
AuthenticationSuccessHandler, AuthenticationFailureHandler와 유사하지 리스너는 서블릿 API와는 독립적으로 사용할 수 있다는 장점이 있다.
10.21.1. Adding Exception Mappings
DefaultAuthenticationEventPublisher는 기본적으로 다음과 같은 이벤트 발생 시 AuthenticationFailureEvent를 발행한다:
| Exception | Event |
|---|---|
BadCredentialsException |
AuthenticationFailureBadCredentialsEvent |
UsernameNotFoundException |
AuthenticationFailureBadCredentialsEvent |
AccountExpiredException |
AuthenticationFailureExpiredEvent |
ProviderNotFoundException |
AuthenticationFailureProviderNotFoundEvent |
DisabledException |
AuthenticationFailureDisabledEvent |
LockedException |
AuthenticationFailureLockedEvent |
AuthenticationServiceException |
AuthenticationFailureServiceExceptionEvent |
CredentialsExpiredException |
AuthenticationFailureCredentialsExpiredEvent |
InvalidBearerTokenException |
AuthenticationFailureBadCredentialsEvent |
publisher는 Exception이 정확하게 일치해야 해당 이벤트를 발행한다. 즉, 이 예외 클래스를 상속한 클래스에선 이벤트를 발생시키지 않는다.
따라서 하위 클래스를 매핑하고 싶다면 publisher의 setAdditionalExceptionMappings 메소드로 매핑을 추가해야 한다:
@Bean
public AuthenticationEventPublisher authenticationEventPublisher
        (ApplicationEventPublisher applicationEventPublisher) {
    Map<Class<? extends AuthenticationException>,
        Class<? extends AuthenticationFailureEvent>> mapping =
            Collections.singletonMap(FooException.class, FooEvent.class);
    AuthenticationEventPublisher authenticationEventPublisher =
        new DefaultAuthenticationEventPublisher(applicationEventPublisher);
    authenticationEventPublisher.setAdditionalExceptionMappings(mapping);
    return authenticationEventPublisher;
}
10.21.2. Default Event
마지막으로, AuthenticationException이 발생할 때마다 실행할 catch-all 이벤트를 설정할 수 있다:
@Bean
public AuthenticationEventPublisher authenticationEventPublisher
        (ApplicationEventPublisher applicationEventPublisher) {
    AuthenticationEventPublisher authenticationEventPublisher =
        new DefaultAuthenticationEventPublisher(applicationEventPublisher);
    authenticationEventPublisher.setDefaultAuthenticationFailureEvent
        (GenericAuthenticationFailureEvent.class);
    return authenticationEventPublisher;
}
Next :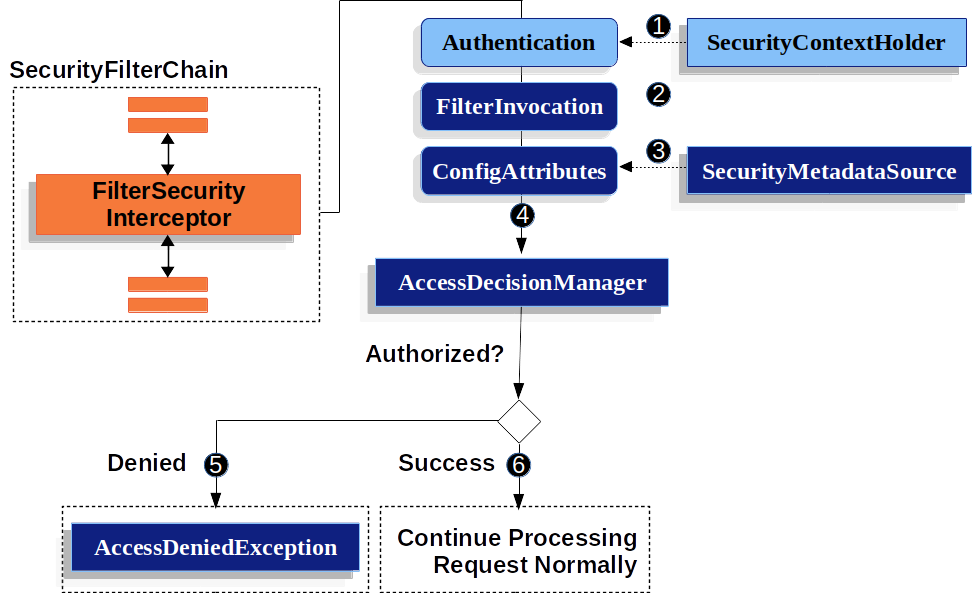 Authorization
서블릿 기반 어플리케이션에 적용할 수 있는 스프링 시큐리티 인가를 설명합니다. 공식 문서에 있는 "authorization" 챕터를 한글로 번역한 문서입니다.
전체 목차는 여기에 있습니다.