스프링 배치 공식 레퍼런스를 한글로 번역한 문서입니다.
전체 목차는 여기에 있습니다.
목차
- 13.1. Spring Batch Integration Introduction
- 13.2. Available Attributes of the Job-Launching Gateway
- 13.3. Sub-Elements
13.1. Spring Batch Integration Introduction
스프링 배치로 해결할 수 없는 일이 Spring Integration으로 간단히 해결될 때도 많다. 반대로 Spring Integration을 사용하다 스프링 배치가 필요할 때도 있으며, 이럴 땐 두 프레임워크를 효율적으로 통합할 방법이 필요하다. 이와 관련한 몇 가지 패턴과 사용 사례가 생겨났고, Spring Batch Integration으로 이런 요구사항을 해결할 수 있다.
스프링 배치와 Spring Integration의 경계가 항상 명확하진 아니지만, 이 두 가지 원칙을 기억해두면 도움이 될 것이다. 잘게 쪼개서 생각하고, 공통 패턴을 적용해라. 이번 장에서는 공통 패턴 몇 가지를 다뤄볼 것이다.
메세지를 보내 배치 프로세스 명령을 자동화하면 주요 관심사를 분리하고 전략화할 수 있다. 예를 들어 메세지 전송으로 job 실행을 트리거링하는 등, 다양한 방법으로 활용할 수 있다. 반대로 job이 완료되거나 실패하면 이 이벤트가 메세지 전송을 트리거링해서, 메세지 컨슈머가 어플리케이션 자체와는 관련 없는 다른 로직을 처리할 수도 있다. 또, job 안에서 메세지 처리를 할 수도 있다(예를 들어 채널로 아이템을 읽고 쓰는 경우). remote partitioning과 remote chunking은 부하를 여러 워커에 분산시킨다.
이번 섹션에서 다루는 주요 개념은 다음과 같다:
- Launching Batch Jobs through Messages
- Providing Feedback with Informational Messages
- Asynchronous Processors
- Externalizing Batch Process Execution
13.1.1. Launching Batch Jobs through Messages
코어 스프링 배치 API는 두 가지 방법으로 배치 job을 시작한다:
- 커맨드라인에서
CommandLineJobRunner사용 - 코드에서
JobOperator.start()나JobLauncher.run()호출
쉘 스크립트에서 CommandLineJobRunner로 배치를 실행하거나
직접 JobOperator를 사용해도 된다
(예를 들어 웹 어플리케이션에서 스프링 배치를 사용하고 있다면).
하지만 좀 더 복잡한 경우라면?
배치에서 데이터를 (S)FTP 서버에 주기적으로 폴링하거나
어플리케이션이 여러 데이터소스를 동시에 사용할 수도 있다.
예를 들어 데이터 파일을 웹에서뿐 아니라 FTP나 다른 곳에서 읽을 수도 있고,
스프링 배치를 시작하기 전 입력 파일을 추가적으로 변환해야 하는 경우도 있다.
이럴 때 쓸 훨씬 강력한 방법이 있는데,
Spring Integration과 여러 어댑터(adapter)로 배치 job을 시작하는 것이다.
예를 들어 파일 인바운드 채널 어댑터를 만들어 파일 시스템 디렉토리를 모니터링하면
입력 파일이 도착하자마자 배치를 시작할 수 있다.
또, 여러 어댑터를 사용해 Spring Integration 플로우를 만들면
배치 job은 동시에 여러 소스에서 데이터를 처리할 수 있다.
Spring Integration을 사용하면,
JobLauncher로 job을 이벤트 기반으로 나눠 실행할 수 있기 때문에
쉽게 이런 시나리오를 구현할 수 있다.
스프링 배치 Integration은 배치 job을 시작할 수 있는
JobLaunchingMessageHandler 클래스를 제공한다.
Spring Integration 메세지가 JobLaunchRequest 타입 페이로드로
JobLaunchingMessageHandler 입력을 만든다.
JobLaunchRequest는 실행할 Job과 실행에 필요한 JobParameters를 감싸고 있다.
아래 이미지는 배치 job을 실행하는 전형적인 Spring Integration 메세지를 보여준다. 전체 메세지 아이콘과 각 설명은 The EIP (Enterprise Integration Patterns) website에 정리돼 있다.
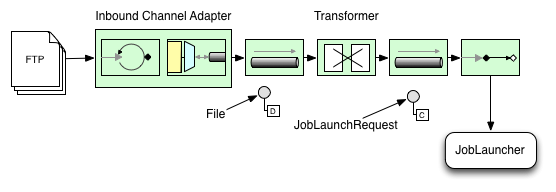
Transforming a file into a JobLaunchRequest
package io.spring.sbi;

import org.springframework.batch.core.Job;
import org.springframework.batch.core.JobParametersBuilder;
import org.springframework.batch.integration.launch.JobLaunchRequest;
import org.springframework.integration.annotation.Transformer;
import org.springframework.messaging.Message;

import java.io.File;

public class FileMessageToJobRequest {
    private Job job;
    private String fileParameterName;

    public void setFileParameterName(String fileParameterName) {
        this.fileParameterName = fileParameterName;
    }

    public void setJob(Job job) {
        this.job = job;
    }

    @Transformer
    public JobLaunchRequest toRequest(Message<File> message) {
        JobParametersBuilder jobParametersBuilder =
            new JobParametersBuilder();

        jobParametersBuilder.addString(fileParameterName,
            message.getPayload().getAbsolutePath());

        return new JobLaunchRequest(job, jobParametersBuilder.toJobParameters());
    }
}
The JobExecution Response
배치 job을 실행하면 JobExecution 인스턴스를 반환하며,
이 인스턴스로 실행 상태를 확인할 수 있다.
JobExecution을 만들 수만 있으면 실제로 job이 성공했는지와는 상관없이 항상 리턴한다.
사용하는 TaskExecutor에 따라 JobExecution 인스턴스를 리턴하는 방법이 다르다.
동기(싱글 쓰레드) TaskExecutor 구현체를 사용한다면
job을 완료한 후에 JobExecution을 리턴한다.
비동기 TaskExecutor는 즉시 JobExecution을 반환한다.
이때는 JobExecution 인스턴스 id를 가져와서(JobExecution.getJobId())
JobExplorer로 JobRepository에 업데이트된 job 상태를 질의한다.
자세한 내용은 스프링 배치 레퍼런스
Querying the Repository를 참고하라.
Spring Batch Integration Configuration
아래 설정은 inbound-channel-adapter 파일을 만들어서
설정한 디렉토리에 있는 CSV 파일을 폴링하고,
FileMessageToJobRequest로 전달해 메세지를 변환하고,
Job Launching Gateway로 job을 실행하고,
JobExecution 결과를 logging-channel-adapter에 로깅한다.
@Bean
public FileMessageToJobRequest fileMessageToJobRequest() {
    FileMessageToJobRequest fileMessageToJobRequest = new FileMessageToJobRequest();
    fileMessageToJobRequest.setFileParameterName("input.file.name");
    fileMessageToJobRequest.setJob(personJob());
    return fileMessageToJobRequest;
}

@Bean
public JobLaunchingGateway jobLaunchingGateway() {
    SimpleJobLauncher simpleJobLauncher = new SimpleJobLauncher();
    simpleJobLauncher.setJobRepository(jobRepository);
    simpleJobLauncher.setTaskExecutor(new SyncTaskExecutor());
    JobLaunchingGateway jobLaunchingGateway = new JobLaunchingGateway(simpleJobLauncher);

    return jobLaunchingGateway;
}

@Bean
public IntegrationFlow integrationFlow(JobLaunchingGateway jobLaunchingGateway) {
    return IntegrationFlows.from(Files.inboundAdapter(new File("/tmp/myfiles")).
                    filter(new SimplePatternFileListFilter("*.csv")),
            c -> c.poller(Pollers.fixedRate(1000).maxMessagesPerPoll(1))).
            handle(fileMessageToJobRequest()).
            handle(jobLaunchingGateway).
            log(LoggingHandler.Level.WARN, "headers.id + ': ' + payload").
            get();
}
Example ItemReader Configuration
이제 파일을 폴링해서 job을 실행시켰으니,
job 파라미터의 “input.file.name”에 정의한 파일을 읽을
스프링 배치 ItemReader를 설정해보겠다:
@Bean
@StepScope
public ItemReader sampleReader(@Value("#{jobParameters[input.file.name]}") String resource) {
...
    FlatFileItemReader flatFileItemReader = new FlatFileItemReader();
    flatFileItemReader.setResource(new FileSystemResource(resource));
...
    return flatFileItemReader;
}
앞의 예제에서 주의 깊게 살펴봐야 할 점은
ItemReader를 step 스코프로 설정하고,
리소스 프로퍼티에 #{jobParameters['input.file.name']}을 주입했다는 것이다.
빈을 step 스코프로 설정해야 프로퍼티를 나중에 바인딩(late binding)하고
jobParameters에 접근할 수 있다.
13.2. Available Attributes of the Job-Launching Gateway
job-launching gateway는 다음과 같은 속성으로 job을 제어한다:
id: 기본 스프링 빈 정의를 식별하며 두 가지 중 하나다:EventDrivenConsumerPollingConsumer(정확한 구현은 입력 채널이SubscribableChannel인지PollableChannel에 따라 다르다.)
auto-startup: job을 실행할 때 엔드포인트를 자동으로 시작해야 하는지 나타내는 boolean 플래그. 디폴트는 true다.request-channel: 엔드포인트의 입력MessageChannel.reply-channel: 결과로JobExecution페이로드를 보낼MessageChannel.reply-timeout: 게이트웨이가 reply 채널에 응답 메세지를 보내는 동안 얼마나(milliseconds) 기다릴지 설정한다. 이 제한을 넘어가면 exeption이 발생한다. 이 속성은 채널이 블락된 경우에만 유효하다 (예를 들어 사용 중인 큐가 다 찬 경우).DirectChannel에 메세지를 보낸다면 sender의 쓰레드에서 받는다는 것에 주의해라. 따라서 메세지 전송에 실패했다면 다른 컴포넌트 다운스트림으로 인한 것일 수 있다.reply-timeout속성은MessagingTemplate인스턴스의sendTimeout프로퍼티에 매핑된다. 값을 지정하지 않으면 디폴트 값인 -1로 설정되는데,Gateway가 무기한 기다린다는 뜻이다.job-launcher: Optional. 커스텀JobLauncher빈을 사용해도 된다. 지정하지 않으면 어댑터는jobLauncherid로 등록한 인스턴스를 재사용한다. 디폴트 인스턴스가 없으면 예외를 던진다.order: 엔드포인트를SubscribableChannel구독자로 연결한 경우 실행 순서를 명시한다.
13.3. Sub-Elements
Gateway가 PollableChannel로 메세지를 받으려면
아래 예제처럼 Job Launching Gateway에 글로벌 디폴트 Poller를 지정하거나
Poller 하위 요소를 설정해야 한다.
@Bean
@ServiceActivator(inputChannel = "queueChannel", poller = @Poller(fixedRate="1000"))
public JobLaunchingGateway sampleJobLaunchingGateway() {
    JobLaunchingGateway jobLaunchingGateway = new JobLaunchingGateway(jobLauncher());
    jobLaunchingGateway.setOutputChannel(replyChannel());
    return jobLaunchingGateway;
}
13.3.1. Providing Feedback with Informational Messages
어떤 스프링 배치 job은 오랫동안 실행될 수도 있기 때문에, 진행 정보를 확인하고 싶을 때가 있다. 예를 들어 배치 job의 일부나 전체가 실패했을 때 관련 담당자에게 통지하고 싶을 수 있다. 스프링 배치는 다음을 통해 정보를 수집할 수 있다:
- Active polling
- Event-driven listeners
스프링 배치 job을 비동기로 시작하면 (예를 들어 Job Launching Gateway를 사용하는 경우)
JobExecution 인스턴스를 반환한다.
따라서 JobExecution.getJobId()를 사용해
JobExplorer로 JobRepository에 있는 업데이트된 JobExecution 인스턴스를
조회하는 식으로 상태를 주기적으로 폴링할 수 있다.
하지만 이건 차선책이고, 먼저 이벤트 지향으로 접근해 보는 게 좋다.
따라서 스프링 배치는 여러 리스너를 제공하며, 다음은 가장 많이 사용하는 리스너다:
- StepListener
- ChunkListener
- JobExecutionListener
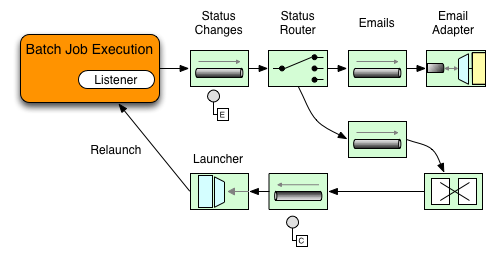
아래 그림에 보이는 예제는 StepExecutionListener를 사용한다.
따라서 Spring Integration은 step에서 발생한 모든 이벤트를 step 전후에 통지받는다.
예를 들어 받은 Router로 StepExecution 상태에 따라 분기할 수 있다.
메일 아웃바운드 채널 어댑터에 메세지를 라우팅하면
특정 조건에 메일로 통지할 수 있다.
다음 두 예제는 StepExecution 이벤트를 Gateway에
메세지로 전송하고 결과를 logging-channel-adapter에 로깅하는
리스너를 설정한다.
먼저 통지를 위한 integration 빈을 정의한다:
@Bean
@ServiceActivator(inputChannel = "stepExecutionsChannel")
public LoggingHandler loggingHandler() {
    LoggingHandler adapter = new LoggingHandler(LoggingHandler.Level.WARN);
    adapter.setLoggerName("TEST_LOGGER");
    adapter.setLogExpressionString("headers.id + ': ' + payload");
    return adapter;
}

@MessagingGateway(name = "notificationExecutionsListener", defaultRequestChannel = "stepExecutionsChannel")
public interface NotificationExecutionListener extends StepExecutionListener {}
설정에
@IntegrationComponentScan어노테이션을 추가해야 한다.
그다음, step 레벨 리스너를 job에 등록한다.
public Job importPaymentsJob() {
    return jobBuilderFactory.get("importPayments")
        .start(stepBuilderFactory.get("step1")
                .chunk(200)
                .listener(notificationExecutionsListener())
                ...
}
13.3.2. Asynchronous Processors
아이템 처리는 비동기 프로세서로 확장할 수 있다.
비동기 프로세서를 사용하면, AsyncItemProcessor는 디스패처 역할을 하며
새 쓰레드에서 ItemProcessor 로직을 실행한다.
아이템을 다 처리하고 나면 AsynchItemWriter에 Future를 전송한다.
게다가 비동기로 아이템을 처리하면
fork-join을 사용할 수 있으므로 성능이 향상된다.
AsyncItemWriter는 결과를 모으고 있다가, 모든 아이템이 다 처리되면 청크로 write한다.
다음은 AsyncItemProcessor를 사용하는 예시이다:
@Bean
public AsyncItemProcessor processor(ItemProcessor itemProcessor, TaskExecutor taskExecutor) {
    AsyncItemProcessor asyncItemProcessor = new AsyncItemProcessor();
    asyncItemProcessor.setTaskExecutor(taskExecutor);
    asyncItemProcessor.setDelegate(itemProcessor);
    return asyncItemProcessor;
}
delegate프로퍼티로 ItemProcessor 빈을 넘기고
taskExecutor 프로퍼티로 원하는 TaskExecutor를 설정하면 된다.
다음은 AsyncItemWriter를 설정하는 방법이다:
@Bean
public AsyncItemWriter writer(ItemWriter itemWriter) {
    AsyncItemWriter asyncItemWriter = new AsyncItemWriter();
    asyncItemWriter.setDelegate(itemWriter);
    return asyncItemWriter;
}
여기서도 마찬가지로 delegate 프로퍼티가 실제 ItemWriter 빈이다.
13.3.3. Externalizing Batch Process Execution
지금 까지 설명한 어플리케이션 통합 방법은 모두 Spring Integration이 스프링 배치를 감싸는 식이었다. 하지만 스프링 배치 내부에서도 Spring Integration을 사용할 수 있다. 이 방법을 사용하면 스프링 배치의 아이템 처리나 심지어 청크 처리까지 외부 프로세스로 위임할 수 있다. 이를 통해 복잡한 처리를 Spring Integration에 위임할 수 있다. Spring Batch Integration은 다음 두 가지를 지원한다:
- Remote Chunking
- Remote Partitioning
Remote Chunking

한 단계 더 나아가서, 아이템을 전송하고 결과를 수집하는
ChunkMessageChannelItemWriter(Spring Batch Integration 제공)를 사용하면
청크 처리도 외부에서 할 수 있다.
스프링 배치는 일단 데이터를 보내고 나면
결과를 기다리지 않고 계속해서 아이템을 읽고 그룹화한다.
ChunkMessageChannelItemWriter가 결과를 모아 통합하고 스프링 배치 프로세스로 돌려준다.
Spring Integration을 사용하면 동시 처리를 완벽하게 제어할 수 있다
(예를 들어 DirectChannel 대신 QueueChannel을 사용함으로써).
게다가 스프링 배치의 풍부한 채널 어댑터(JMS나 AMQP같은)를 사용하면
청크를 외부 시스템으로 분산처리할 수 있다.
step에서 remote chunking을 사용하는 job은 아래와 유사하게 설정할 수 있다:
public Job chunkJob() {
     return jobBuilderFactory.get("personJob")
             .start(stepBuilderFactory.get("step1")
                     .<Person, Person>chunk(200)
                     .reader(itemReader())
                     .writer(itemWriter())
                     .build())
             .build();
 }
ItemReader는 매니저에서 데이터를 읽을 때 사용하는 빈이다.
ItemWriter는 위에서 설명한 특별한 ItemWriter(ChunkMessageChannelItemWriter)를 가리킨다.
processor는(만약 있다면) 워커에서 사용하므로 매니저에는 설정하지 않는다.
다음은 기본적인 매니저를 설정해 보겠다.
실제로 사용할 때는 throttle limit 같은 다른 컴포넌트 프로퍼티도 함께 체크해라.
@Bean
public org.apache.activemq.ActiveMQConnectionFactory connectionFactory() {
    ActiveMQConnectionFactory factory = new ActiveMQConnectionFactory();
    factory.setBrokerURL("tcp://localhost:61616");
    return factory;
}

/*
 * Configure outbound flow (requests going to workers)
 */
@Bean
public DirectChannel requests() {
    return new DirectChannel();
}

@Bean
public IntegrationFlow outboundFlow(ActiveMQConnectionFactory connectionFactory) {
    return IntegrationFlows
            .from(requests())
            .handle(Jms.outboundAdapter(connectionFactory).destination("requests"))
            .get();
}

/*
 * Configure inbound flow (replies coming from workers)
 */
@Bean
public QueueChannel replies() {
    return new QueueChannel();
}

@Bean
public IntegrationFlow inboundFlow(ActiveMQConnectionFactory connectionFactory) {
    return IntegrationFlows
            .from(Jms.messageDrivenChannelAdapter(connectionFactory).destination("replies"))
            .channel(replies())
            .get();
}

/*
 * Configure the ChunkMessageChannelItemWriter
 */
@Bean
public ItemWriter<Integer> itemWriter() {
    MessagingTemplate messagingTemplate = new MessagingTemplate();
    messagingTemplate.setDefaultChannel(requests());
    messagingTemplate.setReceiveTimeout(2000);
    ChunkMessageChannelItemWriter<Integer> chunkMessageChannelItemWriter
            = new ChunkMessageChannelItemWriter<>();
    chunkMessageChannelItemWriter.setMessagingOperations(messagingTemplate);
    chunkMessageChannelItemWriter.setReplyChannel(replies());
    return chunkMessageChannelItemWriter;
}
위 설정에선 빈을 여러 개 정의했는데,
ActiveMQ와 Spring Integration이 제공하는 인바운드/아웃바운드 JMS 어댑터로
메세지 미들웨어를 설정했다.
위 step에서 참조하고 있는 itemWriter는
설정한 미들웨어로 청크를 쓰기 위해 ChunkMessageChannelItemWriter를 사용했다.
이제 워커 설정으로 넘어가서, 아래 예제를 보자:
@Bean
public org.apache.activemq.ActiveMQConnectionFactory connectionFactory() {
    ActiveMQConnectionFactory factory = new ActiveMQConnectionFactory();
    factory.setBrokerURL("tcp://localhost:61616");
    return factory;
}

/*
 * Configure inbound flow (requests coming from the manager)
 */
@Bean
public DirectChannel requests() {
    return new DirectChannel();
}

@Bean
public IntegrationFlow inboundFlow(ActiveMQConnectionFactory connectionFactory) {
    return IntegrationFlows
            .from(Jms.messageDrivenChannelAdapter(connectionFactory).destination("requests"))
            .channel(requests())
            .get();
}

/*
 * Configure outbound flow (replies going to the manager)
 */
@Bean
public DirectChannel replies() {
    return new DirectChannel();
}

@Bean
public IntegrationFlow outboundFlow(ActiveMQConnectionFactory connectionFactory) {
    return IntegrationFlows
            .from(replies())
            .handle(Jms.outboundAdapter(connectionFactory).destination("replies"))
            .get();
}

/*
 * Configure the ChunkProcessorChunkHandler
 */
@Bean
@ServiceActivator(inputChannel = "requests", outputChannel = "replies")
public ChunkProcessorChunkHandler<Integer> chunkProcessorChunkHandler() {
    ChunkProcessor<Integer> chunkProcessor
            = new SimpleChunkProcessor<>(itemProcessor(), itemWriter());
    ChunkProcessorChunkHandler<Integer> chunkProcessorChunkHandler
            = new ChunkProcessorChunkHandler<>();
    chunkProcessorChunkHandler.setChunkProcessor(chunkProcessor);
    return chunkProcessorChunkHandler;
}
설정 대부분이 매니저 설정과 비슷하다.
워커는 스프링 배치 JobRepository나 실제 job 설정 파일에 접근할 필요가 없다.
가장 중요한 빈은 chunkProcessorChunkHandler다.
chunkProcessor 프로퍼티로 ChunkProcessorChunkHandler에
SimpleChunkProcessor를 넘겨줬는데,
매니저로부터 청크를 받으면 이 SimpleChunkProcessor로
워커에서 실행할 ItemWriter를(원한다면 ItemProcessor도) 참조한다.
더 자세한 내용은 Remote Chunking 의 “Scalability” 섹션을 참고하라.
Spring Batch Integration은 4.1 버전부터
@EnableBatchIntegration 어노테이션으로
간단하게 remote chunking을 설정할 수 있다.
이 어노테이션은 어플리케이션 컨텍스트에 주입할 수 있는 빈 두 개를 제공한다:
RemoteChunkingManagerStepBuilderFactory: 매니저 step을 만들 때 사용RemoteChunkingWorkerBuilder: 리모트 워커 플로우를 만들 때 사용
이 둘을 사용하면 아래 다이어그램에 나오는 여러 컴포넌트를 구성할 수 있다:
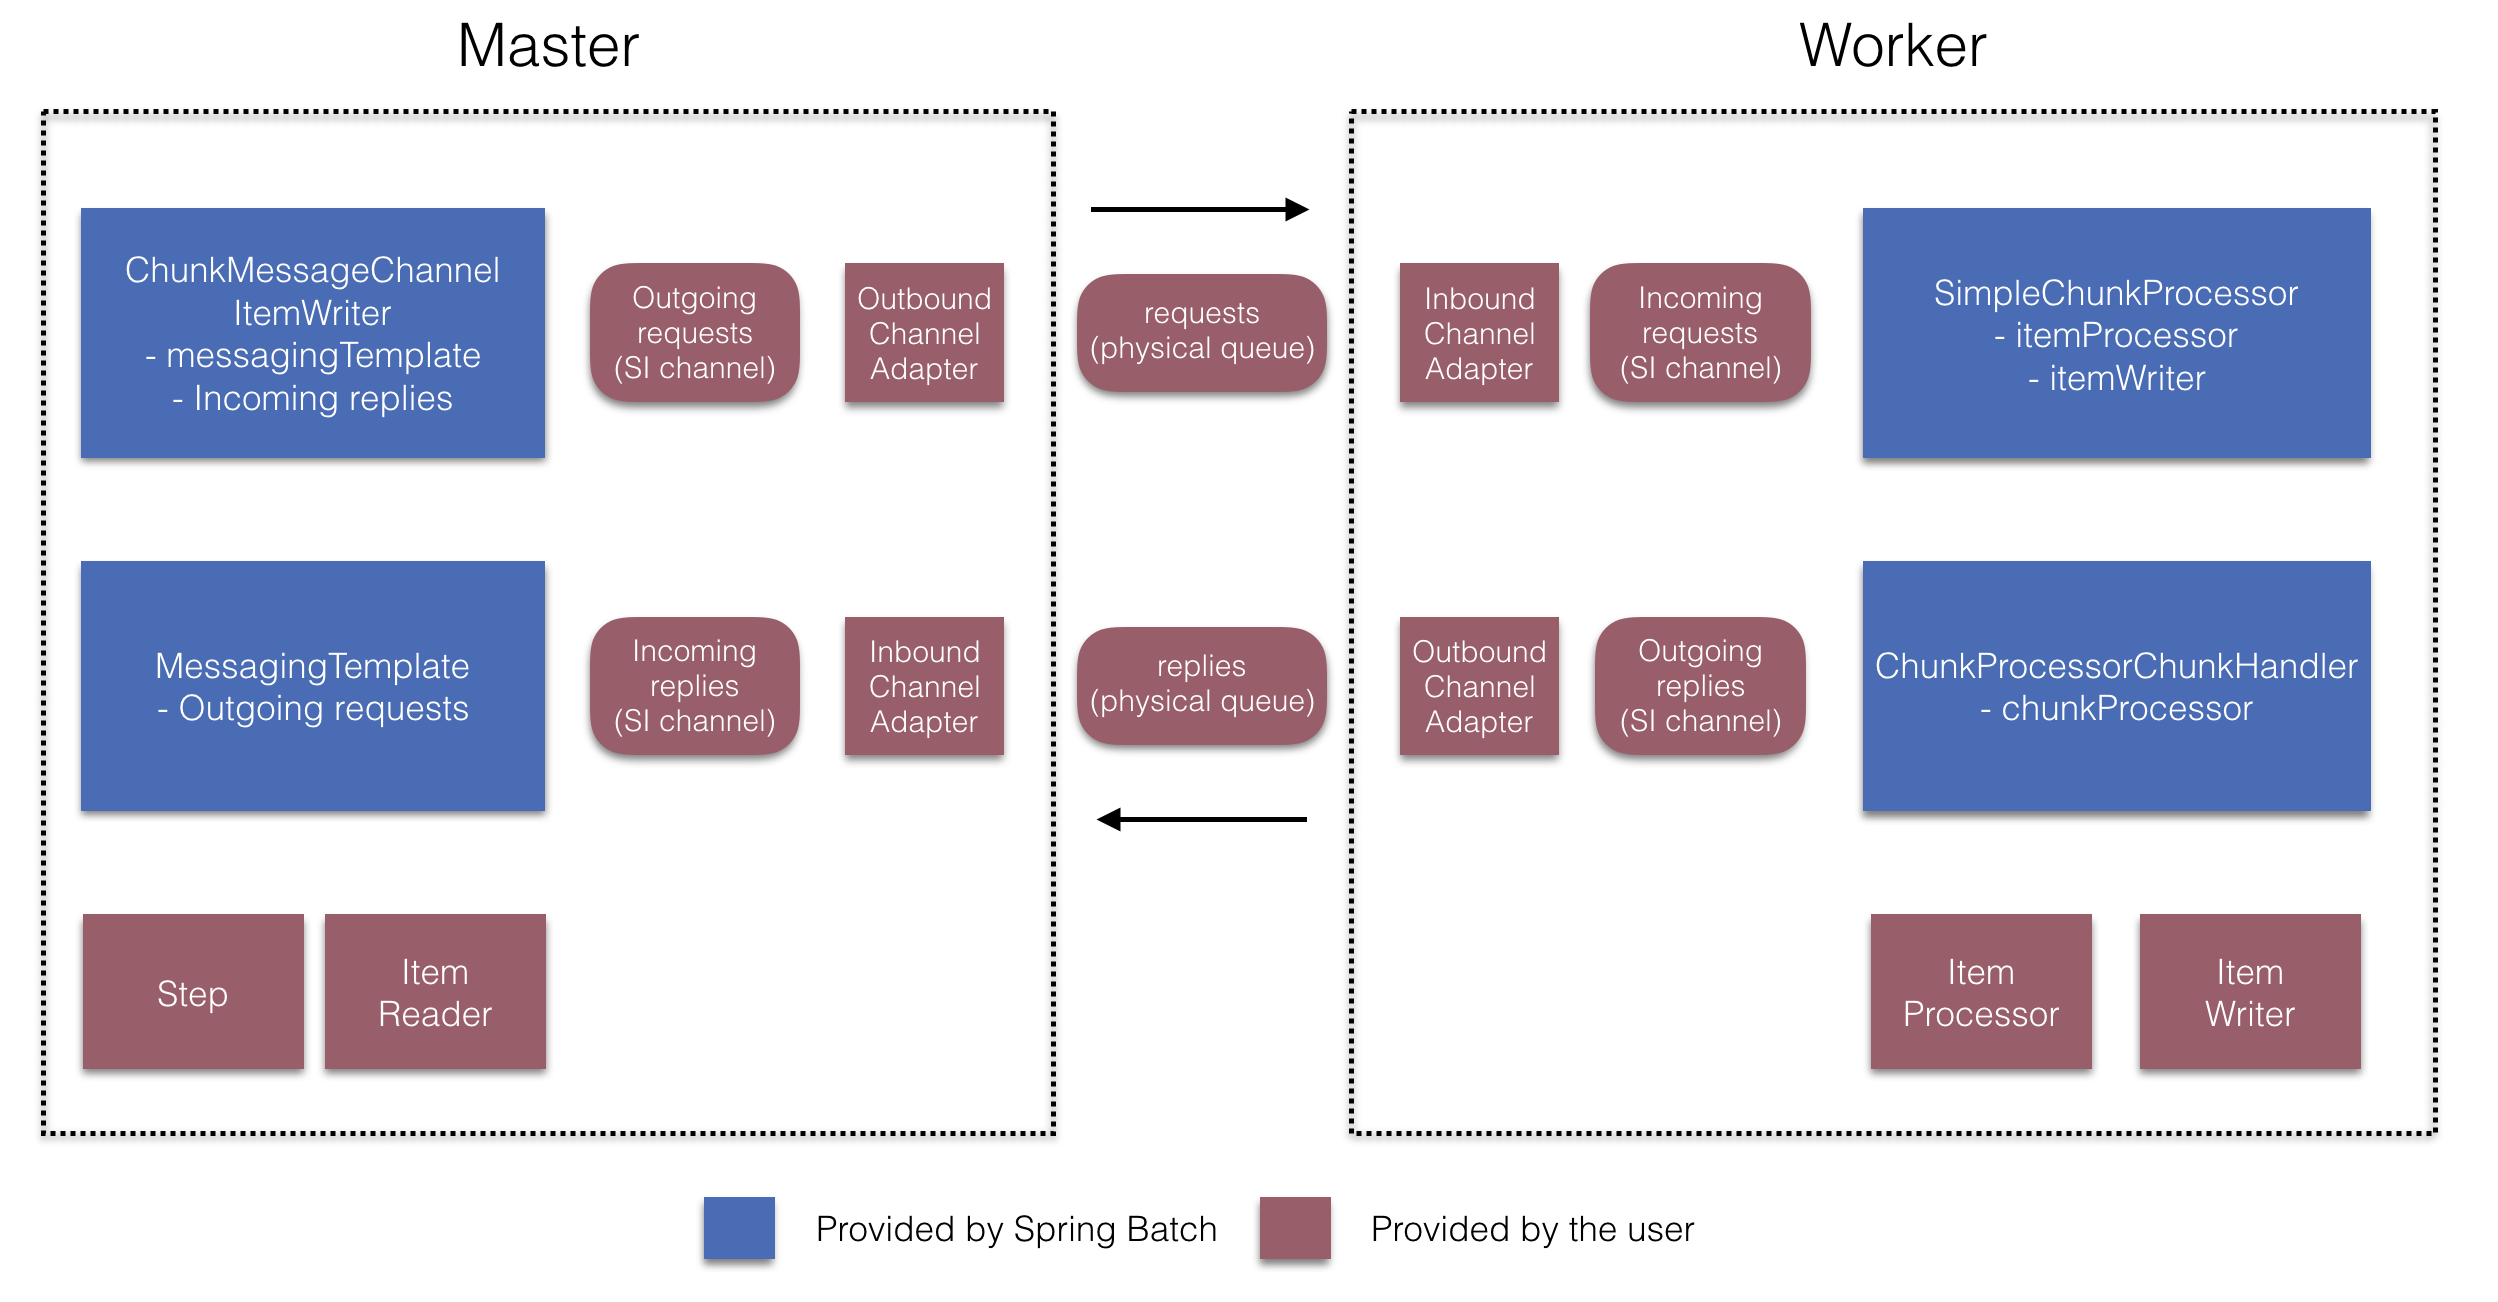
매니저 step을 만들 때는
RemoteChunkingManagerStepBuilderFactory로 다음을 설정할 수 있다:
- 아이템을 읽어서 워커에 전달할 item reader
- 워커에 요청을 전송하는 출력 채널(“Outgoing requests”)
- 워커에게 응답을 받는 입력 채널(“Incoming replies”)
ChunkMessageChannelItemWriter와 MessagingTemplate은
명시적으로 설정하지 않아도 된다 (필요하면 설정할 수는 있다).
RemoteChunkingWorkerBuilder로 워커가 다음과 같은 일을 하도록 설정할 수 있다:
- 매니저가 입력 채널(“Incoming requests”)에 보낸 요청 수신
- 각 요청마다
ItemProcessor와ItemWriter를 가지고 있는ChunkProcessorChunkHandler의handleChunk메소드 호출 - 매니저에게 출력 채널(“Outgoing replies”)로 응답 전송
SimpleChunkProcessor와 ChunkProcessorChunkHandler는
명시적으로 설정하지 않아도 된다 (필요하면 설정할 수는 있다).
아래는 이 API를 사용하는 예제이다:
@EnableBatchIntegration
@EnableBatchProcessing
public class RemoteChunkingJobConfiguration {

    @Configuration
    public static class ManagerConfiguration {

        @Autowired
        private RemoteChunkingManagerStepBuilderFactory managerStepBuilderFactory;

        @Bean
        public TaskletStep managerStep() {
            return this.managerStepBuilderFactory.get("managerStep")
                       .chunk(100)
                       .reader(itemReader())
                       .outputChannel(requests()) // requests sent to workers
                       .inputChannel(replies())   // replies received from workers
                       .build();
        }

        // Middleware beans setup omitted

    }

    @Configuration
    public static class WorkerConfiguration {

        @Autowired
        private RemoteChunkingWorkerBuilder workerBuilder;

        @Bean
        public IntegrationFlow workerFlow() {
            return this.workerBuilder
                       .itemProcessor(itemProcessor())
                       .itemWriter(itemWriter())
                       .inputChannel(requests()) // requests received from the manager
                       .outputChannel(replies()) // replies sent to the manager
                       .build();
        }

        // Middleware beans setup omitted

    }

}
remote chunking job을 사용하는 좀 더 복잡한 예제는 여기를 참고하라.
Remote Partitioning
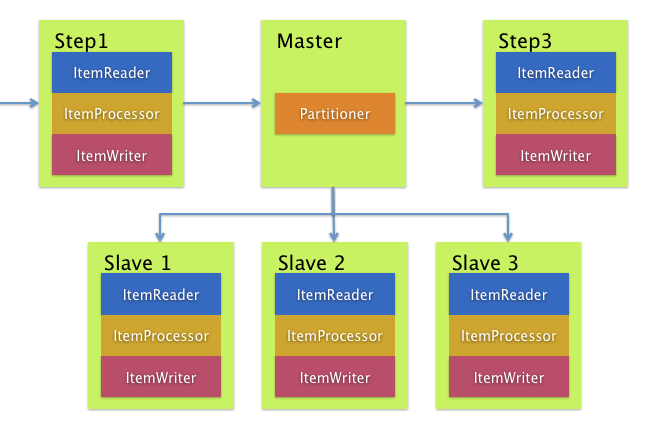
반대로 Remote Partitioning은 아이템 처리가 아니라 I/O가 병목일 때 유용하다.
Remote Partitioning을 사용하면 각 워커에게 스프링 배치 step을 통째로 맡길 수 있다.
각 워커마다 ItemReader, ItemProcessor, ItemWriter를 따로 가지고 있다.
스프링 배치는 이를 위한 MessageChannelPartitionHandler를 제공한다.
이 PartitionHandler 구현체는 MessageChannel 인스턴스를 사용해서
리모트 워커에게 요청을 보내고 결과를 수신한다.
리모트 워커와 통신하는 데 사용하는 전송수단(JMS나 AMQP같은)을 추상화했다.
“Scalability” 섹션에서
remote partitioning을 설명하면서 기본 개념과 필요한 설정을 정리했고,
로컬에서 여러 쓰레드를 실행하는
디폴트 TaskExecutorPartitionHandler를 사용한 예제를 다뤘다.
remote partitioning을 여러 JVM에서 사용하려면 두 가지가 더 필요하다:
- 원격 fabric 혹은 그리드 환경
- 원하는 fabric이나 그리드 환경을 지원하는
PartitionHandler구현체
remote chunking과 유사하게 JMS를 “remoting fabric”으로 사용할 수 있다.
이런 경우 아래 예제처럼
PartitionHandler 구현체는 MessageChannelPartitionHandler를 사용한다.
아래 예제는 파티셔닝된 job이 있다고 가정하고
MessageChannelPartitionHandler와 JMS 설정에 집중한다.
/*
 * Configuration of the manager side
 */
@Bean
public PartitionHandler partitionHandler() {
    MessageChannelPartitionHandler partitionHandler = new MessageChannelPartitionHandler();
    partitionHandler.setStepName("step1");
    partitionHandler.setGridSize(3);
    partitionHandler.setReplyChannel(outboundReplies());
    MessagingTemplate template = new MessagingTemplate();
    template.setDefaultChannel(outboundRequests());
    template.setReceiveTimeout(100000);
    partitionHandler.setMessagingOperations(template);
    return partitionHandler;
}

@Bean
public QueueChannel outboundReplies() {
    return new QueueChannel();
}

@Bean
public DirectChannel outboundRequests() {
    return new DirectChannel();
}

@Bean
public IntegrationFlow outboundJmsRequests() {
    return IntegrationFlows.from("outboundRequests")
            .handle(Jms.outboundGateway(connectionFactory())
                    .requestDestination("requestsQueue"))
            .get();
}

@Bean
@ServiceActivator(inputChannel = "inboundStaging")
public AggregatorFactoryBean partitioningMessageHandler() throws Exception {
    AggregatorFactoryBean aggregatorFactoryBean = new AggregatorFactoryBean();
    aggregatorFactoryBean.setProcessorBean(partitionHandler());
    aggregatorFactoryBean.setOutputChannel(outboundReplies());
    // configure other propeties of the aggregatorFactoryBean
    return aggregatorFactoryBean;
}

@Bean
public DirectChannel inboundStaging() {
    return new DirectChannel();
}

@Bean
public IntegrationFlow inboundJmsStaging() {
    return IntegrationFlows
            .from(Jms.messageDrivenChannelAdapter(connectionFactory())
                    .configureListenerContainer(c -> c.subscriptionDurable(false))
                    .destination("stagingQueue"))
            .channel(inboundStaging())
            .get();
}

/*
 * Configuration of the worker side
 */
@Bean
public StepExecutionRequestHandler stepExecutionRequestHandler() {
    StepExecutionRequestHandler stepExecutionRequestHandler = new StepExecutionRequestHandler();
    stepExecutionRequestHandler.setJobExplorer(jobExplorer);
    stepExecutionRequestHandler.setStepLocator(stepLocator());
    return stepExecutionRequestHandler;
}

@Bean
@ServiceActivator(inputChannel = "inboundRequests", outputChannel = "outboundStaging")
public StepExecutionRequestHandler serviceActivator() throws Exception {
    return stepExecutionRequestHandler();
}

@Bean
public DirectChannel inboundRequests() {
    return new DirectChannel();
}

public IntegrationFlow inboundJmsRequests() {
    return IntegrationFlows
            .from(Jms.messageDrivenChannelAdapter(connectionFactory())
                    .configureListenerContainer(c -> c.subscriptionDurable(false))
                    .destination("requestsQueue"))
            .channel(inboundRequests())
            .get();
}

@Bean
public DirectChannel outboundStaging() {
    return new DirectChannel();
}

@Bean
public IntegrationFlow outboundJmsStaging() {
    return IntegrationFlows.from("outboundStaging")
            .handle(Jms.outboundGateway(connectionFactory())
                    .requestDestination("stagingQueue"))
            .get();
}
아래 예제처럼 반드시 이 partitionHandler 빈을
파티션 handler 속성으로 매핑해야 한다:
	public Job personJob() {
		return jobBuilderFactory.get("personJob")
				.start(stepBuilderFactory.get("step1.manager")
						.partitioner("step1.worker", partitioner())
						.partitionHandler(partitionHandler())
						.build())
				.build();
	}
remote partitioning job을 사용하는 좀 더 복잡한 예제는 여기를 참고하라.
@EnableBatchIntegration 어노테이션으로 remote partitioning 설정을
더 단순하게 만들 수 있다.
이 어노테이션은 remote partitioning에 유용하게 쓸 수 있는 빈 두 개를 제공한다:
RemotePartitioningManagerStepBuilderFactory: 매니저 step을 만들 때 사용RemotePartitioningWorkerStepBuilderFactory: 워커 step을 만들 때 사용
이 둘을 사용하면 아래 다이어그램에 나오는 여러 컴포넌트를 구성할 수 있다:
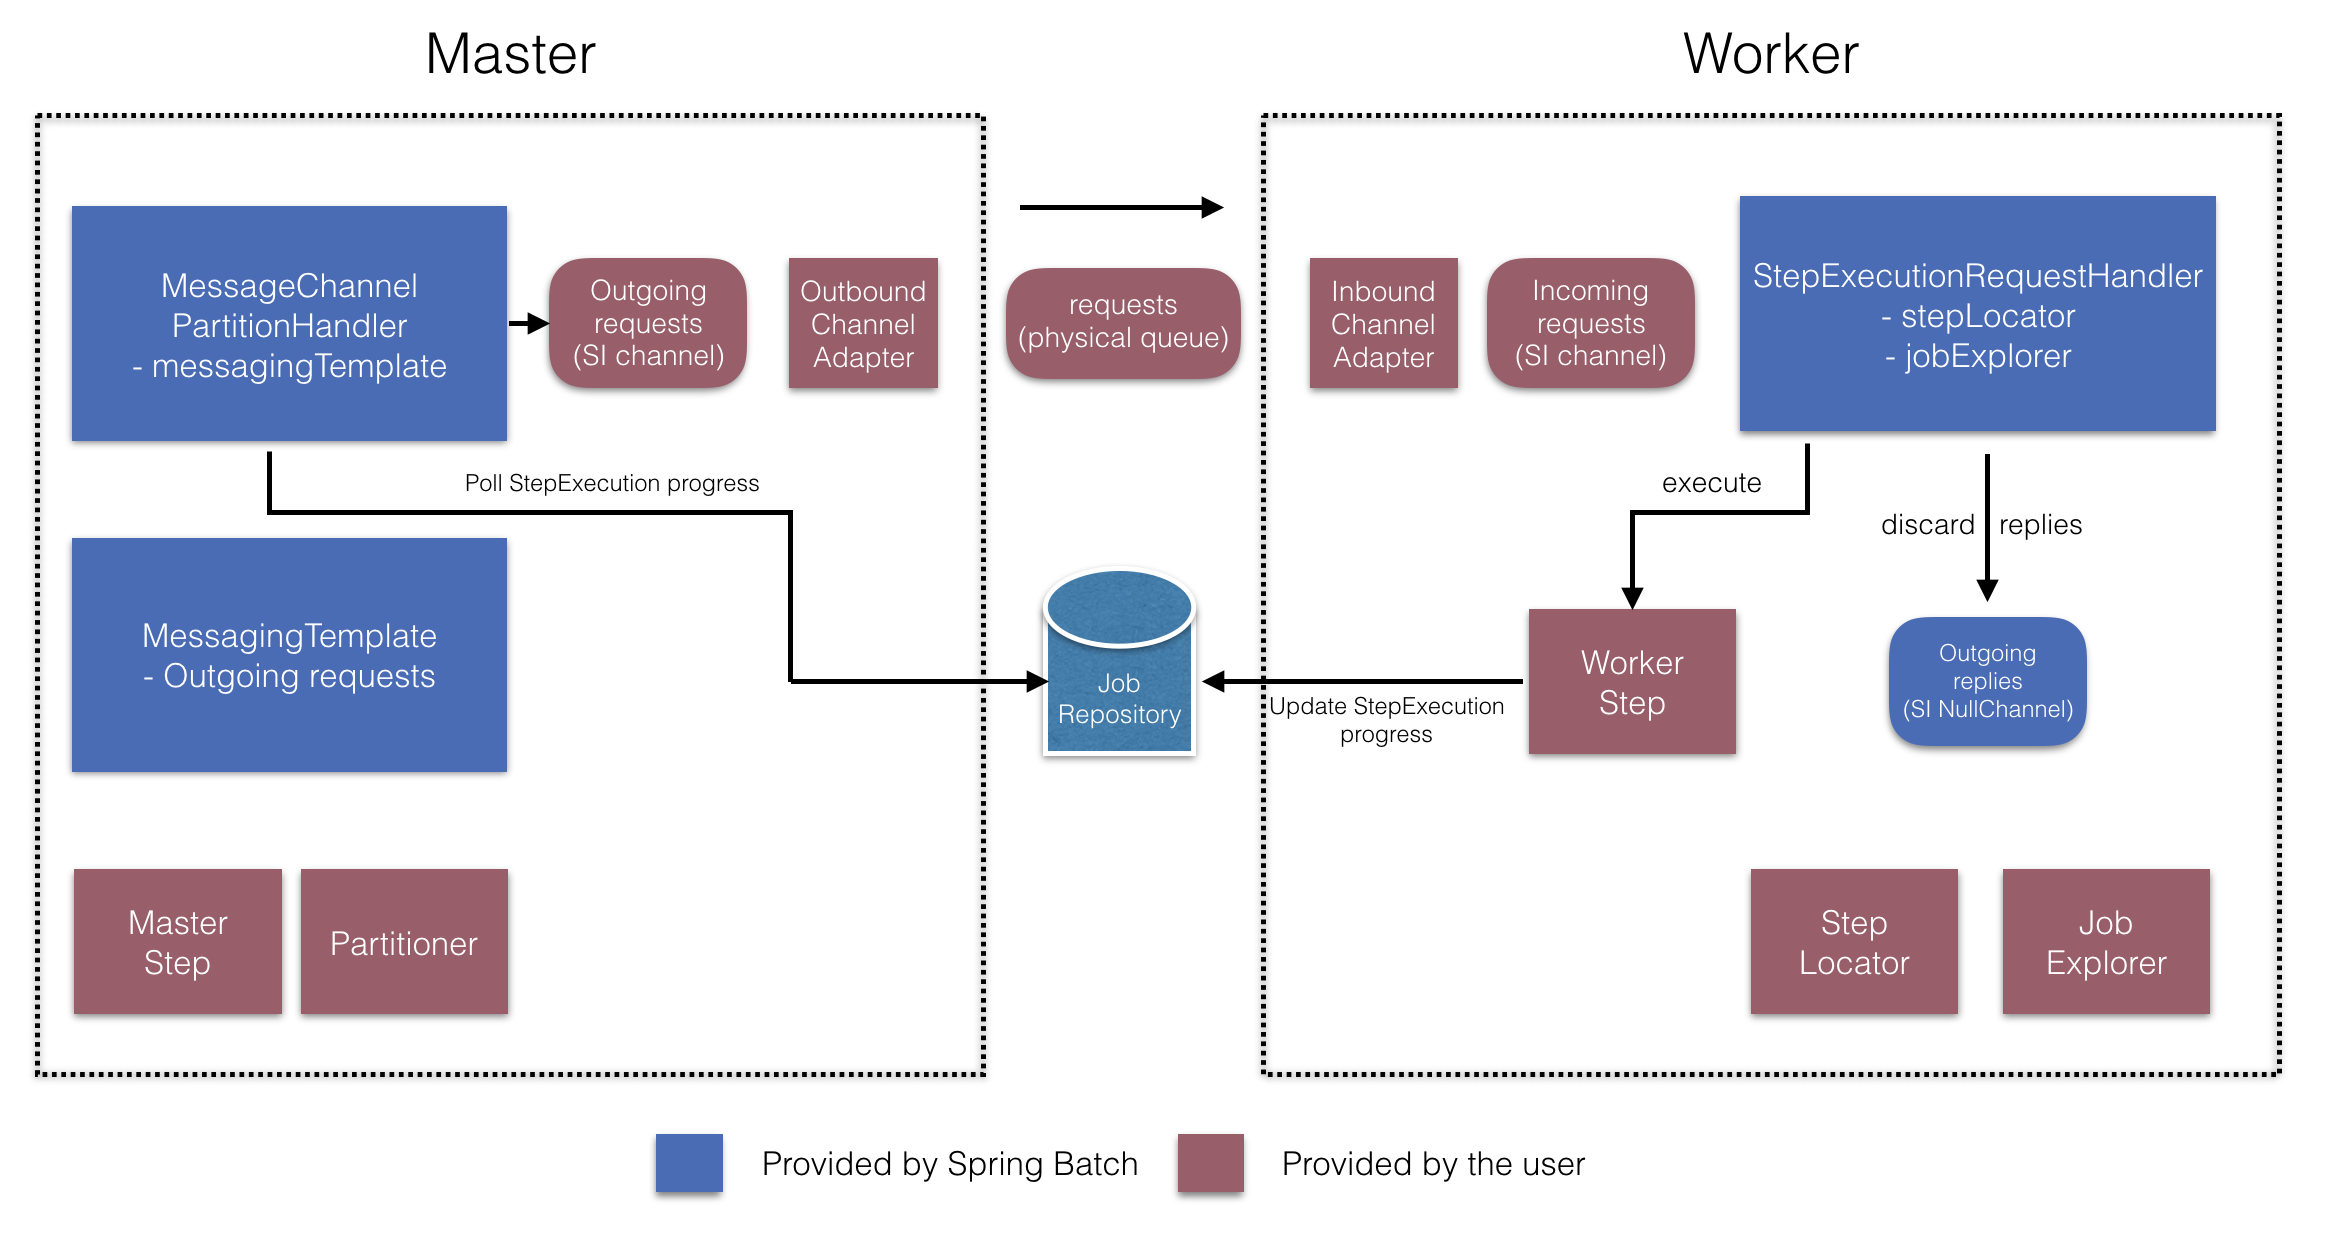

매니저 step을 만들 때는
RemotePartitioningManagerStepBuilderFactory로 다음을 설정할 수 있다:
- 데이터를 나눌 때 사용하는
Partitioner - 워커에 요청을 전송하는 출력 채널(“Outgoing requests”)
- 워커에게 응답을 받는 입력 채널(“Incoming replies”) (replies aggregation을 설정하는 경우)
- 폴링 간격과 타임아웃 파라미터 (job 레포지토리 폴링을 설정한 경우)
MessageChannelPartitionHandler와 MessagingTemplate은
명시적으로 설정하지 않아도 된다 (필요하면 설정할 수는 있다).
RemotePartitioningWorkerStepBuilderFactory로
워커가 다음과 같은 일을 하도록 설정할 수 있다:
- 매니저가 입력 채널(“Incoming requests”)에 보낸 요청 수신
- 각 요청마다
StepExecutionRequestHandler의handle메소드 호출 - 매니저에게 출력 채널(“Outgoing replies”)로 응답 전송
StepExecutionRequestHandler는
명시적으로 설정하지 않아도 된다 (필요하면 설정할 수는 있다).
아래는 이 API를 사용하는 예제이다:
@Configuration
@EnableBatchProcessing
@EnableBatchIntegration
public class RemotePartitioningJobConfiguration {

    @Configuration
    public static class ManagerConfiguration {

        @Autowired
        private RemotePartitioningManagerStepBuilderFactory managerStepBuilderFactory;

        @Bean
        public Step managerStep() {
                 return this.managerStepBuilderFactory
                    .get("managerStep")
                    .partitioner("workerStep", partitioner())
                    .gridSize(10)
                    .outputChannel(outgoingRequestsToWorkers())
                    .inputChannel(incomingRepliesFromWorkers())
                    .build();
        }

        // Middleware beans setup omitted

    }

    @Configuration
    public static class WorkerConfiguration {

        @Autowired
        private RemotePartitioningWorkerStepBuilderFactory workerStepBuilderFactory;

        @Bean
        public Step workerStep() {
                 return this.workerStepBuilderFactory
                    .get("workerStep")
                    .inputChannel(incomingRequestsFromManager())
                    .outputChannel(outgoingRepliesToManager())
                    .chunk(100)
                    .reader(itemReader())
                    .processor(itemProcessor())
                    .writer(itemWriter())
                    .build();
        }

        // Middleware beans setup omitted

    }

}
Next :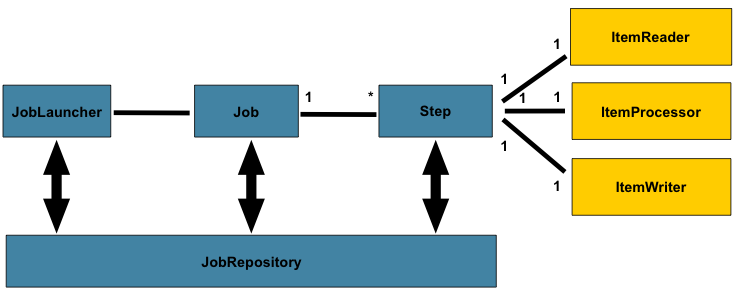 Monitoring and metrics
스프링배치 모니터링, 메트릭 수집 한글 번역
전체 목차는 여기에 있습니다.