스프링 인티그레이션 공식 레퍼런스를 한글로 번역한 문서입니다.
전체 목차는 여기에 있습니다.
목차
- 25.1. Overview
- 25.2. Outbound Channel Adapter
- 25.3. Message-driven Channel Adapter
- 25.4. Inbound Channel Adapter
- 25.5. Outbound Gateway
- 25.6. Inbound Gateway
- 25.7. Channels Backed by Apache Kafka Topics
- 25.8. Message Conversion
- 25.9. Null Payloads and Log Compaction ‘Tombstone’ Records
- 25.10. Calling a Spring Integration flow from a KStream
- 25.11. Performance Considerations for read/process/write Scenarios
25.1. Overview
Spring Integration의 아파치 카프카 모듈에선 Spring for Apache Kafka 프로젝트를 사용한다.
프로젝트에는 아래 의존성을 추가해야 한다:
<dependency>
    <groupId>org.springframework.integration</groupId>
    <artifactId>spring-integration-kafka</artifactId>
    <version>5.5.15</version>
</dependency>
compile "org.springframework.integration:spring-integration-kafka:5.5.15"
이 모듈에선 다음과 같은 컴포넌트들을 제공한다:
25.2. Outbound Channel Adapter
아웃바운드 채널 어댑터는 Spring Integration 채널에서 Apache Kafka 토픽으로 메시지를 게시하는 데 사용한다. 애플리케이션 컨텍스트에 채널을 정의하면 애플리케이션에 연결되고, Apache Kafka에 메시지를 전송할 수 있다. Sender 애플리케이션에선 Spring Integration 메시지를 사용해 아파치 카프카에 메시지를 발행하면 된다. 아웃바운드 채널 어댑터가 내부적으로 다음과 같이 Spring Integration의 메시지를 카프카 레코드로 변환해준다:
- Spring Integration 메시지의 페이로드를 사용해 카프카 레코드의 페이로드를 채운다.
- 기본적으로, Spring Integration 메시지에 있는
kafka_messageKey헤더를 사용해 카프카 레코드의 키를 채운다.
메시지를 게시할 토픽과 파티션은 각각 kafka_topic, kafka_partitionId 헤더를 통해 커스텀할 수 있다.
추가로, <int-kafka:outbound-channel-adapter>는 SpEL 표현식을 설정해서 아웃바운드 메시지로부터 키, 타겟 토픽, 타겟 파티션을 추출할 수 있다. 이때는 아래와 같은 속성들을 사용하면 된다 (각 쌍은 함께 사용할 수 없다):
topic과topic-expressionmessage-key와message-key-expressionpartition-id와partition-id-expression
이 속성들을 사용해 각각 topic, message-key, partition-id를 설정할 수 있다. 어댑터에 정적인 값을 지정할 수도 있고, 런타임에 요청 메시지를 가지고 동적으로 평가할 수도 있다.
헤더와 상호 작용하는데 사용하는 상수들은
KafkaHeaders인터페이스에 담겨 있다 (spring-kafka에서 제공). 이제 디폴트 헤더messageKey와topic은 앞에 프리픽스kafka_가 달려있어야 한다. 이렇게 변경되기 전 버전에서 마이그레이션한다면,<int-kafka:outbound-channel-adapter>에message-key-expression="headers['messageKey']"와topic-expression="headers['topic']"을 명시해줘야 한다. 아니면<header-enricher>나MessageBuilder를 사용해 업스트림 헤더를KafkaHeaders의 새 헤더명으로 변경해도 좋다. 상수 값을 사용하는 경우엔 어댑터의topic,message-key에 직접 설정할 수도 있다.
참고 : 어댑터에 토픽이나 메시지 키를 설정했다면 (상수든, 표현식이든), 설정한 값을 사용하고 헤더는 무시한다. 헤더가 이 설정을 재정의하길 바란다면 다음과 같은 표현식을 설정해줘야 한다:
topic-expression="headers['topic'] != null ? headers['topic'] : 'myTopic'"
어댑터에선 KafkaTemplate을 사용하므로, 적절한 KafkaProducerFactory 설정이 필요하다.
send-failure-channel(sendFailureChannel) 옵션을 제공하면, 메시지 발행에 실패했을 시 (sync이든 async이든) 이 채널로 ErrorMessage를 전송한다. 이때 페이로드는 failedMessage, record(ProducerRecord), cause 프로퍼티를 가지고 있는 KafkaSendFailureException이다. error-message-strategy 프로퍼티를 설정하면 DefaultErrorMessageStrategy를 재정의할 수 있다.
send-success-channel(sendSuccessChannel) 옵션을 제공하면, 메시지 발행에 성공했을 시 org.apache.kafka.clients.producer.RecordMetadata 타입의 페이로드를 가지고 있는 메시지를 전송한다.
애플리케이션이 트랜잭션을 사용하고 있다면, 같은 채널 어댑터를 사용해 리스너 컨테이너로 트랜잭션을 시작하는 곳에서 메시지를 발행하기도 하고, 트랜잭션이 없는 곳에서 발행하기도 하는 경우, 반드시
KafkaTemplate에transactionIdPrefix를 설정해서 컨테이너 혹은 트랜잭션 매니저에서 사용하는 프리픽스를 재정의해야 한다. 컨테이너가 시작하는 트랜잭션에서 사용하는 프리픽스(producer 팩토리 또는 트랜잭션 매니저 프로퍼티)는 모든 애플리케이션 인스턴스에서 동일해야 한다. producer 전용 트랜잭션에 사용하는 프리픽스는 모든 애플리케이션 인스턴스에서 고유해야 한다.
boolean 값으로 리졸브되는 flushExpression을 설정할 수 있다. 카프카 producer 프로퍼티 linger.ms와 batch.size를 사용하고 있다면, 메시지를 몇 개 전송한 뒤 플러시 시킬 수 있으면 유용할 거다. 이 표현식은 마지막 메시지에서 Boolean.TRUE로 평가되어야 하며, true일 땐 배치에 지정 사이즈만큼 메시지가 도착하지 않아도 즉시 전송한다. 디폴트로는 KafkaIntegrationHeaders.FLUSH 헤더(kafka_flush)에서 Boolean 값을 조회한다. 이 값이 true면 플러시를 진행하고, false이거나 헤더 자체가 없으면 플러시하지 않는다.
KafkaProducerMessageHandler.sendTimeoutExpression의 기본값은 10초에서 카프카 producer 프로퍼티 delivery.timeout.ms + 5000으로 변경됐다. 덕분에 프레임워크에서 임의로 타임아웃 타이밍을 결정하지 않으며, 타임아웃이 발생하면 실제 카프카 에러를 애플리케이션에 전파할 수 있다. 이렇게 변경한 이유는 예상과는 다르게 동작할 가능성이 있었기 때문이다 (스프링은 전송 중에 타임아웃이 발생한 것으로 처리했더라도, 실제로는 결국 전송에 성공했을 수도 있다). delivery.timeout.ms는 120초가 디폴트이므로, 에러를 좀 더 빨리 발견하고 싶다면 값을 줄이는 것이 좋다.
25.2.1. Java Configuration
다음은 자바 코드를 사용해 아파치 카프카를 위한 아웃바운드 채널 어댑터를 설정하는 예시다:
@Bean
@ServiceActivator(inputChannel = "toKafka")
public MessageHandler handler() throws Exception {
    KafkaProducerMessageHandler<String, String> handler =
            new KafkaProducerMessageHandler<>(kafkaTemplate());
    handler.setTopicExpression(new LiteralExpression("someTopic"));
    handler.setMessageKeyExpression(new LiteralExpression("someKey"));
    handler.setSuccessChannel(successes());
    handler.setFailureChannel(failures());
    return handler;
}

@Bean
public KafkaTemplate<String, String> kafkaTemplate() {
    return new KafkaTemplate<>(producerFactory());
}

@Bean
public ProducerFactory<String, String> producerFactory() {
    Map<String, Object> props = new HashMap<>();
    props.put(ProducerConfig.BOOTSTRAP_SERVERS_CONFIG, this.brokerAddress);
    // set more properties
    return new DefaultKafkaProducerFactory<>(props);
}
25.2.2. Java DSL Configuration
다음은 Spring Integration Java DSL을 사용해 아파치 카프카를 위한 아웃바운드 채널 어댑터를 설정하는 예시다:
@Bean
public ProducerFactory<Integer, String> producerFactory() {
    return new DefaultKafkaProducerFactory<>(KafkaTestUtils.producerProps(embeddedKafka));
}

@Bean
public IntegrationFlow sendToKafkaFlow() {
    return f -> f
            .<String>split(p -> Stream.generate(() -> p).limit(101).iterator(), null)
            .publishSubscribeChannel(c -> c
                    .subscribe(sf -> sf.handle(
                            kafkaMessageHandler(producerFactory(), TEST_TOPIC1)
                                    .timestampExpression("T(Long).valueOf('1487694048633')"),
                            e -> e.id("kafkaProducer1")))
                    .subscribe(sf -> sf.handle(
                            kafkaMessageHandler(producerFactory(), TEST_TOPIC2)
                                   .timestamp(m -> 1487694048644L),
                            e -> e.id("kafkaProducer2")))
            );
}

@Bean
public DefaultKafkaHeaderMapper mapper() {
    return new DefaultKafkaHeaderMapper();
}

private KafkaProducerMessageHandlerSpec<Integer, String, ?> kafkaMessageHandler(
        ProducerFactory<Integer, String> producerFactory, String topic) {
    return Kafka
            .outboundChannelAdapter(producerFactory)
            .messageKey(m -> m
                    .getHeaders()
                    .get(IntegrationMessageHeaderAccessor.SEQUENCE_NUMBER))
            .headerMapper(mapper())
            .partitionId(m -> 10)
            .topicExpression("headers[kafka_topic] ?: '" + topic + "'")
            .configureKafkaTemplate(t -> t.id("kafkaTemplate:" + topic));
}
25.2.3. XML Configuration
다음은 XML을 사용해 카프카 아웃바운드 채널 어댑터를 설정하는 예시다:
<int-kafka:outbound-channel-adapter id="kafkaOutboundChannelAdapter"
                                    kafka-template="template"
                                    auto-startup="false"
                                    channel="inputToKafka"
                                    topic="foo"
                                    sync="false"
                                    message-key-expression="'bar'"
                                    send-failure-channel="failures"
                                    send-success-channel="successes"
                                    error-message-strategy="ems"
                                    partition-id-expression="2">
</int-kafka:outbound-channel-adapter>

<bean id="template" class="org.springframework.kafka.core.KafkaTemplate">
    <constructor-arg>
        <bean class="org.springframework.kafka.core.DefaultKafkaProducerFactory">
            <constructor-arg>
                <map>
                    <entry key="bootstrap.servers" value="localhost:9092" />
                    ... <!-- more producer properties -->
                </map>
            </constructor-arg>
        </bean>
    </constructor-arg>
</bean>
25.3. Message-driven Channel Adapter
KafkaMessageDrivenChannelAdapter(<int-kafka:message-driven-channel-adapter>)는 spring-kafka KafkaMessageListenerContainer 혹은 ConcurrentListenerContainer를 사용한다.
또한 mode 속성을 사용할 수 있다. 이 속성 값엔 record나 batch를 설정할 수 있다 (디폴트: record). record 모드의 경우, 하나의 ConsumerRecord를 하나의 메시지 페이로드로 변환한다. batch 모드에선 컨슈머 poll로 반환한 모든 ConsumerRecord 인스턴스들을 변환한 객체 목록이 페이로드다. @KafkaListener를 사용해 배치로 처리할 때와 마찬가지로 KafkaHeaders.RECEIVED_MESSAGE_KEY, KafkaHeaders.RECEIVED_PARTITION_ID, KafkaHeaders.RECEIVED_TOPIC, KafkaHeaders.OFFSET 헤더 역시 리스트로 담긴다 (같은 레코드의 페이로드와 동일한 위치에).
수신한 메시지에는 특정 헤더들이 채워져 있다. 자세한 내용은 KafkaHeaders 클래스를 참고해라.
(
kafka_consumer헤더에 들어있는)Consumer객체는 스레드로부터 안전하지 않다. 따라서Consumer객체의 메소드는 어댑터 내에서 리스너를 호출하는 스레드에서만 실행해야 한다. 메시지를 다른 스레드에 전달하는 경우 관련 메소드를 호출해서는 안 된다.
retry-template을 제공하면, 메시지 전달에 실패했을 시 이 retry 정책에 따라 재시도한다. 이 경우 error-channel은 사용할 수 없다. 재시도 횟수를 모두 소진하면 recovery-callback을 사용해 에러를 처리할 수 있다. 대부분은 ErrorMessageSendingRecoverer를 사용해 에러 채널로 ErrorMessage를 전송한다.
ErrorMessage를 빌드할 땐 (Error-channel이나 recovery-callback에서 사용할 목적으로) error-message-strategy 프로퍼티를 설정하면 에러 메시지를 커스텀할 수 있다. 기본적으론 RawRecordHeaderErrorMessageStrategy를 사용하며, 여기서는 변환된 메시지 뿐 아니라 원래의 ConsumerRecord에도 접근할 수 있다.
25.3.1. Java Configuration
다음은 자바 코드를 사용해 message-driven 채널 어댑터를 설정하는 예시다:
@Bean
public KafkaMessageDrivenChannelAdapter<String, String>
            adapter(KafkaMessageListenerContainer<String, String> container) {
    KafkaMessageDrivenChannelAdapter<String, String> kafkaMessageDrivenChannelAdapter =
            new KafkaMessageDrivenChannelAdapter<>(container, ListenerMode.record);
    kafkaMessageDrivenChannelAdapter.setOutputChannel(received());
    return kafkaMessageDrivenChannelAdapter;
}

@Bean
public KafkaMessageListenerContainer<String, String> container() throws Exception {
    ContainerProperties properties = new ContainerProperties(this.topic);
    // set more properties
    return new KafkaMessageListenerContainer<>(consumerFactory(), properties);
}

@Bean
public ConsumerFactory<String, String> consumerFactory() {
    Map<String, Object> props = new HashMap<>();
    props.put(ConsumerConfig.BOOTSTRAP_SERVERS_CONFIG, this.brokerAddress);
    // set more properties
    return new DefaultKafkaConsumerFactory<>(props);
}
25.3.2. Java DSL Configuration
다음은 Spring Integration Java DSL을 사용해 message-driven 채널 어댑터를 설정하는 예시다:
@Bean
public IntegrationFlow topic1ListenerFromKafkaFlow() {
    return IntegrationFlows
            .from(Kafka.messageDrivenChannelAdapter(consumerFactory(),
                    KafkaMessageDrivenChannelAdapter.ListenerMode.record, TEST_TOPIC1)
                    .configureListenerContainer(c ->
                            c.ackMode(AbstractMessageListenerContainer.AckMode.MANUAL)
                                    .id("topic1ListenerContainer"))
                    .recoveryCallback(new ErrorMessageSendingRecoverer(errorChannel(),
                            new RawRecordHeaderErrorMessageStrategy()))
                    .retryTemplate(new RetryTemplate())
                    .filterInRetry(true))
            .filter(Message.class, m ->
                            m.getHeaders().get(KafkaHeaders.RECEIVED_MESSAGE_KEY, Integer.class) < 101,
                    f -> f.throwExceptionOnRejection(true))
            .<String, String>transform(String::toUpperCase)
            .channel(c -> c.queue("listeningFromKafkaResults1"))
            .get();
}
@KafkaListener 어노테이션에 사용하는 컨테이너 팩토리를 이용해 다른 용도로 사용할 ConcurrentMessageListenerContainer 인스턴스를 생성할 수도 있다. 예시가 필요하다면 Spring for Apache Kafka 문서를 참고해라.
Java DSL을 사용할 땐, DSL이 컨테이너를 빈으로 등록해주기 때문에 컨테이너를 @Bean으로 설정하지 않아도 된다. 다음 예제를 참고해라:
@Bean
public IntegrationFlow topic2ListenerFromKafkaFlow() {
    return IntegrationFlows
            .from(Kafka.messageDrivenChannelAdapter(kafkaListenerContainerFactory().createContainer(TEST_TOPIC2),
            KafkaMessageDrivenChannelAdapter.ListenerMode.record)
                .id("topic2Adapter"))
            ...
            get();
}
여기선 어댑터에 id(topic2Adapter)를 지정했다는 점에 주목해라. 컨테이너는 topic2Adapter.container라는 이름으로 애플리케이션 컨텍스트에 등록된다. 어댑터에 id 프로퍼티가 없으면, 컨테이너 클래스의 풀 네임fully qualified name에 #n을 더한 것을 컨테이너의 빈 이름으로 사용한다. 여기서 n은 각 컨테이너마다 증가하는 값이다.
25.3.3. XML Configuration
다음은 XML을 사용해 message-driven 채널 어댑터를 설정하는 예시다:
<int-kafka:message-driven-channel-adapter
        id="kafkaListener"
        listener-container="container1"
        auto-startup="false"
        phase="100"
        send-timeout="5000"
        mode="record"
        retry-template="template"
        recovery-callback="callback"
        error-message-strategy="ems"
        channel="someChannel"
        error-channel="errorChannel" />

<bean id="container1" class="org.springframework.kafka.listener.KafkaMessageListenerContainer">
    <constructor-arg>
        <bean class="org.springframework.kafka.core.DefaultKafkaConsumerFactory">
            <constructor-arg>
                <map>
                <entry key="bootstrap.servers" value="localhost:9092" />
                ...
                </map>
            </constructor-arg>
        </bean>
    </constructor-arg>
    <constructor-arg>
        <bean class="org.springframework.kafka.listener.config.ContainerProperties">
            <constructor-arg name="topics" value="foo" />
        </bean>
    </constructor-arg>

</bean>
25.4. Inbound Channel Adapter
KafkaMessageSource는 pollable 채널 어댑터 구현체로 활용할 수 있다.
25.4.1. Java Configuration
@InboundChannelAdapter(channel = "fromKafka", poller = @Poller(fixedDelay = "5000"))
@Bean
public KafkaMessageSource<String, String> source(ConsumerFactory<String, String> cf)  {
    KafkaMessageSource<String, String> source = new KafkaMessageSource<>(cf, "myTopic");
    source.setGroupId("myGroupId");
    source.setClientId("myClientId");
    return source;
}
관련 프로퍼티는 javadoc을 확인해봐라.
기본적으로 컨슈머 팩토리엔 반드시 max.poll.records를 설정해줘야 하며, 컨슈머 팩토리가 DefaultKafkaConsumerFactory인 경우엔 강제로 1로 설정된다. allowMultiFetch 속성을 true로 설정하면 이 동작을 재정의할 수 있다.
리밸런싱을 피하려면
max.poll.interval.ms내로 컨슈머를 폴링해야 한다.allowMultiFetch를true로 설정했다면,max.poll.interval.ms내로 조회한 모든 레코드를 처리하고 한 번 더 폴링해와야 한다.
이 어댑터에서 방출한 메시지들엔 이전 폴링에서 남은 레코드 수가 담겨있는 kafka_remainingRecords 헤더가 포함돼 있다.
25.4.2. Java DSL Configuration
@Bean
public IntegrationFlow flow(ConsumerFactory<String, String> cf)  {
    return IntegrationFlows.from(Kafka.inboundChannelAdapter(cf, "myTopic")
                .groupId("myDslGroupId"), e -> e.poller(Pollers.fixedDelay(5000)))
            .handle(System.out::println)
            .get();
}
25.4.3. XML Configuration
<int-kafka:inbound-channel-adapter
        id="adapter1"
        consumer-factory="consumerFactory"
        ack-factory="ackFactory"
        topics="topic1"
        channel="inbound"
        client-id="client"
        group-id="group"
        message-converter="converter"
        payload-type="java.lang.String"
        raw-header="true"
        auto-startup="false"
        rebalance-listener="rebal">
    <int:poller fixed-delay="5000"/>
</int-kafka:inbound-channel-adapter>
25.5. Outbound Gateway
아웃바운드 게이트웨이는 request/reply 연산을 위한 컴포넌트다. 게이트웨이에서 전송 스레드를 블로킹하지 않고, reply 리스너 컨테이너 스레드에서 응답을 처리한다는 점에서 대부분의 Spring Integration 게이트웨이와는 다르다고 할 수 있다. 동기식 Messaging Gateway 뒤에 있는 게이트웨이를 호출하는 경우, 응답을 수신할 때까지 (또는 타임아웃이 발생할 때까지) 사용자 스레드는 블로킹된다.
이 게이트웨이는 reply 컨테이너에 토픽과 파티션이 할당될 때까지 요청을 수락하지 않는다. 템플릿의 reply 컨테이너 프로퍼티에
ConsumerRebalanceListener를 추가해서, 게이트웨이에 메시지를 전송하기 전onPartitionsAssigned가 호출되길 기다리는 것을 권장한다.
KafkaProducerMessageHandler sendTimeoutExpression의 기본값은 카프카 producer 프로퍼티 delivery.timeout.ms + 5000이다. 덕분에 프레임워크에서 임의로 타임아웃 타이밍을 결정하지 않으며, 타임아웃이 발생하면 실제 카프카 에러를 애플리케이션에 전파할 수 있다. 이렇게 변경한 이유는 예상과는 다르게 동작할 가능성이 있었기 때문이다 (스프링은 전송 중에 타임아웃이 발생한 것으로 처리했더라도, 실제로는 결국 전송에 성공했을 수도 있다). delivery.timeout.ms는 120초가 디폴트이므로, 에러를 좀 더 빨리 발견하고 싶다면 값을 줄이는 것이 좋다.
25.5.1. Java Configuration
다음은 자바 코드를 사용해 게이트웨이를 설정하는 예시다:
@Bean
@ServiceActivator(inputChannel = "kafkaRequests", outputChannel = "kafkaReplies")
public KafkaProducerMessageHandler<String, String> outGateway(
        ReplyingKafkaTemplate<String, String, String> kafkaTemplate) {
    return new KafkaProducerMessageHandler<>(kafkaTemplate);
}
관련 프로퍼티는 javadoc을 확인해봐라.
아웃바운드 채널 어댑터와 같은 클래스를 사용하며, 생성자로 전달한 KafkaTemplate이 ReplyingKafkaTemplate이라는 점만 다르다는 것에 주목해라. 자세한 내용은 Spring for Apache Kafka 문서를 참고해라.
아웃바운드 토픽, 파티션, 키 등은 아웃바운드 어댑터와 같은 방법으로 결정한다. reply 토픽은 다음과 같이 결정한다:
- 메시지 헤더에
KafkaHeaders.REPLY_TOPIC이 있으면 (값이 있다면 반드시String이나byte[]여야 한다), 템플릿의 reply 컨테이너가 구독하는 토픽 중에 있는 토픽인지 검증해본다. - 템플릿의
replyContainer가 하나의 토픽만 구독하고 있다면, 이 토픽을 사용한다.
응답에 사용할 특정 파티션을 결정할 때도 마찬가지로 KafkaHeaders.REPLY_PARTITION 헤더를 지정할 수 있다. 역시 마찬가지로, 템플릿의 reply 컨테이너가 구독 중인지 검증하는 절차를 거친다.
25.5.2. Java DSL Configuration
다음은 Java DSL을 사용해 아웃바운드 게이트웨이를 설정하는 예시다:
@Bean
public IntegrationFlow outboundGateFlow(
        ReplyingKafkaTemplate<String, String, String> kafkaTemplate) {

    return IntegrationFlows.from("kafkaRequests")
            .handle(Kafka.outboundGateway(kafkaTemplate))
            .channel("kafkaReplies")
            .get();
}
아니면 아래 보이는 빈처럼 설정해주는 방법도 있다:
@Bean
public IntegrationFlow outboundGateFlow() {
    return IntegrationFlows.from("kafkaRequests")
            .handle(Kafka.outboundGateway(producerFactory(), replyContainer())
                .configureKafkaTemplate(t -> t.replyTimeout(30_000)))
            .channel("kafkaReplies")
            .get();
}
25.5.3. XML Configuration
<int-kafka:outbound-gateway
    id="allProps"
    error-message-strategy="ems"
    kafka-template="template"
    message-key-expression="'key'"
    order="23"
    partition-id-expression="2"
    reply-channel="replies"
    reply-timeout="43"
    request-channel="requests"
    requires-reply="false"
    send-success-channel="successes"
    send-failure-channel="failures"
    send-timeout-expression="44"
    sync="true"
    timestamp-expression="T(System).currentTimeMillis()"
    topic-expression="'topic'"/>
25.6. Inbound Gateway
인바운드 게이트웨이는 request/reply 연산을 위한 컴포넌트다.
다음은 자바 코드를 사용해 인바운드 게이트웨이를 설정하는 예시다:
@Bean
public KafkaInboundGateway<Integer, String, String> inboundGateway(
        AbstractMessageListenerContainer<Integer, String>container,
        KafkaTemplate<Integer, String> replyTemplate) {

    KafkaInboundGateway<Integer, String, String> gateway =
        new KafkaInboundGateway<>(container, replyTemplate);
    gateway.setRequestChannel(requests);
    gateway.setReplyChannel(replies);
    gateway.setReplyTimeout(30_000);
    return gateway;
}
관련 프로퍼티는 javadoc을 확인해봐라.
다음은 Java DSL을 이용해, 간단한 대문자 변환 용 컨버터를 설정하는 예시다:
@Bean
public IntegrationFlow serverGateway(
        ConcurrentMessageListenerContainer<Integer, String> container,
        KafkaTemplate<Integer, String> replyTemplate) {
    return IntegrationFlows
            .from(Kafka.inboundGateway(container, replyTemplate)
                .replyTimeout(30_000))
            .<String, String>transform(String::toUpperCase)
            .get();
}
아니면, 다음과 같은 코드로도 컨버터를 설정할 수 있다:
@Bean
public IntegrationFlow serverGateway() {
    return IntegrationFlows
            .from(Kafka.inboundGateway(consumerFactory(), containerProperties(),
                    producerFactory())
                .replyTimeout(30_000))
            .<String, String>transform(String::toUpperCase)
            .get();
}
@KafkaListener 어노테이션에 사용하는 컨테이너 팩토리를 이용해 다른 용도로 사용할 ConcurrentMessageListenerContainer 인스턴스를 생성할 수도 있다. 예시가 필요하다면 Spring for Apache Kafka 문서와 Message-driven Channel Adapter를 참고해라.
25.6.1. XML Configuration
<int-kafka:inbound-gateway
        id="gateway1"
        listener-container="container1"
        kafka-template="template"
        auto-startup="false"
        phase="100"
        request-timeout="5000"
        request-channel="nullChannel"
        reply-channel="errorChannel"
        reply-timeout="43"
        message-converter="messageConverter"
        payload-type="java.lang.String"
        error-message-strategy="ems"
        retry-template="retryTemplate"
        recovery-callback="recoveryCallback"/>
각 프로퍼티에 대한 설명은 XML 스키마를 참고해라.
25.7. Channels Backed by Apache Kafka Topics
Spring Integration에는 지속성persistence을 위해 Apache Kafka 토픽에 메시지를 저장하는 MessageChannel 구현체가 있다.
이 채널에선 메시지 전송을 위한 KafkaTemplate이 필요하며, subscribable 채널의 경우 리스너 컨테이너 팩토리가, pollable 채널의 경우 KafkaMessageSource가 추가로 필요하다.
25.7.1. Java DSL Configuration
@Bean
public IntegrationFlow flowWithSubscribable(KafkaTemplate<Integer, String> template,
        ConcurrentKafkaListenerContainerFactory<Integer, String> containerFactory) {

    return IntegrationFlows.from(...)
            ...
            .channel(Kafka.channel(template, containerFactory, "someTopic1").groupId("group1"))
            ...
            .get();
}

@Bean
public IntegrationFlow flowWithPubSub(KafkaTemplate<Integer, String> template,
        ConcurrentKafkaListenerContainerFactory<Integer, String> containerFactory) {

    return IntegrationFlows.from(...)
            ...
            .publishSubscribeChannel(pubSub(template, containerFactory),
                pubsub -> pubsub
                            .subscribe(subflow -> ...)
                            .subscribe(subflow -> ...))
            .get();
}

@Bean
public BroadcastCapableChannel pubSub(KafkaTemplate<Integer, String> template,
        ConcurrentKafkaListenerContainerFactory<Integer, String> containerFactory) {

    return Kafka.publishSubscribeChannel(template, containerFactory, "someTopic2")
            .groupId("group2")
            .get();
}

@Bean
public IntegrationFlow flowWithPollable(KafkaTemplate<Integer, String> template,
        KafkaMessageSource<Integer, String> source) {

    return IntegrationFlows.from(...)
            ...
            .channel(Kafka.pollableChannel(template, source, "someTopic3").groupId("group3"))
            .handle(...,  e -> e.poller(...))
            ...
            .get();
}
25.7.2. Java Configuration
/**
 * Channel for a single subscriber.
 **/
@Bean
SubscribableKafkaChannel pointToPoint(KafkaTemplate<String, String> template,
    KafkaListenerContainerFactory<String, String> factory)

    SubscribableKafkaChannel channel =
        new SubscribableKafkaChannel(template, factory, "topicA");
    channel.setGroupId("group1");
    return channel;
}

/**
 * Channel for multiple subscribers.
 **/
@Bean
SubscribableKafkaChannel pubsub(KafkaTemplate<String, String> template,
    KafkaListenerContainerFactory<String, String> factory)

    SubscribableKafkaChannel channel =
        new SubscribableKafkaChannel(template, factory, "topicB", true);
    channel.setGroupId("group2");
    return channel;
}

/**
 * Pollable channel (topic is configured on the source)
 **/
@Bean
PollableKafkaChannel pollable(KafkaTemplate<String, String> template,
    KafkaMessageSource<String, String> source)

    PollableKafkaChannel channel =
        new PollableKafkaChannel(template, source);
    channel.setGroupId("group3");
    return channel;
}
25.7.3. XML Configuration
<int-kafka:channel kafka-template="template" id="ptp" topic="ptpTopic" group-id="ptpGroup"
    container-factory="containerFactory" />

<int-kafka:pollable-channel kafka-template="template" id="pollable" message-source="source"
    group-id = "pollableGroup"/>

<int-kafka:publish-subscribe-channel kafka-template="template" id="pubSub" topic="pubSubTopic"
    group-id="pubSubGroup" container-factory="containerFactory" />
25.8. Message Conversion
메시지를 변환할 땐 StringJsonMessageConverter를 사용할 수 있다. 자세한 정보는 Spring for Apache Kafka 문서를 참고해라.
컨버터를 message-driven 채널 어댑터와 함께 사용할 땐, 전달받은 페이로드를 어떤 타입으로 변환할지를 지정할 수 있다. 이땐 어댑터의 payload-type 속성(payloadType 프로퍼티)을 설정해주면 된다. 다음은 XML을 이용해 페이로드 타입을 설정하는 예시다:
<int-kafka:message-driven-channel-adapter
        id="kafkaListener"
        listener-container="container1"
        auto-startup="false"
        phase="100"
        send-timeout="5000"
        channel="nullChannel"
        message-converter="messageConverter"
        payload-type="com.example.Foo"
        error-channel="errorChannel" />

<bean id="messageConverter"
    class="org.springframework.kafka.support.converter.MessagingMessageConverter"/>
다음은 자바 코드를 사용해 어댑터의 payload-type 속성(payloadType 프로퍼티)을 설정하는 예시다:
@Bean
public KafkaMessageDrivenChannelAdapter<String, String>
            adapter(KafkaMessageListenerContainer<String, String> container) {
    KafkaMessageDrivenChannelAdapter<String, String> kafkaMessageDrivenChannelAdapter =
            new KafkaMessageDrivenChannelAdapter<>(container, ListenerMode.record);
    kafkaMessageDrivenChannelAdapter.setOutputChannel(received());
    kafkaMessageDrivenChannelAdapter.setMessageConverter(converter());
    kafkaMessageDrivenChannelAdapter.setPayloadType(Foo.class);
    return kafkaMessageDrivenChannelAdapter;
}
25.9. Null Payloads and Log Compaction ‘Tombstone’ Records
spring-messaging의 Message<?> 객체는 null 페이로드를 가질 수 없다. Apache Kafka 전용 엔드포인트를 사용하는 경우, null 페이로드(일명 톰스톤tombstone 레코드)는 KafkaNull 타입의 페이로드로 표현한다. 자세한 내용은 Spring for Apache Kafka 문서를 참고해라.
POJO 메소드를 Spring Integration 엔드포인트로 사용할 땐 KafkaNull 대신 진짜 null 값을 사용할 수 있다. 그러려면 파라미터를 @Payload(required = false)로 마킹해라. 다음 예제를 참고해라:
@ServiceActivator(inputChannel = "fromSomeKafkaInboundEndpoint")
public void in(@Header(KafkaHeaders.RECEIVED_MESSAGE_KEY) String key,
               @Payload(required = false) Customer customer) {
    // customer is null if a tombstone record
    ...
}
25.10. Calling a Spring Integration flow from a KStream
MessagingTransformer를 사용하면 KStream으로 통합 플로우를 실행할 수 있다:
@Bean
public KStream<byte[], byte[]> kStream(StreamsBuilder kStreamBuilder,
        MessagingTransformer<byte[], byte[], byte[]> transformer)  transformer) {
    KStream<byte[], byte[]> stream = kStreamBuilder.stream(STREAMING_TOPIC1);
    stream.mapValues((ValueMapper<byte[], byte[]>) String::toUpperCase)
            ...
            .transform(() -> transformer)
            .to(streamingTopic2);

    stream.print(Printed.toSysOut());

    return stream;
}

@Bean
@DependsOn("flow")
public MessagingTransformer<byte[], byte[], String> transformer(
        MessagingFunction function) {

    MessagingMessageConverter converter = new MessagingMessageConverter();
    converter.setHeaderMapper(new SimpleKafkaHeaderMapper("*"));
    return new MessagingTransformer<>(function, converter);
}

@Bean
public IntegrationFlow flow() {
    return IntegrationFlows.from(MessagingFunction.class)
        ...
        .get();
}
서비스 인터페이스로 통합 플로우를 시작하면 생성되는 프록시는 플로우 빈의 이름 뒤에 “.gateway”가 붙기 때문에, 필요하다면 @Qualifier에 이 이름을 사용해도 된다.
25.11. Performance Considerations for read/process/write Scenarios
많은 애플리케이션들이 토픽에서 메시지를 컨슘하고 필요한 처리를 수행한 뒤 또 다른 토픽에 저장한다. 메시지 발행에 실패하면 대부분은 애플리케이션에서 예외를 던져, 요청을 다시 받거나 DLQdead letter queue로 전달하길 바랄 거다. 이런 기능은 적절한 에러 핸들러를 설정해주면 내부 메시지 리스너 컨테이너가 잘 처리해줄 거다. 하지만 이게 가능하려면, 컨테이너로 예외를 던질 수 있도록 쓰기 작업이 성공(또는 실패)할 때까지 리스너 스레드를 블로킹해야 한다. 레코드를 하나씩 컨슘하고 있다면 아웃바운드 어댑터에 sync 프로퍼티를 설정해주면 된다. 하지만 메시지를 배치로 가져오면서 sync를 사용한다면, 매번 전송 결과를 받고 나서야 다음 메시지를 전송하기 때문에 애플리케이션 성능이 크게 떨어질 수 있다. 전송 작업을 여러 번 수행하고나서 이후에 그 결과들을 기다리는 방법도 있다. 이땐 메시지 핸들러에 futuresChannel을 추가해주면 된다. 이 기능을 활성화하려면 아웃바운드 메시지에 KafkaIntegrationHeaders.FUTURE_TOKEN을 추가해라. 그러면 이 값을 이용해 Future와 전송한 메시지를 연결할 수 있다. 다음은 이 기능을 사용하는 한 가지 방법을 보여주는 코드다:
@SpringBootApplication
public class FuturesChannelApplication {

    public static void main(String[] args) {
        SpringApplication.run(FuturesChannelApplication.class, args);
    }

    @Bean
    IntegrationFlow inbound(ConsumerFactory<String, String> consumerFactory, Handler handler) {
        return IntegrationFlows.from(Kafka.messageDrivenChannelAdapter(consumerFactory,
                    ListenerMode.batch, "inTopic"))
                .handle(handler)
                .get();
    }

    @Bean
    IntegrationFlow outbound(KafkaTemplate<String, String> kafkaTemplate) {
        return IntegrationFlows.from(Gate.class)
                .enrichHeaders(h -> h
                        .header(KafkaHeaders.TOPIC, "outTopic")
                        .headerExpression(KafkaIntegrationHeaders.FUTURE_TOKEN, "headers[id]"))
                .handle(Kafka.outboundChannelAdapter(kafkaTemplate)
                        .futuresChannel("futures"))
                .get();
    }

    @Bean
    PollableChannel futures() {
        return new QueueChannel();
    }

}

@Component
@DependsOn("outbound")
class Handler {

    @Autowired
    Gate gate;

    @Autowired
    PollableChannel futures;

    public void handle(List<String> input) throws Exception {
        System.out.println(input);
        input.forEach(str -> this.gate.send(str.toUpperCase()));
        for (int i = 0; i < input.size(); i++) {
            Message<?> future = this.futures.receive(10000);
            ((Future<?>) future.getPayload()).get(10, TimeUnit.SECONDS);
        }
    }

}

interface Gate {

    void send(String out);

}
Next :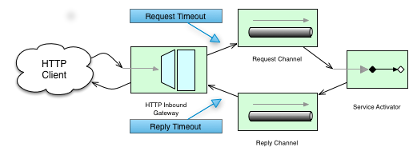 WebFlux Support
리액티브 방식으로 메시지 처리와 HTTP 처리 통합하기
전체 목차는 여기에 있습니다.